ArduPilot Mission Planner is a helpful tool for managing and analyzing missions for ArduPilot vehicles. With this software, users can easily design, simulate, and execute detailed flight plans. Whether you’re working with a copter, plane, or rover, Mission Planner provides a full set of features to ensure successful missions. ArduPilot Mission Planner is a versatile and powerful ground control station software for drones and other unmanned aerial vehicles (UAVs). Its user-friendly interface and comprehensive features make it a valuable tool for both hobbyists and professionals.
Mission Planner allows users to enter waypoints, configure autopilot settings, and download log files for detailed analysis. The software also supports running SITL (Software In The Loop) simulations, providing a strong testing environment. From waypoint navigation to complex event management, Mission Planner covers all aspects of mission planning. For those looking to push boundaries, Mission Planner offers advanced capabilities like camera control, geotagging, and the creation of rally points. The easy-to-use interface and detailed documentation make it accessible for both beginners and experienced users.
Streamlining Drone Missions: ArduPilot Mission Planner’s Key Features
Mission Planning Made Easy
ArduPilot Mission Planner simplifies complex flight paths. Plot waypoints, set altitudes, and define actions for your drone with a user-friendly interface. Visualize your mission on maps and fine-tune details effortlessly.
Real-Time Telemetry and Control
Stay informed and in control during flights. Monitor your drone’s position, altitude, battery life, and other vital parameters in real-time. Adjust settings on the fly, send commands, or take manual control if needed.
Flight Log Analysis and Tuning
Review your drone’s performance after each flight. Download and analyze detailed flight logs, including GPS data, sensor readings, and command history. Use this information to fine-tune your drone’s settings and optimize future missions.
Beyond the Basics: Advanced Features
Mission Planner offers a wealth of advanced tools for experienced users:
| Feature | Description |
|---|---|
| Geofencing | Set virtual boundaries to keep your drone within a designated area. |
| Follow Me Mode | Have your drone autonomously follow you or a moving object. |
| Terrain Following | Fly at a constant altitude above the ground, even over varying terrain. |
| Camera Control | Trigger camera actions (photos, videos) based on waypoints or other events. |
| Flight Simulator | Practice missions and test settings in a virtual environment before flying in the real world. |
| Firmware Updates | Keep your drone’s flight controller up-to-date with the latest software improvements and features. |
Beyond Hobbyist Use: Professional Applications
ArduPilot Mission Planner isn’t just for hobbyists. Its powerful capabilities are also leveraged in commercial and industrial applications, such as aerial mapping, surveying, inspection, and delivery.
Key Takeaways
- Mission Planner helps in creating and executing flight plans for ArduPilot vehicles.
- Users can manage waypoints, autopilot settings, and log files seamlessly.
- Advanced features include camera control and geotagging for detailed missions.
Getting Started with Mission Planner
Mission Planner is an essential tool for configuring and controlling your autonomous vehicle, whether it’s a drone, rover, or boat. This section guides you through the initial steps to set it up, including downloading, installing, and connecting to your vehicle.
Downloading and Installing
To begin, Mission Planner can be downloaded from the official ArduPilot website or directly from firmware.ardupilot.org. Ensure you have the latest version for optimal performance. The installation process is straightforward: open the installer file and follow the on-screen instructions. Admin rights may be necessary to complete the installation.
After installation, launch Mission Planner. The primary interface includes a map view, configuration tabs, and a console window. Familiarize yourself with these key areas to streamline the setup process.
Connecting to Your Vehicle
Connecting to your vehicle involves using either a USB cable or a telemetry radio. If using USB, connect it to your flight controller. For telemetry radio, ensure both ground and air radios are powered and linked.
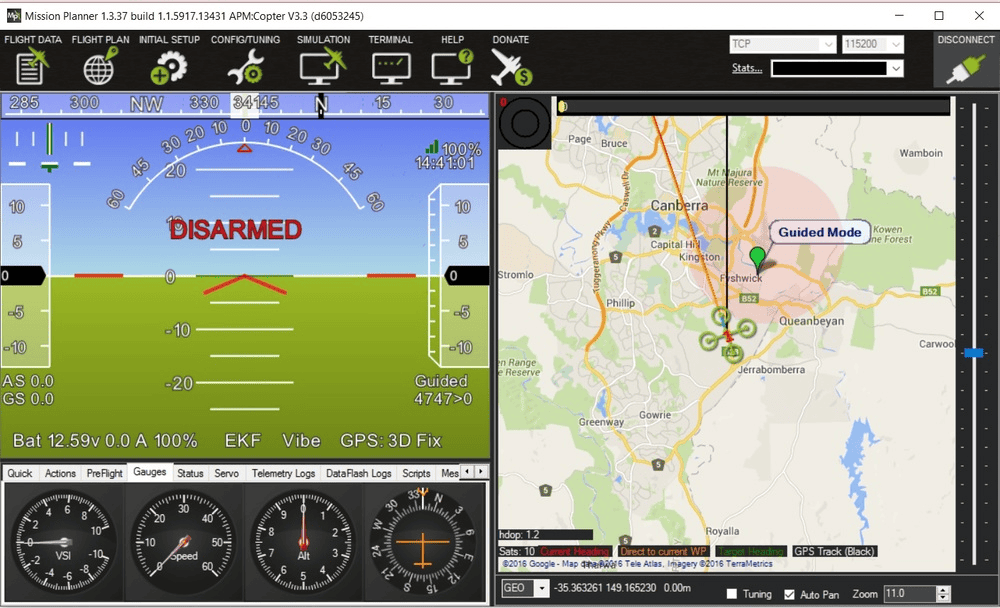
In Mission Planner, select the appropriate COM port and baud rate (typically 115200 for USB connections). Click Connect. This process establishes a MAVLink connection, allowing you to interact with your vehicle’s parameters and data streams.
Firmware Configuration
Once connected, you need to configure the firmware of your vehicle. Go to the Initial Setup tab and select Install Firmware. Choose the correct firmware for your vehicle type (e.g., copter, plane, or rover). Beta versions are also available, but stable releases are recommended unless you are testing specific features.
Load the firmware by following the on-screen instructions. Once the firmware is installed, Mission Planner will confirm and prompt a reboot. Ensure the firmware is properly loaded and that your vehicle reconnects automatically after rebooting.
Setting Home Position and Waypoints
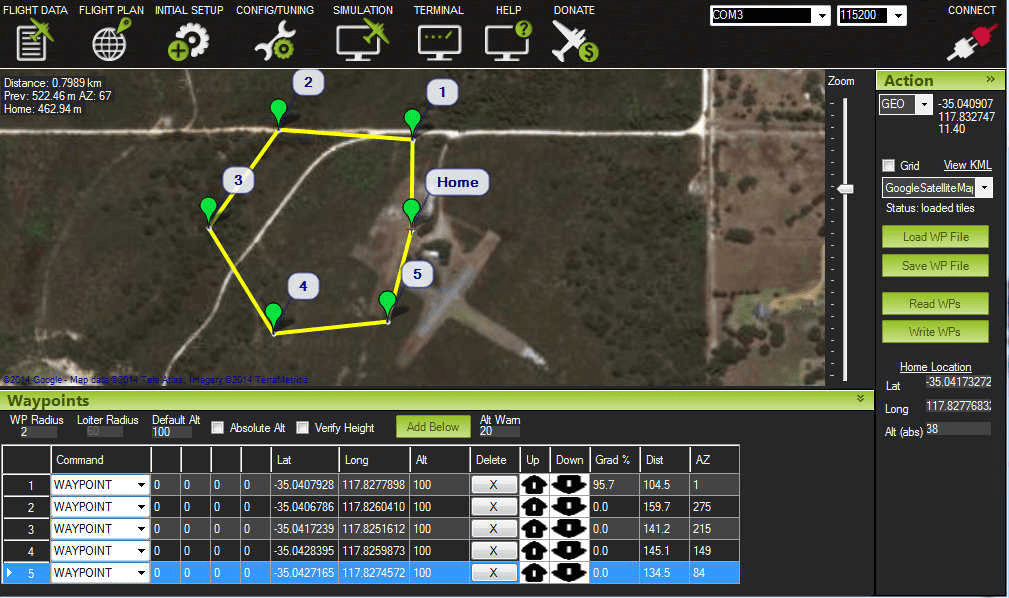
To set the home position, navigate to the Flight Plan tab. By default, this is set to your current GPS location, but it can be adjusted using the map interface. Right-click on the map to set the home position or add waypoints.
For waypoint missions, use the right-click menu to select Polygon and draw the desired area. Choose Auto WP, then Grid. Set the altitude and spacing parameters. Mission Planner will generate a grid pattern of waypoints.
Fine-tune waypoint settings by clicking on individual waypoints to specify actions such as changing altitude or triggering a camera. Once set, upload the mission to your vehicle by clicking Write WPs. This completes your initial mission setup.
Advanced Mission Planning
ArduPilot Mission Planner is a powerful tool for configuring, managing, and advancing your autonomous aerial missions. This section focuses on how to utilize its advanced features and tools effectively.
Mission Planning Tools
Mission Planner offers an array of tools to streamline mission design. Users can create and edit waypoints, rallies, and geofences. Key commands include MAVLink Mission Command Messages (MAV_CMD), enabling precise waypoint settings, altitude controls, Loiter, and RTL (Return-to-Launch).
Camera Control and Gimbal adjustments, using commands like DO_Gimbal_Manager_Pitchyaw, make sophisticated aerial photography possible. The Joystick interface provides a manual control option, enhancing flexibility during mission execution.
Additional Features in Mission Planner
The Flight Plan screen helps in setting up intricate missions. Utilizing Survey (Grid) missions allows for optimized aerial mapping, integrating with data sources such as SRTM and Bing for terrain elevation.
The use of scripts expands functionality. Scripts can automate actions based on specific triggers, enhancing mission efficiency. For instance, DO_Set_Servo can command onboard devices at precise times. Proxy and Android integration support in-field flexibility.
Fail-Safes and Geofences
Safety in mission planning cannot be understated. Fail-Safes and Geofences are crucial. Mission Planner provides configurable geofences, which include circular and polygonal fences, restricting the operational area.
The Failsafe feature ensures the vehicle returns to a safe state in case of errors. Geofence setup in Mission Planner prevents unauthorized airspace entry. Rally Points act as safe landing sites during emergencies, providing predefined locations for contingencies.
Data Management and Analysis
Efficient data management enhances the utility of Mission Planner. TLog files store detailed flight logs, critical for post-mission analysis. The MAVLink Inspector feature offers real-time telemetry.
Integration with third-party platforms like Dronelogbook facilitates comprehensive data logging and compliance with regulations. Improved metadata handling ensures smoother data transfer and analysis. SITL (Software in the Loop) and RFDesign modules support advanced simulation and communication setups for mission testing and validation.
Frequently Asked Questions
This section addresses common questions about the ArduPilot Mission Planner, providing essential information on installation, compatibility, access to resources, and more.
How can I download and install Mission Planner for use with ArduPilot?
To download Mission Planner, visit the official download page. The installation process involves downloading the installer file and running it on your computer. Follow the on-screen instructions to complete the setup.
Where can I find the Mission Planner manual in PDF format?
The official documentation for Mission Planner is available online on the ArduPilot documentation site. For a PDF version, look for options to download or print the pages directly from the website. Check community forums for additional resources.
Is there a version of Mission Planner available for MacOS, and how can I install it?
Mission Planner is primarily designed for Windows. For MacOS, you can use virtualization software like Parallels or Wine to run the application. Detailed instructions can be found in the ArduPilot community forums or documentation.
What flight controllers are compatible with ArduPilot?
ArduPilot supports a range of flight controllers. Popular ones include the Pixhawk series, APM 2.x, and CubeAutopilot. To see the full list of compatible hardware, refer to the ArduPilot supported hardware page.
How can I access the Mission Planner source code on GitHub?
The Mission Planner source code is available on GitHub. You can clone the repository using Git and contribute or customize it as needed. The GitHub page also provides information on how to set up the development environment.
Where can I find comprehensive documentation for Mission Planner?
Comprehensive documentation is available on the ArduPilot documentation site. This includes guides, tutorials, and detailed explanations of features. For additional help, consult the community forums and user-contributed articles.