Disassembling your PS5 controller may be necessary for repairs, cleaning, or customization; or when fixing things like stick drift or button malfunctions. While it may seem intimidating at first, with the right tools and a bit of patience, you can open up your controller to address some common problems. It’s important to note that taking apart your PS5 controller will void the warranty, so it’s typically advised to do so only if the warranty period has expired or if manufacturer support is not a viable option.
This step-by-step guide will help you safely navigate the process, ensuring you can access the internal components without causing any damage.
Steps To Disassemble A PS5 Controller
Required Tools
- Phillips head screwdriver (small size)
- Plastic pry tool or guitar pick
- Optional: Tweezers (for handling small screws and components)
Disassembly Steps
| # | Step | Description |
|---|---|---|
| 1 | Power Down & Disconnect | Turn off your PS5 and disconnect the controller. |
| 2 | Pry Open the Faceplate / Case | Use a plastic prying tool (or a thin, flat tool like a guitar pick) to carefully pry open the seam between the front faceplate and the back casing. Start near the bottom corners where the grips meet the body and gently work your way up the sides. Be mindful of snapping any clips or damaging the plastic. |
| 3 | Remove L1 and R1 Buttons | Carefully pry up the L1 and R1 buttons using the pry tool. They should pop off with gentle pressure. |
| 4 | Remove the Screws | Locate the four screws hidden behind the L1 and R1 buttons, and at the bottom of each handle. Use the Phillips head screwdriver to remove these screws and set them aside in a safe place. |
| 5 | Separate Controller Halves | Gently pry along the sides of the controller to create a slight separation. Look inside the seam for two small tabs near the microphone. Use the pry tool to release these tabs. Carefully pull the back half of the controller away from the front half. Be mindful of the ribbon cable connecting the two halves. |
| 6 | Disconnect Ribbon Cable | Carefully lift the small plastic flap securing the ribbon cable. Gently pull the ribbon cable out of its connector. |
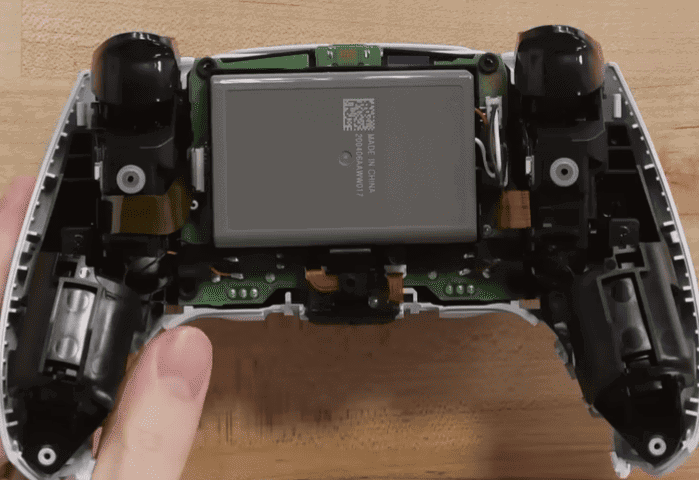
| 7 | Access Internal Components | You now have access to the internal components of the controller, including the battery, triggers, rumble motors, and motherboard. Proceed with caution when handling these parts. |
| 8 | Battery Removal (Optional) | The battery is now accessible. If you only need to replace the battery, you can disconnect its ribbon cable and remove it. Be mindful of the fragile connector. |
| 9 | Further Disassembly (Advanced) | For more extensive disassembly, you’ll need to disconnect ribbon cables and remove additional screws to access deeper components like the motherboard or vibration motors. Caution: This process is intricate and increases the risk of damaging the controller. |
| 10 | Reassembly | Reassemble the controller by reversing the steps carefully. Ensure all screws and ribbon cables are properly connected before snapping the case shut. |
Important Notes
- Take your time and be patient to avoid damaging any components.
- Keep track of all screws and small parts.
- If you encounter resistance, reassess your approach before applying more force.
- Reassembly is essentially the reverse of these steps.
Disclaimer: Disassembling a PS5 controller can void your warranty. Proceed with caution and only if you are comfortable with delicate electronics.
Remember: This table is a general guide. For specific details and visual references, consult a video disassembly guide below.
Opening up a DualSense controller involves carefully removing screws and detaching components connected by delicate ribbons and clips. The process requires precision to avoid damaging the intricate parts inside. After disassembling, making the needed repairs or cleaning and then reassembling the controller must be done with equal care to ensure that everything functions properly upon completion.
Key Takeaways
- Disassembling a PS5 controller allows for repair and maintenance.
- Care is needed to avoid damage when opening and repairing.
- Reassembling the controller accurately ensures it works correctly after maintenance.
Disassembling the PS5 DualSense Controller
Disassembly of the PS5 DualSense controller requires a careful approach to avoid damage. The following steps will guide you through the process using the appropriate tools and techniques.
Preparing Your Workspace and Tools
First, create a clean workspace with plenty of light. Gather the tools you will need: a set of precision screwdrivers, plastic opening tools, and tweezers. It’s a good idea to have a small container nearby to hold the screws so they do not get lost.
Removing the External Components
Step 1: Make sure the PS5 console is turned off. Unpair the controller to prevent any unintended input.
Step 2: Turn the controller so the button side is down. Find the four screws securing the back cover. With the correct screwdriver, carefully remove these screws and place them in your container.
Step 3: Use the plastic opening tools to gently separate the two halves of the controller. Be patient and work around the edges to release the clips that hold the pieces together.
Disconnecting Internal Components
After opening the controller, you will see the battery and various cables connected to the motherboard.
Step 1: Locate the battery. It sits on top of a plastic piece within the controller. Use your tweezers to lightly disconnect the battery’s connector.
Step 2: Remove the screws holding the motherboard in place. Keep track of these screws and which holes they belong to, as they might be different sizes.
Step 3: Carefully disconnect the ribbon cables attached to the motherboard by lifting the connectors. These cables are delicate, so a gentle touch is necessary.
Step 4: If any cleaning is necessary, use a soft brush. Make sure the internal components are free of dust before reassembling.
Reassembling and Testing Your Controller
Proper reassembly of the PS5 DualSense controller is crucial for ensuring its functionality after a repair or replacement of parts. Testing the controller after reassembly confirms that all components are working as intended.
Aligning Internal Components and Reconnecting Cables
When one begins to put the controller back together, careful attention is required to align all internal components correctly. The process involves:
- Positioning the buttons and triggers into their respective places on the front shell of the controller.
- Laying down the circuit board gently, making sure it sits properly without forcing any parts.
- Reconnecting cables: Secure all the ribbon cables to their connectors. Firmly press each connector to attach the cable, but do so without excessive force to avoid damage.
Securing the External Covers and Test
Once the internal components are aligned and connected, one must close the controller by performing the following:
- Place the back cover on the controller, ensuring it lines up precisely with the front cover.
- Insert and tighten the screws at the back of the controller using the appropriate screwdriver.
After reassembling, it’s important to test the controller’s functionality:
- Check all buttons, including the PS button, to confirm they press smoothly.
- Test the analog sticks by moving them in all directions and checking for any resistance or stick drift.
- Connect the controller to the PS5 console and verify that all repaired or replaced components are responding correctly, ensuring the performance is up to standard.
Frequently Asked Questions
This section addresses common inquiries people have when they need to disassemble their PS5 controller. It guides you through various procedures including joystick replacement, fixing drift issues, thorough cleaning, and reassembly.
What is the correct procedure to replace a PS5 controller’s joystick?
To replace a joystick on your PS5 controller, you must first safely open the controller. After removing the screws from the back, carefully separate the controller’s two halves. Detach the battery and any connected ribbons to access the joystick module. Once in view, you can remove and replace the faulty joystick with a new one.
What are the steps to fix drift issues by disassembling a PS5 controller?
Fixing drift issues typically requires you to access the interior mechanisms that the analog sticks are a part of. After opening the controller as described above, inspect the analog stick modules for any sign of damage or debris. Cleaning the area around the sticks or replacing the modules may resolve drift issues when reassembled correctly.
How can one disassemble a PS5 controller for thorough cleaning?
Begin by turning off your console and disconnecting the controller. Remove the screws on the back of the controller, then use a prying tool to gently separate the front and back housing. With the internals exposed, you can dust off the electronic components using a soft brush and wipe down other surfaces with a slightly damp cloth.
Can a PS5 controller be opened and its buttons cleaned without professional tools?
Yes, it’s feasible to open a PS5 controller with common tools like a small Phillips-head screwdriver. Additional items like a plastic prying tool or a soft-bristled brush can help clean around the buttons. Handle the components gently to avoid any damage.
What is the proper method for reassembling a PS5 controller after repair?
After making any necessary repairs or cleaning, ensure that all components are dry and properly seated. Carefully reconnect any ribbon cables and replace the battery. Align the two halves of the controller and gently snap them back together before screwing them securely.
Is it possible to open and clean a PS5 Elite controller without damaging it?
Opening and cleaning a PS5 Elite controller is akin to handling a standard PS5 controller. The steps involve carefully unscrewing and prying apart the device. During cleaning, extra care should be taken with the additional buttons and toggles that the Elite version may have. Reassemble with precision to avoid any operational issues.


