Changing your mouse DPI (dots per inch) settings can make a big difference in how your computer responds to your movements. Many users don’t realize they can adjust the speed and precision of their mouse through simple settings in their operating system. Adjusting your mouse DPI can improve accuracy during detailed tasks like graphic design or give you better responsiveness while gaming.
Whether you’re using Windows, Mac, or Linux, you can easily change your mouse sensitivity through your system settings. In Windows, you can find these options by going to Settings > Devices > Mouse and adjusting the pointer speed slider. This simple change can transform how your cursor moves across the screen and how precisely you can control it.
For users who want more detailed control, many gaming mice come with dedicated software that allows for custom DPI settings. These programs let you fine-tune your sensitivity levels and even create profiles for different activities, giving you the perfect responsiveness for every situation.

Steps To Change Mouse DPI
Changing your mouse’s DPI (Dots Per Inch) directly impacts its sensitivity. A higher DPI means the cursor moves further on screen with less physical mouse movement, and vice-versa. Here’s how you can typically change it:
1. Using a Dedicated DPI Button (Common on Gaming Mice):
- Many gaming mice have a dedicated “DPI” button, often located near the scroll wheel or on the side.
- Press this button to cycle through preset DPI levels. You’ll usually notice an immediate change in your cursor’s speed. Some mice have LED indicators to show which DPI level is currently active.
2. Using Mouse Software (For Advanced Customization):
- Many gaming mice (e.g., Logitech, Razer, SteelSeries, Corsair) come with their own software (e.g., Logitech G HUB, Razer Synapse, SteelSeries GG, Corsair iCue).
- Download and install the software for your specific mouse model from the manufacturer’s website.
- Open the software and navigate to the “Performance,” “DPI,” or “Sensitivity” settings.
- Here, you can often:
- Set specific numerical DPI values.
- Create multiple DPI profiles for different activities (e.g., low DPI for precise aiming in games, high DPI for general Browse).
- Assign DPI switching to other mouse buttons.
- Adjust other settings like polling rate and acceleration.
3. Adjusting Through Operating System Settings (Windows & macOS):
While operating system settings don’t offer true numerical DPI control, they allow you to adjust the “pointer speed” or “tracking speed,” which has a similar effect on sensitivity.
On Windows:
- Open Settings: Click the Start menu and select “Settings” (the gear icon), or press
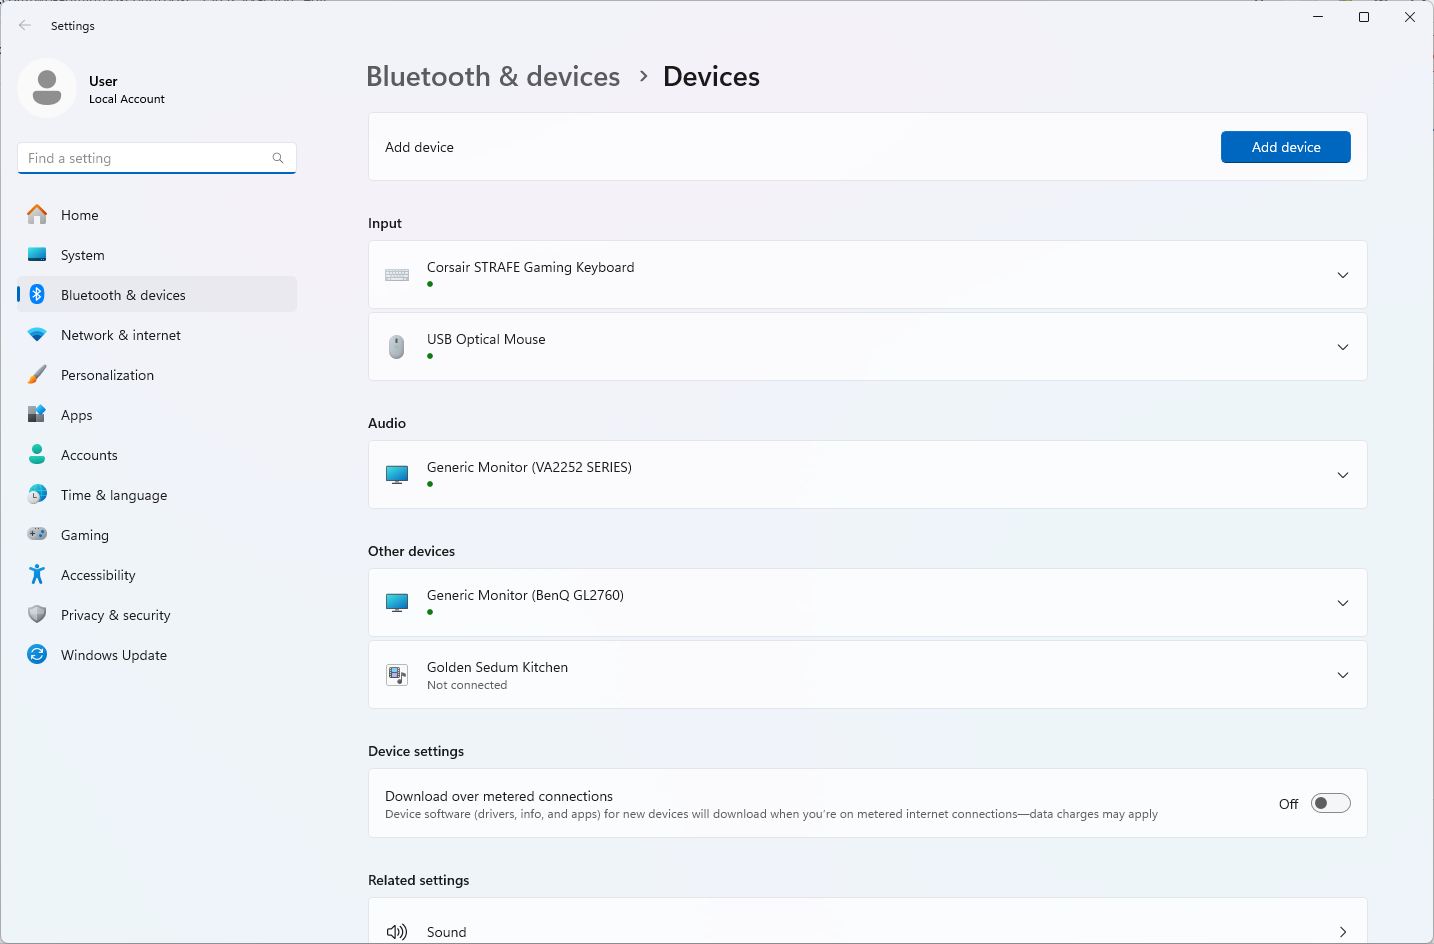
Windows Key + I. - Go to Bluetooth & devices: In the Settings window, click on “Bluetooth & devices” in the left sidebar.
- Select Mouse: On the right, click “Mouse.”
- Adjust Pointer Speed: You’ll see a slider labeled “Mouse pointer speed.” Drag the slider to the left to decrease sensitivity (lower effective DPI) or to the right to increase sensitivity (higher effective DPI).
- For more options (Windows 10/11): Scroll down and click “Additional mouse settings” under “Related settings.”
- Pointer Options Tab: In the “Mouse Properties” window that opens, go to the “Pointer Options” tab.
- Motion: Under the “Motion” section, adjust the “Select a pointer speed” slider. You can also check “Enhance pointer precision” (this enables mouse acceleration, which some users prefer to turn off, especially for gaming).
- Apply and OK: Click “Apply” and then “OK” to save your changes.
On macOS:
- Open System Settings: Click the Apple icon in the top-left corner of the screen and select “System Settings…”
- Select Mouse: In the System Settings sidebar, scroll down and click on “Mouse.”
- Adjust Tracking Speed: You’ll find a “Tracking speed” slider. Drag it to the left to decrease sensitivity or to the right to increase sensitivity.
Tips for Finding Your Ideal DPI:
- Experiment: There’s no single “best” DPI. It depends on your personal preference, the tasks you’re doing (gaming, graphic design, general use), and your screen resolution.
- Test in applications: Try out your new DPI settings in the applications you use most frequently, especially games, to see how it feels.
- Consistency: For activities like gaming, many prefer to keep “Enhance pointer precision” (mouse acceleration) off in Windows settings and use the mouse’s native DPI settings or software for more consistent movement.
Key Takeaways
- Mouse DPI controls cursor speed and precision, with higher settings providing faster movement and lower settings offering more accuracy.
- You can adjust mouse sensitivity through your operating system settings or specialized software that came with your mouse.
- Different activities benefit from different DPI settings, so experiment to find what works best for your specific needs.
Understanding DPI and Mouse Sensitivity
DPI and sensitivity settings directly impact how your mouse cursor behaves on screen. These settings determine everything from precision in creative work to performance in competitive gaming.
The Fundamentals of DPI
DPI stands for “dots per inch,” which measures how many pixels your cursor moves when you physically move your mouse one inch. A higher DPI means your cursor travels further with less physical movement. For example, a mouse set to 800 DPI will move the cursor 800 pixels when you move the mouse one inch.
Most modern gaming mice offer adjustable DPI settings, typically ranging from 400 to 16,000 DPI or higher. This setting is different from your operating system’s pointer speed setting, which acts as a multiplier on top of your DPI.
You can typically change DPI through:
- Dedicated DPI buttons on your mouse
- Manufacturer software installed on your computer
- Some mice have small switches on the bottom
Effects of DPI on Gaming and General Use
DPI significantly impacts both everyday computing and gaming performance. In fast-paced games like FPS (first-person shooters), many professional players actually prefer lower DPI settings (400-800) for better precision when aiming.
For general computer use, higher DPI settings (1200-1600) often work well for navigating across larger or higher-resolution monitors. Creative professionals may adjust their DPI based on tasks:
| Activity | Recommended DPI Range |
|---|---|
| Precise photo editing | 800-1200 DPI |
| Gaming (FPS) | 400-800 DPI |
| General use | 1000-1600 DPI |
| Multiple monitors | 1600+ DPI |
Higher isn’t always better—extremely high DPI can make your cursor feel too sensitive and difficult to control.
Finding the Ideal DPI Setting
The perfect DPI setting varies based on personal preference, screen resolution, and use case. Start with these steps to find your ideal setting:
- Begin at a moderate setting (800-1200 DPI)
- Test it in different applications and games
- Adjust up if cursor movement feels sluggish
- Adjust down if you lack precision
Your mouse’s effective sensitivity is actually a combination of DPI, in-game sensitivity, and Windows pointer speed settings. Gamers often track their “eDPI” (effective DPI), which multiplies DPI by in-game sensitivity to compare settings across different games.
Screen size and resolution also matter. Larger or higher-resolution displays typically benefit from higher DPI settings to reduce physical movement needed to traverse the screen.
How to Change Mouse DPI Settings
Changing your mouse DPI (dots per inch) can significantly improve your computer experience by adjusting how sensitively your cursor responds to physical movement. Different situations may call for different DPI settings, from precise photo editing to fast-paced gaming.
Using DPI Buttons on Your Mouse
Many modern gaming mice come with dedicated DPI buttons that allow for quick adjustments without software. These buttons are typically located on the top or side of the mouse, often marked with DPI or sensitivity icons.
Pressing the DPI button cycles through preset sensitivity levels. Some mice have LED indicators that change color based on the current DPI setting. For example, red might indicate 800 DPI while blue shows 1600 DPI.
Higher-end gaming mice may offer a wider range of adjustable DPI settings, sometimes reaching up to 20,000 DPI. The adjustment increments vary by manufacturer – some mice change in steps of 400 or 800 DPI, while others offer finer control.
To check if your mouse has this feature, look for small buttons near the scroll wheel or along the sides of the device.
Adjusting DPI from the Control Panel
For mice without dedicated DPI buttons, Windows offers built-in options to change pointer sensitivity:
- Open the Start menu and type “Mouse settings”
- Click on “Mouse” or “Mouse settings” in the results
- In Windows 10/11, click “Additional mouse options”
- Select the “Pointer Options” tab
- Adjust the “Motion” slider to change sensitivity
The slider works as a DPI multiplier – moving it right increases sensitivity while moving left decreases it. Unchecking “Enhance pointer precision” can provide more consistent cursor movement, especially for gaming.
Remember that these settings affect all connected mice. For more precise control, you might need to check if your mouse manufacturer offers specialized software that allows for exact DPI adjustments.
Third-Party Applications for DPI Adjustment
When built-in options aren’t enough, third-party software can offer more control over mouse sensitivity. Popular options include:
Mouse manufacturer software: Logitech G HUB, Razer Synapse, and Corsair iCUE let users set exact DPI values and create multiple profiles for different activities.
Raw Accel: This open-source tool provides granular control over mouse sensitivity. Users can change DPI settings precisely, create custom acceleration curves, and save different profiles.
Mouse Rate Checker: This utility helps verify your current DPI settings and polling rate.
These applications often provide additional customization like mapping buttons, creating macros, and adjusting polling rates. Most gaming peripherals come with companion software that allows for DPI adjustment in increments as small as 1 DPI.
Adjusting Touchpad Sensitivity
Laptop touchpads also have sensitivity settings that function similarly to mouse DPI:
- Open Settings and select “Bluetooth & devices”
- Click “Touchpad”
- Adjust the sensitivity slider to your preference
Many laptops offer additional touchpad settings through manufacturer software. These might include multi-finger gesture controls and palm rejection settings.
For precision tasks, you can temporarily decrease touchpad sensitivity. Higher sensitivity requires less finger movement but might reduce accuracy for detailed work.
Some laptops also allow for separate sensitivity settings for different usage scenarios, such as standard browsing versus gaming. Check your laptop manufacturer’s support site for specialized touchpad control software.
Frequently Asked Questions
Mouse DPI settings can significantly impact cursor precision and speed. Users often have specific questions about adjusting these settings across different operating systems and devices.
What are the steps to adjust mouse DPI settings in Windows 11?
To adjust mouse DPI in Windows 11, users should navigate to Settings by pressing the Windows key and selecting the Settings icon.
Next, select Bluetooth & devices from the left menu, then click on Mouse.
Under Mouse pointer speed, users can adjust the slider to increase or decrease DPI. Moving it to the right increases pointer speed while moving left decreases it.
How can I change my mouse sensitivity in Windows 10?
In Windows 10, click on the Start menu or press the Windows key and select Settings.
Navigate to Devices and then select Mouse from the left sidebar menu.
Adjust the slider under “Mouse pointer speed” to set your preferred sensitivity level. Some mice may also have additional settings in their specialized software.
What is the process for setting mouse DPI to a specific value, such as 800 or 1600?
For precise DPI values like 800 or 1600, the best approach is to use manufacturer-specific software that came with your mouse.
If using a basic conversion method, set your mouse to 1600 DPI and then adjust in-game or system sensitivity accordingly. For example, to convert from 1600 to 1000 DPI, use a sensitivity multiplier of 0.625.
Some gaming mice feature dedicated DPI buttons that cycle through preset values, which often include 800 and 1600 DPI options.
How do I modify the DPI settings of my mouse through the control panel?
Open Control Panel by searching for it in the Windows search bar.
Select Hardware and Sound, then click on Mouse to open mouse properties.
Navigate to the Pointer Options tab and adjust the pointer speed slider. Note that Control Panel offers fewer precision options than manufacturer software.
Can mouse DPI be adjusted on-the-fly and, if so, how?
Many gaming and premium mice feature dedicated DPI buttons that allow on-the-fly adjustments during use.
These buttons are typically located on the top or side of the mouse and cycle through preset DPI values when pressed.
Some manufacturers also provide keyboard shortcuts through their proprietary software that allow users to switch between different DPI profiles instantly.
Where can I find DPI Analyzer tools to measure my mouse DPI changes?
Several online DPI analyzer tools can help measure your current mouse settings, such as Mouse-Sensitivity.com and DPI Analyzer.
Gaming peripheral manufacturers like Logitech, Razer, and SteelSeries often include DPI testing tools within their software suites.
Third-party applications like MouseTester can also provide detailed information about your mouse’s current DPI and movement accuracy.