
Loudness equalization is a feature found in many audio enhancement programs, particularly in Windows operating systems. It serves to normalize the volume, ensuring that all sounds are heard at an average level of loudness. This can be particularly useful when listening to audio tracks that fluctuate between very soft and very loud passages, making the experience more consistent.
Boosting Your Audio Experience
Loudness Equalization (LE) is a built-in feature in Windows that aims to create a more balanced and consistent audio experience. It does this by reducing the perceived volume differences between quiet and loud sounds, making it easier to listen to audio without constantly adjusting the volume.
How Does It Work?
LE analyzes the audio signal in real-time and applies compression to louder parts while amplifying quieter ones. This results in a more uniform volume level across different sources, such as movies, music, and games.
When to Use It
Loudness Equalization is particularly useful in situations where there are significant volume fluctuations within a single audio source or between different sources. It can be beneficial for:
- Watching movies with varying dialogue and action scenes: LE helps maintain a consistent volume level, preventing sudden loud bursts during action sequences.
- Listening to music with quiet vocals and loud instruments: LE enhances the vocals and reduces the impact of loud instruments, making it easier to hear all parts of the song.
- Playing games with dramatic audio effects: LE prevents sudden loud noises from startling you while ensuring that quieter sounds remain audible.
Enabling Loudness Equalization
- Right-click on the speaker icon in your taskbar.
- Select “Sounds.”
- Go to the “Playback” tab.
- Double-click on your default playback device.
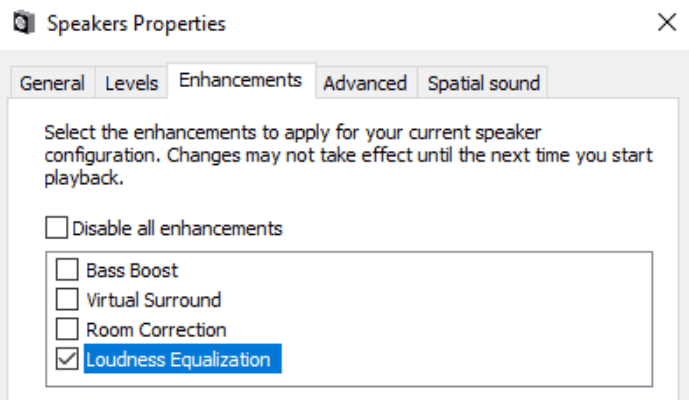
- Switch to the “Enhancements” tab.
- Check the box next to “Loudness Equalization.”
- Click “Apply” and “OK.”
Additional Tips
- If the “Enhancements” tab is not available, your audio driver might not support this feature. Check for driver updates or try using a different audio device.
- You can further customize LE by adjusting the “Release time” setting, which controls how quickly the compressor reacts to changes in volume. A shorter release time results in more aggressive equalization.
Windows Loudness Equalization Settings
| Setting | Description | Default | Tips |
|---|---|---|---|
| Enabled/Disabled | Turns Loudness Equalization on or off. | On | Enable for consistent volume in movies, music with varying loudness. Disable for audio production or if preferred listening experience involves dynamic range. |
| Release Time | Determines the speed of volume adjustments. | Short | Short: Faster adjustments, may sound less natural. Long: Slower adjustments, smoother but potentially noticeable compression artifacts. |
| Equalization Presets (specific to audio driver) | Fine-tune Loudness Equalization for different content types like movies, music, or speech. | None | Experiment with presets to find one that suits your preferences. |
| Additional settings (specific to audio driver) | Some drivers offer more granular control over equalization curves or specific frequency adjustments. | Varies | Explore advanced settings if you want further customization. |
Additional Notes:
- Loudness Equalization settings are applied system-wide and affect all playback devices.
- The specific settings and options available may vary depending on your audio driver.
- Loudness Equalization can subtly affect audio quality, especially with short release times.
- Consider disabling Loudness Equalization if you’re using dedicated audio software with its own equalization features.
Loudness Equalization vs. Other Sound Enhancements
| Feature | Purpose | Benefits | Drawbacks |
|---|---|---|---|
| Loudness Equalization (LE) | Reduce volume differences between quiet and loud sounds. | More consistent volume levels, easier listening experience, less need for manual volume adjustments. | May slightly reduce dynamic range and alter the intended sound. |
| Bass Boost | Amplify low-frequency sounds. | Enhances bass response, more immersive audio experience. | Can muddy the sound or cause distortion. |
| Virtual Surround | Simulate surround sound from stereo speakers. | Creates a wider soundstage, more immersive experience. | May not be as effective as a true surround sound setup. |
| Room Correction | Adjust audio based on the acoustics of your room. | Improves overall sound quality and accuracy. | Requires additional setup and calibration. |
| Equalizer | Manually adjust different frequency bands. | Precise control over sound signature, can customize sound to personal preference. | Requires knowledge of audio frequencies and may be time-consuming to set up properly. |
Understanding Loudness Equalization
How it works:
- Loudness equalization assesses the audio content, identifying the loudest and softest elements.
- It then adjusts the volume dynamically, bringing quieter sounds up and reducing the volume of louder sections.
- The result is a more balanced audio output where no single sound dominates the listening experience.
Benefits:
- Reduces the need to manually adjust volume levels.
- Improves the clarity of speech and detail in quiet sounds.
- Prevents sudden volume spikes that can be startling or uncomfortable.
Settings Access:
- Users can toggle loudness equalization via the audio properties within the Control Panel or the Sound Settings in Windows.
- This volume management feature is typically found under the ‘Enhancements’ tab in the speaker properties.
By understanding and using loudness equalization, users can enjoy a more polished and uniform audio experience across different types of content. It is a testament to volume management features that make listening to music, movies, and other audio forms on computers a more enjoyable activity.
Enabling Loudness Equalization
Enabling Loudness Equalization in Windows can balance the sound output of your audio device, ensuring a consistent volume across different types of content. This section will guide you through the process step-by-step.
Accessing Sound Settings
First, one needs to navigate to the sound settings on their Windows computer. To do this, they can input ‘Control Panel’ in the search bar on the taskbar and press enter. Once the Control Panel is open, they should click on ‘Hardware and Sound’, and then select ‘Sound’, which brings up a list of audio devices.
Adjusting Enhancements Tab
Within the ‘Sound’ window, individuals should proceed to the ‘Playback’ tab where they can find their audio device. They will then select their device and click on the ‘Properties’ button. This action will bring up the Speaker Properties window. There, users should locate the ‘Enhancements’ tab. It is in this tab where they can manage audio preferences such as Loudness Equalization or even room correction to suit various room and speaker characteristics.
Applying Settings Effectively
After ticking the ‘Loudness Equalization’ option in the Enhancements tab, one must apply these settings for them to take effect. They do this by clicking ‘Apply’, followed by ‘OK’ to close the properties window. By enabling this feature, users will notice a more balanced audio level that maintains consistent sound quality regardless of volume level changes within the content itself. It’s tailored to match personal preference while considering the acoustic environment of the room.
Configuring Audio Devices
When adjusting your computer’s audio settings, it’s essential to select the appropriate device and fine-tune the sound to suit your needs. This section guides you through the process of setting up your audio device and customizing sound options for the best listening experience.
Selecting the Right Audio Device
Identifying and choosing the correct audio output device is crucial. Users should navigate to their PC’s Sound settings. Here’s how one can do this:
- Right-click on the Sound icon on the taskbar.
- Select Sound settings.
This will display a list of available audio devices, such as speakers, headphones, or any connected external sound cards. It is necessary to:
- Ensure the active speaker or intended device is highlighted.
- Click on the Properties button to access advanced settings like balance and volume.
Customizing Sound Options
Once the preferred audio device is selected, the next step is to customize sound options to improve the quality and consistency of audio output. Here are the steps to manage these settings:
- In the Properties menu of the selected device, locate the Enhancements tab.
- Find and select the Loudness Equalization checkmark box.
Enabling Loudness Equalization helps maintain consistent volume levels when playing any media on the PC. This feature is particularly useful when experiencing volume fluctuations during video playback or when switching between different media types. Each device’s properties offer unique customization, like tweaking the sound equalizer to match a user’s listening preference or adjusting the audio balance for a finer sound experience.
Understanding Sound Enhancements
Sound enhancements in Windows can elevate one’s audio experience significantly, allowing for more enjoyable music, clearer dialogue in videos, and a more immersive gaming experience. By tweaking these settings, users can optimize how audio plays through their speakers or headphones.
Volume Balancing and Dynamics
Windows Loudness Equalization is a feature focused on balancing volume output. It ensures consistency, especially when media volumes vary widely. It effectively normalizes sound levels, so users don’t have to constantly adjust the volume. For instance, it can tone down the blare of loud commercials or amplify the sound of a quiet podcast.
Quality and Playback Experience
Enhancements like Bass Management and Speaker Fill contribute to an enriched sound quality that can be tailored to the user’s preferences or the type of media being played. Windows also offers Windows Sonic for Headphones, which provides a virtual surround sound experience to make gameplay and movie-watching more immersive. Users should note that these enhancements might affect playback performance on lower-end systems.
Compatibility with Media Types
Sound settings and enhancements in Windows not only impact music and video content but also affect gameplay audio. Users should ensure that the enhancements they enable are compatible with the various types of media they consume. Some enhancements work better with certain types of audio streams, and users might want to toggle these settings depending on what they’re listening to or watching.
By understanding and correctly applying these sound enhancements, users can significantly improve their overall audio experience.
Advanced Audio Settings
When tailoring your computer’s sound for an optimal listening experience, the advanced audio settings in Windows offer a wealth of options. From equalizers to sound card-specific features, these settings allow you to fine-tune your audio.
Equalizer and Filters
An equalizer is like a set of scales for your audio, letting you adjust different frequencies to get the right balance. Most equalizers come with presets like ‘Jazz’, ‘Rock’, or ‘Classical’ to enhance specific genres of music.
- Bass Management: Adjusts low-frequency sounds, perfect for when you want that extra thump.
- Room Correction: Customizes audio to suit the acoustics of your space.
Think of filters as audio sculpting tools that can remove certain sounds or frequencies, like the hiss from an old recording.
Sound Card Specific Features
The features available can vary depending on your sound card and driver. When exploring your sound card’s capabilities, you may come across:
- Sound Blaster: Known for offering crystalline clarity and audio enhancements.
- Realtek: Typically comes with a built-in sound equalizer in their drivers, offering a range of pre-set options.
Each sound card may offer unique audio enhancements. Check your device’s support site or software for details like how to engage Dolby Atmos or DTS for immersive sound experiences.
Remember to periodically check for updates to your sound driver, as manufacturers often release enhancements that can improve performance and introduce new features.
Troubleshooting Common Issues
When addressing audio problems in Windows, users may face issues like missing settings or uneven volume levels across different applications. This section provides guidance on how to identify and resolve such issues.
Identifying and Resolving Audio Problems
System sound problems can stem from various factors, but they typically relate to the sound driver or audio settings. First, ensure that your audio drivers are up-to-date by visiting the device manufacturer’s website. If Loudness Equalization is absent, it could be missing due to a driver issue. To check for this:
- Press Windows + R, type
devmgmt.msc, and hit OK. - In the Device Manager, locate your sound card, right-click it, and select Update driver.
In cases where the Loudness Equalization option is still not visible, trying a system restart or searching for additional updates in Windows Update may remedy the situation.
Volume Inconsistencies Across Applications
Volume fluctuations between applications are common and can often be adjusted through the Volume Mixer. Here’s how:
- Right-click the speaker icon in the system tray and choose Open Volume Mixer.
- You’ll see sliders for each application. Adjust these until you achieve a consistent volume level.
If adjusting the mixer does not yield results, enabling Loudness Equalization can help:
- Right-click the speaker icon and select Sounds.
- Navigate to the Playback tab, click on your device, and choose Properties.
- In the properties window, click on the Enhancements tab.
- Check the box next to Loudness Equalization and press OK.
For users not finding this setting, third-party software that performs a similar function may be necessary. It’s essential to select such software from reputable sources to avoid potential system security risks.
Exploring Audio Enhancements Across Windows Versions
Audio enhancements in Windows have evolved over time, providing a range of options to improve sound quality. In Windows 10, users could access the Loudness Equalization feature via the Control Panel. This feature helped even out the audio levels to make quieter sounds more audible without blasting the louder ones.
To access it, users followed these steps:
- Navigate to Control Panel.
- Select Sound.
- Choose their playback device and click Properties.
- Go to the Enhancements tab.
However, in Windows 11, the approach to audio enhancements changed slightly, streamlining user experience. Users disappointed with missing Loudness Equalization options found that updates altered the way these settings are managed.
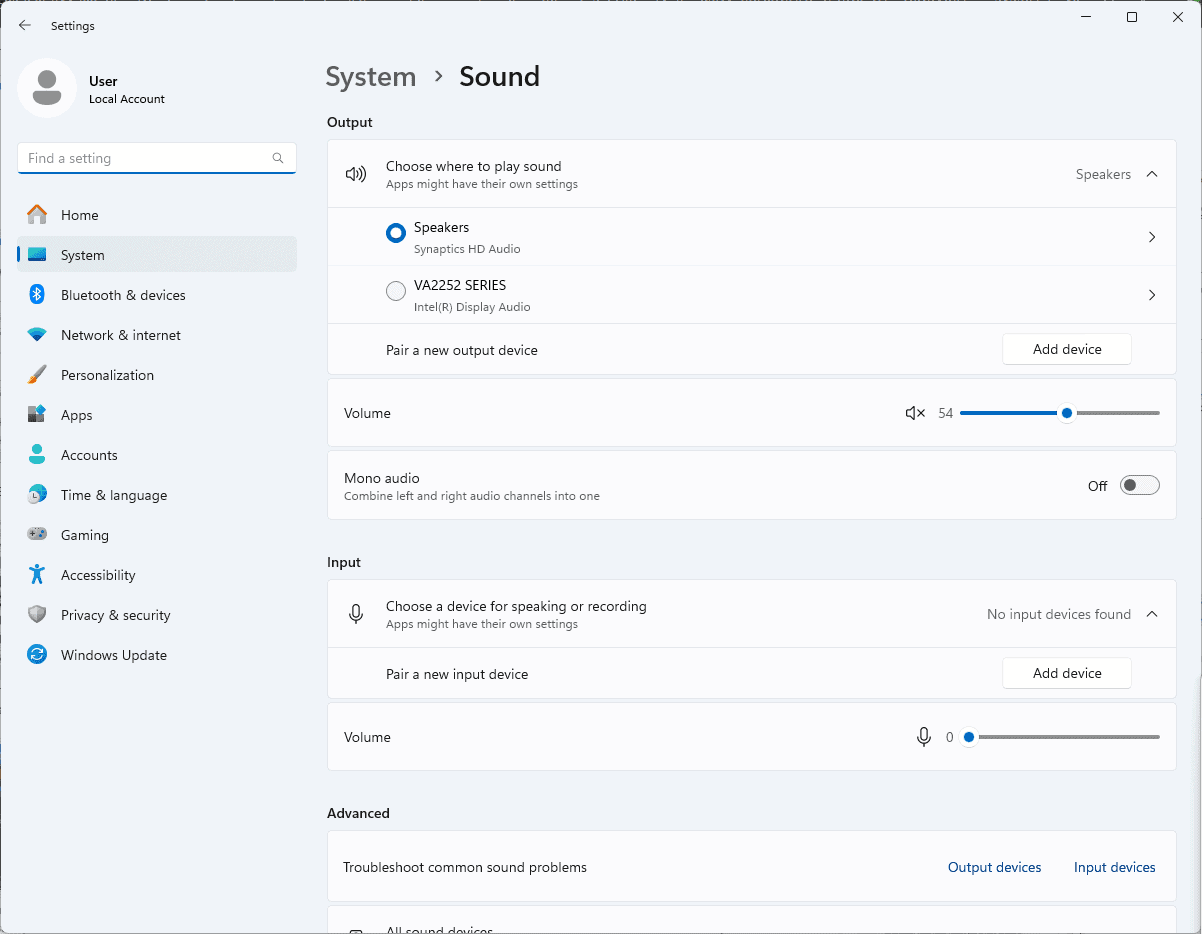
For the latest Windows version, Audio Enhancements are found within the new Settings app:
- Open Settings.
- Click on System > Sound.
- Select an audio device under All sound devices.
- Toggle Audio Enhancements to ‘On’.
Despite the interface changes, the goal remained the same: to provide a better listening experience through software. Those who dive into the Manage audio devices menu will note Microsoft’s efforts to offer a more unified and simplified settings menu, possibly a response to feedback on previous versions’ complexity.
Across these Windows versions, navigating to the right spot for audio settings continues to hold importance for users looking to personalize their sound experience. Each update seems targeted at making this process more user-friendly, aiming to cater to a broad audience.
Customization and User Preferences
When it comes to personalizing how you hear sound on a computer, Windows provides various options for users to fine-tune their audio experience. The control panel acts as the main hub for adjusting sound settings. From here, individuals can navigate to the sound settings, specifically zeroing in on loudness equalization under the playback tab.
Loudness equalization is a feature designed to even out the volume levels so each audio track or video sounds consistent. Here’s a quick guide on how to access and adjust these settings:
- Open Control Panel: Search for ‘Control Panel’ from the Windows start menu and click to open it.
- Access Sound Settings: Within the Control Panel, locate and click on ‘Sound’.
- Modify Playback Settings: Under the Playback tab, you’ll find a list of audio devices. Choose your preferred device and click ‘Properties’.
Within the properties section, users can find an enhancements tab. If loudness equalization is available for their chosen playback device, it will appear here with a checkbox. Ticking this box enables the feature, and unticking it will disable it. It’s important for users to test these changes with their favourite tracks or applications, as preferences for volume consistency can differ from person to person.
Some users appreciate that all sounds are brought to an equivalent level, eliminating the need to constantly adjust the volume. For others, particularly in environments where audio dynamics are essential, like in certain video games or when watching movies, loudness equalization might not be the preferred setting. The beauty of Windows sound customization lies in its flexibility, allowing each user to tailor their audio experience to their liking.
Optimizing Settings for Specific Use Cases
When it comes to gaming, clarity is key. Loudness Equalization can enhance your gaming experience by balancing quiet and loud sounds, making it easier to detect subtle game cues. Players should adjust the Release Time toward short on the slider for instant feedback during fast-paced games.
For media enthusiasts enjoying movies or music, setting the slider toward the long end can provide a more cinematic feel by smoothly transitioning volume levels. It stabilizes audio playback, ensuring a consistent listening experience.
In various applications such as video conferencing, clarity in communication is crucial. A mid-range setting on the slider can be a good starting point, as it allows for clearer voices without drastic volume shifts.
System-wise, balancing loudness equalization settings can benefit overall audio handling in Windows. However, the best setting can depend on your hardware and personal preference. Experiment with the slider to find the sweet spot that suits your needs.
Here’s a quick reference for setting up Loudness Equalization:
| Use Case | Release Time Setting |
|---|---|
| Gaming | Short |
| Media | Long |
| Applications | Medium |
| System | Varies |
Remember, optimizing these settings is about finding what works best for you in each scenario. Don’t hesitate to tweak the settings as you switch between different audio experiences.
Frequently Asked Questions

Understanding the configuration and effects of loudness equalization can help you enhance your audio experience on a Windows system. Here’s what users often ask about.
How can I enable loudness equalization in Windows 7?
In Windows 7, click on the speaker icon in the taskbar and select ‘Playback Devices’. Right-click your default device, click ‘Properties’, navigate to ‘Enhancements’, and check the ‘Loudness Equalization’ option.
What steps are required to adjust loudness equalization settings in Windows 11?
For Windows 11, access the sound settings by right-clicking the speaker icon on the taskbar. Go to ‘Sound’ in the Settings menu, select your device, and under ‘Properties’, you will find the ‘Enhancements’ tab where you can toggle loudness equalization.
Where can I find the loudness equalization option in Windows 10?
In Windows 10, right-click the sound icon in the system tray. Choose ‘Sounds’, then select your playback device and click on ‘Properties’. Under the ‘Enhancements’ tab, you can enable or disable loudness equalization.
How does activating loudness equalization affect audio quality?
Loudness equalization balances the volume across different audio sources, normalizing loud and quiet sounds to maintain a consistent volume level, thus affecting the perceived audio quality.
Can loudness equalization improve the sound experience on all types of media?
Loudness equalization can enhance audio for various types of media, especially those with varying volume levels, by equating the sound to one consistent level.
Why is the loudness equalization option missing or not available in my sound settings?
If loudness equalization is absent, it could be due to outdated sound drivers, your sound card not supporting this feature, or the manufacturer’s software overriding Windows settings. Check for driver updates or manufacturer-specific audio software.