Canceling a QuickBooks Online account is a straightforward process that can be completed in just a few steps. To cancel your QuickBooks Online subscription, log into your account as an admin, navigate to Settings, select Account and Settings, then go to the Billing & Subscription tab and choose Cancel subscription or Cancel online. This method applies to subscriptions purchased directly from Intuit.
For those who signed up through a mobile app store, the cancellation process differs slightly. Users need to access their app store account to manage the subscription. This ensures that all billing is properly halted and prevents unexpected charges.
Before initiating the cancellation, it’s important to consider backing up your financial data and completing any pending transactions. This precaution allows you to retain access to your business information even after the account is closed.

QuickBooks Online Cancellation Steps
If you’ve decided to part ways with QuickBooks Online, canceling your subscription is a straightforward process. Here’s a detailed guide to help you through it:
1. Access QuickBooks Online
Open a web browser on your computer and sign in to your QuickBooks Online account as the primary or company admin.
2. Navigate to Settings
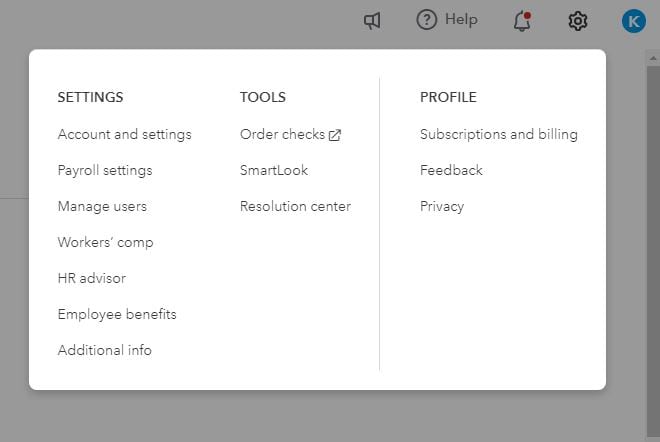
Click on the Gear icon in the top right corner of the QuickBooks Online dashboard.
3. Select Subscriptions and billing
In the menu under Profile click “Subscriptions and billing”.
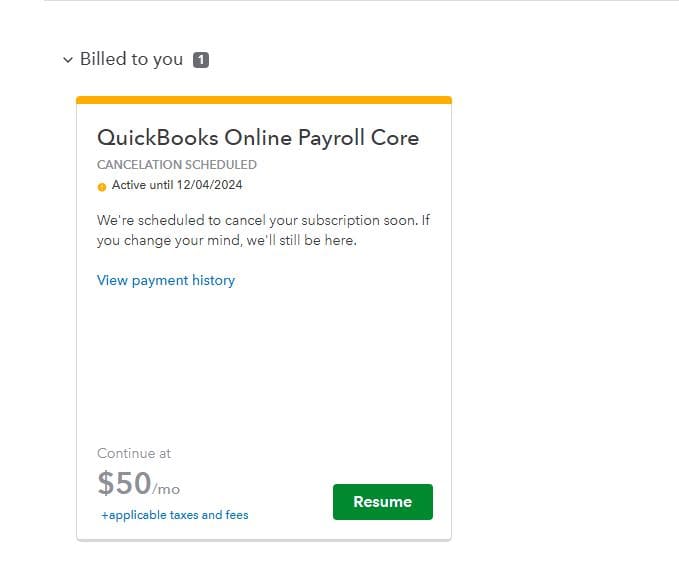
4. Cancel Your Subscription
In the QuickBooks section, you’ll see options to “Cancel subscription” under each of your subscriptions. Click the appropriate option. If you’re canceling a trial, you’ll see “Cancel trial” instead.
5. Follow the Prompts
QuickBooks Online will guide you through a series of prompts to confirm your cancellation. You might be asked to provide a reason for canceling or complete a short survey.
6. Confirm Cancellation
Review the details of your cancellation, including the last date you’ll have access to your account. Once you’ve confirmed everything is correct, click the final “Cancel” or “Submit” button to complete the process.

Important Notes
- Data Access: After canceling, you might have limited access to your QuickBooks Online data for a certain period, depending on your subscription plan. It’s a good idea to download any important data before canceling.
- Refunds: Refunds for unused subscription time are generally not provided, so make sure to cancel before your next billing cycle if you want to avoid charges.
- Alternative Options: If you’re not completely sure about canceling, QuickBooks Online might offer alternative options, such as downgrading to a less expensive plan or pausing your subscription temporarily.
Troubleshooting
If you encounter any issues during the cancellation process, here are a few things to try:
- Clear Your Browser Cache: Clearing your browser’s cache and cookies can sometimes resolve website glitches.
- Try a Different Browser: Try accessing QuickBooks Online and canceling your subscription using a different web browser.
- Contact QuickBooks Support: If you’re unable to cancel online or need assistance, reach out to QuickBooks customer support for help.
Canceling Through App Stores
If you purchased your QuickBooks Online subscription through an app store (like the Apple App Store or Google Play Store), you’ll need to cancel it through the respective app store’s subscription management settings.
By following these steps, you can easily cancel your QuickBooks Online account and manage your subscription effectively.
Managing Your QuickBooks Online Data After Cancellation
After canceling your QuickBooks Online subscription, you might be wondering what happens to your data. Here are a few key points to keep in mind:
- Data Retention: QuickBooks Online typically retains your data for a certain period after cancellation, even if you no longer have full access to the account. This allows you to potentially reactivate your subscription or retrieve your data if needed.
- Data Download: Before canceling, it’s highly recommended to download all your important data, including financial reports, customer information, and transaction history. QuickBooks Online provides options to export your data in various formats.
- Data Security: QuickBooks Online maintains security measures to protect your data even after cancellation. However, it’s always a good practice to keep your own backups of important data for added security.
- Data Ownership: You retain ownership of your data even after canceling your QuickBooks Online subscription. You have the right to request access to or deletion of your data, subject to QuickBooks Online’s data retention policies.
By understanding these aspects of data management, you can make informed decisions about your QuickBooks Online data after canceling your subscription.
Key Takeaways
- Cancellation steps vary based on where the subscription was purchased
- Backing up data before canceling preserves important financial information
- QuickBooks offers multiple cancellation options to accommodate different user needs
Understanding QuickBooks Online Account Subscription
QuickBooks Online offers various subscription plans to meet different business accounting needs. Each plan provides specific features and capabilities tailored to different company sizes and financial management requirements.
Key Features of QuickBooks Online
QuickBooks Online includes essential accounting tools for small to medium-sized businesses. Users can track income and expenses, send invoices, and manage bills. The software allows for bank account connections, enabling automatic transaction imports.
QuickBooks Online offers real-time financial reporting, including profit and loss statements and balance sheets. It provides multi-user access, allowing team collaboration on financial tasks.
The platform includes payroll processing options and inventory tracking features in higher-tier plans. Mobile apps are available for on-the-go financial management.
Different QuickBooks Online Plans
QuickBooks Online offers several subscription tiers:
- Simple Start: Basic plan for new or very small businesses
- Essentials: Adds bill management and time tracking
- Plus: Includes inventory tracking and project profitability
- Advanced: Offers business analytics and dedicated support
Each plan increases in price and features. Users can upgrade or downgrade as their business needs change.
Some plans offer industry-specific versions for contractors, nonprofits, and retail businesses. Intuit often provides promotional pricing for new subscribers.
Accessing Your QuickBooks Online Account
To access QuickBooks Online, users sign in through the Intuit website or mobile app. The login requires an email address and password associated with the Intuit account.
Once logged in, users land on a dashboard showing key financial data. Navigation menus provide access to different features and reports.
Account settings are managed through the gear icon, typically found in the upper right corner. Here, users can view subscription details, update billing information, and manage user permissions.
For security, QuickBooks Online supports two-factor authentication. Users can set up additional verification methods like security questions or mobile device confirmation.
Pre-Cancellation Considerations
Before canceling your QuickBooks Online account, take time to review key factors that may impact your business operations and financial data. Carefully weigh your options and potential consequences.
Understanding the Implications for Your Data
Canceling your QuickBooks Online subscription affects access to your financial records. Your company data remains stored for a limited time after cancellation, but you’ll lose the ability to make changes or enter new transactions.
QuickBooks offers a read-only access period, typically lasting 1-3 years depending on your subscription level. During this time, you can view and download reports, but cannot add or edit information.
Consider exporting important data before canceling. Download financial reports, customer lists, and transaction histories. This ensures you retain crucial business information for future reference or tax purposes.
Remember that once your subscription is fully terminated, all data may be permanently deleted from QuickBooks servers.
Exploring Alternatives to Cancellation
Before canceling outright, explore other options that might better suit your needs. QuickBooks offers various subscription tiers with different features and pricing. Downgrading to a lower-cost plan could save money while maintaining essential functions.
If cash flow is an issue, contact QuickBooks support about temporary payment arrangements. They may offer short-term solutions like suspended subscriptions or deferred payments to help you through financial difficulties.
For seasonal businesses, investigate options to pause your subscription during slow periods. This allows you to reactivate quickly when needed without losing data or starting from scratch.
Consider your long-term accounting needs. Switching to a new system involves time and effort to transfer data and learn new processes. Weigh these factors against potential benefits of cancellation.
Steps to Cancel QuickBooks Online Subscription
Canceling a QuickBooks Online subscription involves a few key steps. Users need to access their account settings, verify ownership, and complete the cancellation process.
Navigating to Account Management
To begin, log in to your QuickBooks Online account. Click the gear icon in the top right corner to open the Company Settings menu. Select “Account and Settings” or “Your Account” from the dropdown. Look for a tab labeled “Billing & Subscription” or “Billing Info.” This section contains all the information about your current subscription and payment details.
If you’re using a mobile device, open the QuickBooks app and tap on the menu icon. Navigate to “Settings” or “Account Settings.” Find the option for “Subscriptions” or “Billing Information.”
Verifying Account Ownership
Before proceeding with cancellation, QuickBooks may require you to verify your account ownership. This step ensures that only authorized users can make changes to the subscription.
You might need to confirm your login credentials or answer security questions. In some cases, QuickBooks may send a verification code to your registered email or phone number. Enter this code when prompted to prove your identity.
Completing Cancellation Process
Once verified, locate the “Cancel Subscription” or “Cancel” button next to your subscription status. Click this button to start the cancellation process. QuickBooks will ask why you’re canceling. Select the most appropriate reason from the list provided.
Review any information about data retention or access after cancellation. QuickBooks typically allows read-only access to your data for one year after canceling. Confirm your decision to cancel by clicking “Cancel Now” or a similar button.
After cancellation, you’ll receive a confirmation email. Keep this for your records. Remember to download any important reports or data you might need before your access expires.
Post-Cancellation Actions
After canceling your QuickBooks Online account, you’ll need to manage your data access and consider potential reactivation options. These steps are crucial for maintaining business continuity and preserving financial records.
Accessing Data After Cancellation
QuickBooks Online provides read-only access to your company data for one year after cancellation. This means you can view and download reports, but you can’t make changes or add new transactions. To access your data:
- Log in to your QuickBooks Online account using your existing credentials.
- Navigate to the reports section to view financial statements.
- Download any necessary reports or data for your records.
It’s important to save essential reports before the one-year period ends. Consider exporting:
- Profit and Loss statements
- Balance Sheets
- Tax reports
- Customer and vendor lists
How to Reactivate Your Subscription
If you decide to reactivate QuickBooks Online, you can easily resubscribe within the one-year read-only period. To reactivate:
- Sign in to your QuickBooks Online account.
- Click the “Resubscribe” button in the account settings.
- Choose your desired subscription plan.
- Enter payment details and confirm.
Your data will be fully restored, allowing you to resume normal operations. If you reactivate after the one-year period, you may need to start a new subscription and manually import your old data.
Keep in mind that pricing and features may change, so review the current offerings before resubscribing. Contact QuickBooks support if you need help with the reactivation process.
Utilizing QuickBooks Online Support
QuickBooks offers various support options to help users cancel their accounts and resolve related issues. These include direct customer service channels and self-help resources.
Contacting QuickBooks Support
QuickBooks provides multiple ways to reach their support team. Users can call the QuickBooks customer service line for immediate assistance. The phone number is available on the QuickBooks website. Live chat is another option, accessible through the QuickBooks Online account dashboard. For less urgent matters, email support is available.
Support representatives can guide users through the cancellation process, answer questions about account status, and address concerns about data retention. They can also help with any technical issues that may arise during the cancellation attempt.
Utilizing the Help Resources
QuickBooks offers a comprehensive help center on their website. Users can find step-by-step guides for canceling subscriptions. These guides often include screenshots, making the process easier to follow.
The QuickBooks community forum is another valuable resource. Users can search for similar cancellation experiences or post their own questions. Community experts and QuickBooks staff often respond to inquiries.
Video tutorials are available on the QuickBooks YouTube channel. These videos can provide visual guidance for navigating the cancellation process. Users can also find tips for managing their account and data after cancellation.
Managing QuickBooks on Mobile Devices
QuickBooks offers a mobile app for managing business finances on the go. Users can access key features and perform important tasks from their smartphones or tablets.
Overview of QuickBooks Mobile App
The QuickBooks mobile app allows users to view, create, and edit invoices remotely. It provides access to customer information and transaction details. Users can attach notes and photos to customers and transactions for easy reference.
The app syncs with the web version of QuickBooks Online, ensuring data remains up-to-date across devices. It displays bank transactions in the user’s home currency, though multi-currency support is limited to the web version.
QuickBooks mobile aims to increase flexibility for business owners. It enables them to handle financial tasks while away from their computers, potentially improving customer interactions and business efficiency.
Cancellation via QuickBooks Mobile App
The QuickBooks mobile app does not currently support account cancellation. To cancel a QuickBooks Online subscription, users must use a computer browser rather than a mobile device.
The cancellation process requires logging into QuickBooks Online as the primary or company admin. Users then navigate to Settings, select Subscriptions and billing, and choose Cancel subscription in the QuickBooks section.
For those considering cancellation, it’s important to note that resubscription or reactivation options exist if needed in the future. These processes can be initiated through the QuickBooks Online web interface.
Frequently Asked Questions
QuickBooks Online users often have questions about account management and cancellation processes. Here are some common inquiries and their answers.
How can I unsubscribe from QuickBooks Online Accountant?
QuickBooks Online Accountant is currently a free program. There is no option to cancel or unsubscribe from this service at this time.
What steps should be taken before cancelling a QuickBooks Online subscription?
Before cancelling, back up all important data. Export any necessary reports and financial information. Ensure all outstanding bills and invoices are settled.
What are the consequences of deactivating an account within QuickBooks Online?
After cancellation, users have read-only access to their data for one year. This allows for viewing and exporting information, but no new entries can be made.
How can one delete their QuickBooks Online account permanently?
Log in to your account and go to ‘Account and Settings’. Select ‘Close Your Account’ and follow the prompts to permanently delete your QuickBooks Online account.
What is the process to remove a user from QuickBooks Online?
To remove a user, go to the ‘Manage Users’ section in account settings. Find the user you want to remove and click on ‘Delete User’. Confirm the action to complete the process.
Is there a cancellation phone number for QuickBooks Online?
QuickBooks does not provide a specific cancellation phone number. Users can cancel their subscription online through their account settings or by contacting customer support through their general helpline.


