Accessing the service menu on a Sony TV grants users access to advanced options and settings not typically available in the standard options menu. While this feature is primarily intended for service technicians, it can also be useful for troubleshooting and optimizing television performance. However, it’s important to exercise caution when accessing this menu as some of the settings can significantly impact your TV’s functionality.
The service menu is typically hidden by design to prevent accidental changes that could disrupt the TV’s regular operation. To access this menu, specific remote control button sequences are required, which might vary slightly depending on the model of the Sony TV. Nevertheless, it usually involves using the standard remote control provided with the television.
Accessing Your Sony TV’s Hidden Menu
The Sony TV service menu contains a range of advanced settings for calibration, diagnostics, and troubleshooting. While this menu is primarily intended for technicians, curious and tech-savvy users may find it valuable. Just remember to proceed with caution – making changes here could affect your TV’s functionality.
Important Note: Incorrect changes in the service menu can potentially damage your TV. Proceed at your own risk, and consider having a professional technician handle any complex adjustments.
Methods to Access the Service Menu
There are a few different ways to get into the Sony TV service menu. The method that works for you may depend on your specific TV model:
Method 1: Button Combination on Remote
- Aim your Sony remote at the TV.
- Press the following button sequence: Display -> 5 -> Volume Up -> Power
- Your TV may enter the service menu.
Method 2: Service Menu Code
- Using your TV’s remote control, go to the Settings menu.
- Navigate to Device Preferences or System.
- Locate the About section.
- Scroll down and find the Build number.
- Click on the Build number repeatedly. You might see a message indicating “You are now a developer.”
- Return to the main Settings menu and look for a new option, often called Developer Options or similar.
- Inside this new menu, there might be a setting to enable the service menu.
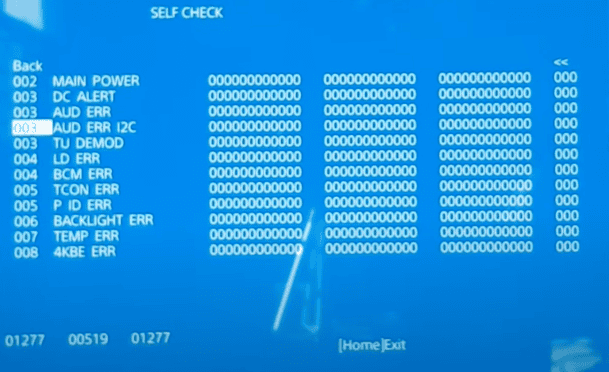
Understanding the Service Menu
The Sony TV Service menu has a variety of settings organized into different categories. Here’s a breakdown of some common sections:
| Section | Description |
|---|---|
| Panel PQ | Controls picture quality, including white balance and color |
| ADC/WB | Stands for “Analog to Digital Conversion/White Balance,” offering fine-grained calibration settings. |
| OPI | Contains screen uniformity adjustments. |
| TT | Abbreviation for “Tool Mode,” includes diagnostic tools and tests. |
Important Considerations
- Document Original Settings: Before modifying anything, carefully note or take photos of the original settings. This will help you revert changes if needed.
- Research Thoroughly: Understand what each setting does before making adjustments. Look for online resources and guides specific to your TV model.
- Proceed With Caution: Small changes can have significant effects. Adjust settings in small increments and observe the results.
Key Takeaways
- The service menu provides advanced settings for Sony TVs.
- Specific button sequences on the remote access the service menu.
- Caution is important as changes can affect TV functionality.
Navigating to the Service Menu
Accessing the service menu on a Sony TV allows for a deeper level of customization and troubleshooting. This section provides specific instructions on how to prepare and access this hidden menu using the remote control.
Understanding Sony TV Service Mode
Service mode, also known as service menu or factory mode, is a hidden menu on Sony TVs not typically accessible to the end user. It’s designed for technicians to diagnose problems and tweak settings that are not available in the regular user interface.
Preparing Your Sony TV
Before entering the service mode, ensure your Sony TV is turned off. Have the remote control handy, as it is the only tool required for this process. There should be no obstructions between the remote control and the TV sensor.
Accessing the Menu Using a Remote Control
To get into the service menu, first power on the TV. Then, point the remote control at the TV sensor and press the following sequence of buttons: Display, 5, Volume Up (+), and then Power. The service menu should appear on the screen. Use the remote’s numeric buttons to navigate through the options. To alter any values, use the number keys and confirm your changes. To leave the service menu, turn off the TV which will exit the menu and save the settings you’ve changed.


