Applying a screen protector on your device is a simple process, but it’s important to prevent air bubbles from getting trapped underneath. Air bubbles not only detract from the appearance but can also affect the functionality of the touch screen. To avoid this, ensure that your device’s screen is clean and free of dust before applying the screen protector.
It’s crucial to properly prepare the screen to ensure a smooth application and prevent dust from getting trapped under the protector. This involves thoroughly cleaning the screen, aligning the protector accurately, and applying it carefully to prevent bubbles. If bubbles do appear, you can typically smooth them out towards the edges using a plastic card or your fingers, as long as the screen protector hasn’t completely adhered to the screen yet.
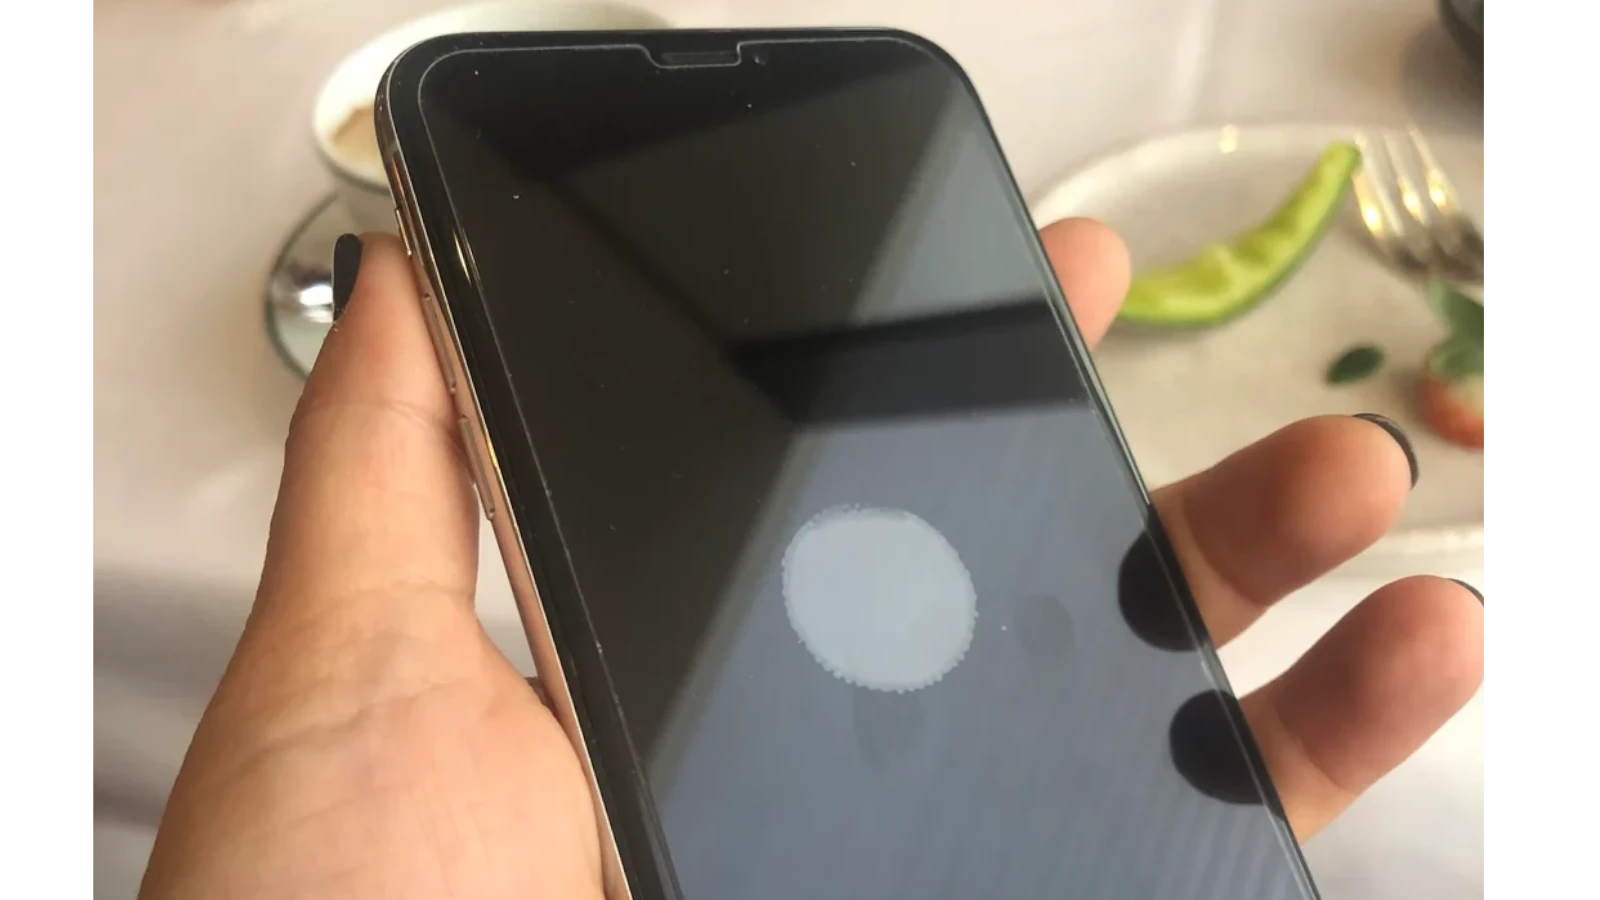
Ways To Remove Air Bubbles From A Screen Protector
- Use a plastic card: Gently push the bubble from the center to the edge with a clean plastic card, like a credit card. For bubbles near the edge, you can try lifting the corner with a thin piece of plastic, then use the card to secure the protector back in place.
- Use a hair dryer: For stubborn bubbles, you can soften the adhesive with low heat from a hair dryer, then press down to smooth them out.
- Reapply the screen protector: You can try reapplying the screen protector, but keep in mind that the adhesive can wear off and more dust can get in. Reapplying too many times can also cause the screen protector to lose its stickiness.
Bubbles can form in a screen protector for a number of reasons, including: Improper installation, Dust on the screen, Oily fingerprints on the glass, and Pressure on the screen protector over time.
To avoid bubbles when installing a screen protector, you can:
- Wash your hands with soap
- Install the screen protector in a dust-free environment
- Clean the screen with the included alcohol pad
Remove Air Bubbles From A Screen Protector
| Method | Description | Best For |
|---|---|---|
| Credit Card/Squeegee | Gently push air bubbles towards the edge of the screen with a credit card wrapped in a microfiber cloth or a squeegee. | Small bubbles, especially near the edges. |
| Vegetable Oil Trick | Dip a Q-tip or cotton swab in a tiny amount of vegetable oil and dab it along the edges of the protector. The oil helps to seal and smooth out bubbles. | Bubbles along the edges that refuse to budge. |
| Re-application | If there are many bubbles or a large dust particle is trapped: * Carefully lift a corner of the screen protector. * Clean the screen thoroughly with a microfiber cloth. * Re-apply the screen protector slowly and carefully. | Multiple bubbles, large bubbles, or dust particles. |
| Humidity (Tempered Glass) | For tempered glass screen protectors, install them in a humid bathroom after running a hot shower. The steam reduces dust and helps the protector adhere more smoothly. | New installations of tempered glass protectors. |
Important Notes:
- Cleanliness is key: Always clean your screen extremely well before applying a screen protector.
- Don’t use fingernails: Avoid lifting the protector with fingernails, as this can introduce more dust or damage the adhesive.
- Prevention: When installing a new screen protector, work slowly and try to line it up perfectly to minimize the chance of bubbles.
Key Takeaways
- Proper device preparation can prevent air bubble formation.
- Most air bubbles can be removed with a plastic card or similar tool.
- Ensuring a dust-free installation environment is key to a bubble-free screen protector application.
Preparing Your Device for Installation
Cleaning the Screen
Start by washing your hands to remove any dirt and oils. Turn off your device and remove its case if you have one. Take a lint-free cloth or a microfiber cloth and gently wipe the screen’s surface. Next, use an alcohol pad to remove stubborn residues and oils. This will ensure the screen is free of any dust particles and fingerprints. After using the alcohol pad, go over the screen once more with the dry side of the cloth for a final clean.
Aligning the Protector
Once the screen is clean, prepare to align the screen protector. Peel off a small portion of the protective film on the adhesive side of the screen protector to start. Carefully place the exposed adhesive side down, starting from one end, usually the one with the camera or speaker cutouts. Check that it lines up perfectly with the edges, buttons, and camera of your device for precise placement. If the alignment is off, gently lift and adjust.
Applying the Screen Protector
After the protector is aligned, slowly peel back the rest of the protective film and press down the protector starting from the center and moving outward. This method helps to eliminate potential bubbles. If you do see air pockets forming, you can use a squeegee tool, if included with your screen protector, or a similar device like a credit card. Wrap it in a microfiber cloth to protect the protector from scratches. Then, push the bubbles out from the center to the edge of the device. If a bubble won’t budge, gently lift the screen protector near the bubble and use the card to press the bubble out as you lay the protector back down.
Eliminating Air Bubbles After Installation
When you’ve just put on a screen protector and notice air bubbles, don’t worry. You can get rid of those pesky bubbles with a few careful steps.
Basic Removal Techniques
First, if you see bubbles under your screen protector, gently push them toward the edges. Start from the center and move outward. Here’s how you can do it:
- Lay your device flat and turn off the screen to see the bubbles clearly.
- Wrap a credit card in a soft microfiber cloth to avoid scratching.
- Gently press the wrapped card against the center of the bubble.
- Slowly slide the card toward the nearest edge to move the bubble out.
- Work with one bubble at a time to avoid new ones forming.
If bubbles remain near the corners, carefully lift the screen protector:
- Use a piece of tape to lift a corner.
- Be sure not to touch the sticky side, as oils from your hands can prevent it from re-adhering.
- Press the protector back down smoothly.
Professional Tips for Stubborn Bubbles
If basic methods fail, here’s what you can try:
Cleaning: Use rubbing alcohol and a cotton swab to clean under the lifted corner.
- Slightly lift the corner near the bubble.
- Clean the screen and the protector with the swab.
- Allow it to dry, then reapply carefully.
Reapplication:
- If numerous bubbles persist, remove the screen protector entirely.
- Use a dust-free cloth to clean the screen.
- Apply the screen protector again slowly, aligning it carefully.
By following these steps, achieving a bubble-free application is possible. Remember to use gentle pressure and clean tools for the best results.
Frequently Asked Questions
Screen protectors are essential for keeping your device’s screen scratch-free, but air bubbles can be frustrating. This section addresses common concerns and offers clear solutions to ensure your screen looks as good as new.
How can air bubbles be removed from the edge of a screen protector?
To remove air bubbles at the edge, gently push them toward the nearest edge using a thin card, like a credit card. A smooth, firm motion works best to slowly move the bubbles out from under the protector.
What is the most effective way to eliminate air bubbles from a screen protector without removal?
Apply gentle pressure with a flat object and push the bubble towards the edge of the screen. Starting from the center and moving outward is often most effective.
Does the use of a hair dryer help in getting rid of screen protector bubbles?
Yes, lightly warming the screen protector with a hair dryer on a low heat setting can help. The warmth loosens the adhesive, making it easier to smooth out the bubbles.
Is it possible for air bubbles under a screen protector to cause damage to the screen?
No, air bubbles themselves do not damage the screen. However, they may obstruct the view and can be annoying to look at.
Over time, do screen protector bubbles disappear on their own?
Some small bubbles may disappear on their own as the adhesive settles. However, larger bubbles usually require manual removal.
What are the steps to remove air bubbles from a screen protector on an iPhone?
Position the iPhone on a flat surface. Use a plastic card at an angle to gently push the bubble from the center of the screen to the edges. This movement helps move the air out and re-adhere the protector smoothly.


