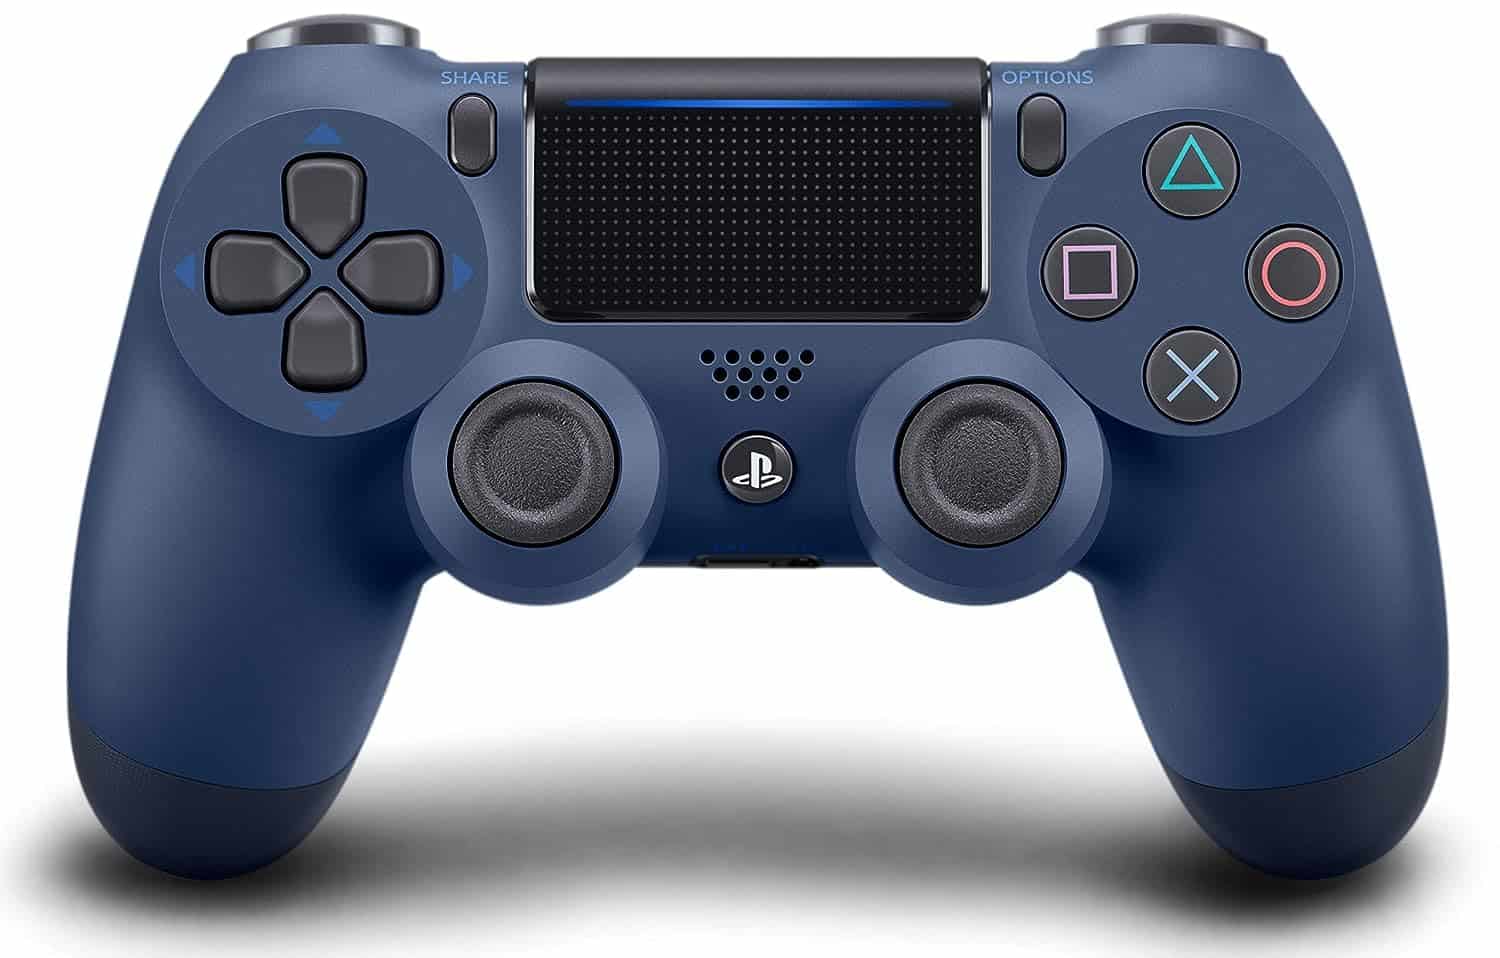
Calibrating your DualShock controller can improve your gaming experience. Unresponsive buttons or drifting analog sticks often signal the need for calibration. Several methods exist to calibrate a DualShock controller, including resetting it on the PS4 or using Windows calibration tools.
The process involves simple steps that gamers can perform at home. For PS4 controllers, pressing specific button combinations and rotating the analog sticks can recenter them. PC users have access to built-in Windows calibration tools for fine-tuning their controllers.
Regular calibration maintains controller accuracy and extends its lifespan. This quick maintenance task can prevent frustrating gameplay issues and ensure precise in-game movements. Gamers who calibrate their controllers often report smoother, more responsive gaming sessions.
Calibrating Your DualShock Controller
Is your DualShock controller acting up? Maybe your character drifts in-game, or the buttons don’t seem as responsive as they should be. It might be time for a calibration! Here’s how to fine-tune your DualShock 4 controller and get it back to its best.
Why Calibrate?
Calibration ensures your controller’s inputs are accurately registered by your PlayStation console. This can fix issues like:
- Stick Drift: When your character moves without you touching the analog stick.
- Button Sensitivity: When buttons don’t respond properly or require excessive pressure.
- Dead Zones: When the initial movement of a stick isn’t registered.
Calibration Methods
There are two main ways to calibrate your DualShock 4:
1. Using the PS4’s Built-in Calibration Tool
- Access Settings: On your PS4, go to Settings > Devices > Controllers.
- Choose “Adjust DualShock 4”: Select this option to start the calibration process.
- Follow the On-Screen Prompts: You’ll be guided through a series of tests, including rotating the sticks, pressing buttons, and testing the trigger sensitivity.
- Reset to Default: If you want to start fresh, you can also choose the “Restore Default Settings” option in the controller settings.
2. Using Steam’s Controller Configuration (for PC Users)
If you’re using your DualShock 4 on PC, Steam offers a robust calibration tool:
- Open Steam’s Big Picture Mode: Launch Steam and enter Big Picture Mode.
- Go to Controller Settings: Navigate to Settings > Controller Settings.
- Detect Your Controller: Make sure your DualShock 4 is connected and detected.
- Calibrate: Select your controller and choose “Calibrate.” You’ll be guided through similar tests to the PS4’s built-in tool.
- Fine-Tune: Steam offers advanced options to adjust dead zones, sensitivity curves, and more.
Additional Tips
- Check for Physical Damage: Before calibrating, inspect your controller for any physical damage that might be causing the issues.
- Update Firmware: Ensure your controller’s firmware is up to date. You can usually do this through the PS4’s settings.
- Clean the Controller: Dirt and debris can interfere with the buttons and sticks. Clean your controller regularly with a soft, dry cloth.
- Consider a Replacement: If calibration doesn’t fix the problem, your controller might be nearing the end of its life. Consider purchasing a new one.
Connecting Your DualShock 4 to Different Devices
Want to use your DualShock 4 with other devices besides your PlayStation 4? Here’s how:
- PC: Connect via Bluetooth or using a USB cable. You may need to install the DS4Windows driver for full compatibility.
- Mobile Devices: Connect via Bluetooth. Many mobile games support DualShock 4 controllers.
- Raspberry Pi: Connect via Bluetooth or USB. You can use your DualShock 4 for retro gaming and other projects on your Raspberry Pi.
Remember to check for specific instructions and compatibility information depending on the device and application you’re using.
Key Takeaways
- Calibration fixes common controller issues like button unresponsiveness and analog stick drift
- PS4 and PC offer different calibration methods for DualShock controllers
- Regular calibration improves gaming performance and extends controller lifespan
Troubleshooting DualShock 4 Connection Issues on PC
If your DualShock 4 controller is connecting to your PC but not being detected or functioning correctly in games or applications, here’s a breakdown of how to troubleshoot the problem:
1. Identify the Issue
- Check Devices and Printers: Open the Control Panel and go to “Devices and Printers.” Connect your controller via USB. Right-click on the controller icon and select “Properties.”
- Inspect Drivers: Under the “Hardware” tab, check the “HID Compliant Game Controller” drivers. If “HIDGuardian” is listed, it might be causing the issue.
2. Uninstall Conflicting Software
- Remove InputMapper: If you have InputMapper installed, uninstall it completely. This often resolves HIDGuardian conflicts.
- Reinstall DS4Windows: If you’ve used older versions of DS4Windows, uninstall and reinstall the latest version to ensure proper driver installation.
3. Manually Uninstall Device Functions
- Open Device Properties: In “Devices and Printers,” open the properties for your wireless controller.
- Uninstall Driver: Go to the “Hardware” tab, select the relevant function (e.g., “Wireless Controller” with Bluetooth icon and “HID Compliant Game Controller”). Click “Change Settings” and then “Uninstall.”
4. Verify Driver Removal
- Reconnect Controller: Reconnect your controller and check the driver details again. You should see “None found/installed” for both the “Wireless Controller” and “HID Compliant Game Controller.”
5. Additional Troubleshooting Steps
- Reinstall Wireless Controller: Uninstall and reconnect your controller to refresh its drivers.
- Check Device Manager: Ensure no USB input or Bluetooth devices are disabled in Device Manager.
- Enable Bluetooth Services: If Bluetooth is not working, check the Bluetooth driver properties under the controller’s properties in “Devices and Printers.” Go to “Services” and ensure Bluetooth drivers are enabled.
- Install DS4Windows: Even if you primarily use Steam, installing DS4Windows can provide necessary drivers for DualShock 4 functionality on Windows.
Other Common Fixes
Here are some other solutions that might help if you’re still experiencing issues:
- Restart Your PC: After making any changes, restart your PC to ensure they take effect.
- Update Controller Firmware: Make sure your DualShock 4 controller’s firmware is up to date.
- Check USB Connections: Try different USB ports and cables to rule out connection problems.
- Disable Other Input Devices: Temporarily disconnect other controllers or input devices that might be interfering.
- Consult Online Forums: Search for your specific issue online; communities like Reddit or Steam forums often have helpful advice.
Understanding Dualshock Controller Issues
Dualshock controllers can experience various problems that affect gameplay. Knowing how to identify and address these issues is key for PlayStation users.
Identifying Common Problems
Stick drift is a frequent issue with Dualshock controllers. This occurs when the thumbsticks register movement without being touched. Players may notice their character moving on its own or the camera spinning unexpectedly.
Button responsiveness can also decline over time. The L3 and R3 buttons, activated by pressing down on the thumbsticks, may become less sensitive or stop working entirely.
Connectivity problems are another concern. Controllers might disconnect randomly or fail to sync with the console. This can disrupt gameplay and cause frustration.
The Role of Calibration
Calibration helps resolve many controller issues. It resets the neutral position of the thumbsticks and ensures accurate input recognition.
The PS4 has a built-in calibration process. Users can access it through the console’s settings menu. This tool guides players through a series of steps to recenter the analog sticks.
For more precise calibration, third-party software on PC can be used. These programs offer detailed adjustment options for stick sensitivity and dead zones.
Regular calibration can prevent stick drift and improve overall controller performance. It’s a simple yet effective maintenance step for Dualshock owners.
Comparing Dualshock and Dualsense Controllers
The Dualshock 4 is the standard controller for PS4, while the Dualsense is designed for PS5. Both share similar layouts but have distinct features.
Dualsense introduces adaptive triggers and haptic feedback. These technologies offer more immersive gameplay experiences. The Dualshock 4 lacks these advanced features.
Calibration processes differ between the two. Dualsense controllers often require less manual calibration due to improved internal sensors. Dualshock 4 controllers may need more frequent adjustments.
Compatibility is another key difference. Dualshock 4 works with PS4 and PC, while Dualsense is fully compatible with PS5 and offers limited functionality on other platforms.
Step-by-Step Calibration Guide
Calibrating a DualShock controller involves several methods. These range from using built-in Windows tools to performing manual resets and even utilizing advanced scripting techniques.
Using the Windows Calibration Tool
Windows offers a built-in calibration tool for game controllers. This tool helps adjust the sensitivity and deadzone of analog sticks.
- Connect the DualShock controller to the PC via USB.
- Open the Control Panel and navigate to “Devices and Printers.”
- Right-click on the controller icon and select “Game Controller Settings.”
- Click “Properties” and then “Calibrate.”
- Follow the on-screen instructions to center and test the analog sticks.
- Adjust deadzone settings if needed.
This process can fix minor stick drift issues and improve overall controller responsiveness.
Performing a Soft Reset
A soft reset can resolve many controller issues without data loss. This method often fixes connection problems and minor calibration errors.
Steps:
- Locate the small reset button on the back of the controller.
- Use a paperclip to press and hold the button for 5 seconds.
- Release the button and reconnect the controller to the console or PC.
- Test the controller to check if the issue is resolved.
Soft resets are quick and non-invasive, making them a good first step in troubleshooting.
Executing a Hard Reset
Hard resets are more thorough than soft resets. They can fix persistent calibration issues but may require re-pairing the controller.
Process:
- Turn off the console or disconnect from the PC.
- Remove the controller’s battery (if possible) for 30 seconds.
- Reinsert the battery and hold the PS button for 10 seconds.
- Connect the controller to the console or PC using a USB cable.
- Press the PS button to re-pair the controller.
This method can resolve more stubborn calibration problems and connectivity issues.
Advanced Solutions: Scripting with Python
For tech-savvy users, Python scripting offers a powerful calibration method. This approach allows for fine-tuned adjustments beyond standard tools.
Key steps:
- Install Python and necessary libraries (e.g., pyusb, pyjoy).
- Write a script to read controller input data.
- Analyze the data to identify calibration issues.
- Create adjustment algorithms based on the analysis.
- Apply the calibration changes through the script.
This method requires programming knowledge but provides the most precise calibration. Users can tailor the script to address specific controller quirks or preferences.
Frequently Asked Questions
Calibrating a PS4 controller can solve various issues and improve gameplay. These common questions address key aspects of the calibration process for different scenarios.
How can I calibrate my PS4 controller to fix stick drift issues?
To fix stick drift, turn off the PS4 console. Press and hold L3 and R3 buttons for 30 seconds. Release and rotate both analog sticks clockwise five times, then counterclockwise five times. Press and hold L3 and R3 again for 30 seconds. This process can help recenter the analog sticks.
What steps are needed to recalibrate a PS4 controller?
Recalibration involves a few simple steps. Ensure the console is off. Press and hold the L3 and R3 buttons for 30 seconds. Release and rotate both analog sticks in both directions. Finish by pressing L3 and R3 again for 30 seconds. This procedure can improve controller responsiveness.
Is there specific calibration software for a PS4 controller?
Sony does not offer official calibration software for PS4 controllers. Third-party tools exist for PC use, but these are not officially supported. The built-in calibration method using button combinations is the recommended approach for PS4 systems.
How do I perform a controller calibration test on my PS4?
The PS4 does not have a built-in calibration test. Users can check controller accuracy in games with precise aiming requirements. Some games offer sensitivity settings to fine-tune controller response. Testing in various games can help identify calibration issues.
In what way can I calibrate my PS4 controller when connected to a PC?
Calibrating a PS4 controller on PC requires specific steps. Connect the controller via USB or Bluetooth. Access the Windows Game Controllers settings. Select the PS4 controller and click “Properties.” Use the built-in calibration tool to adjust stick sensitivity and dead zones.
What are the procedures to calibrate a PS4 Move controller?
PS4 Move controllers use a different calibration process. Turn on the PS4 and connect the Move controller. Navigate to Settings > Devices > PlayStation Move. Follow the on-screen instructions to calibrate the motion sensors. This typically involves rotating the controller in various directions.

