The paperclip test is a quick and easy way to conduct a preliminary assessment of your PSU’s health if your computer fails to power on. It can help you determine if the PSU is causing the issue. It’s important to note that while a spinning fan is a positive sign, it does not definitively guarantee a perfectly functioning PSU. If you continue to experience problems, further investigation or professional assistance might be necessary.
But the paperclip test is still a good ‘first step’ to rule out several issues if your computer isn’t turning on. The good news is that there’s a quick and easy test, called the ‘Paperclip Test’, which can check to see if ATX PSUs will at least power on. This test is fairly simple to perform.
Important Note: While the paperclip test is relatively straightforward, it’s important to handle electronics with care. Always double-check your connections before powering on the PSU. If you’re uncomfortable working with electronics, consider seeking help from a professional.
Unmasking PSU Problems: The Paperclip Test Explained
When your computer refuses to power on, the culprit might be a faulty power supply unit (PSU). Before you rush to replace it, a simple paperclip test can offer valuable insights into its functionality.
Understanding the Paperclip Test
The paperclip test, also known as the “jumper test,” is a basic way to check if your PSU is working without connecting it to your entire PC setup. By shorting specific pins on the PSU’s main 24-pin connector, you can trick it into thinking it’s connected to a motherboard and initiate a power-on sequence.
Performing the Test
| # | Step | Instructions |
|---|---|---|
| 1 | Safety First | Turn off and unplug your PSU from the wall outlet. Disconnect all cables from the PSU except for the main 24-pin connector. |
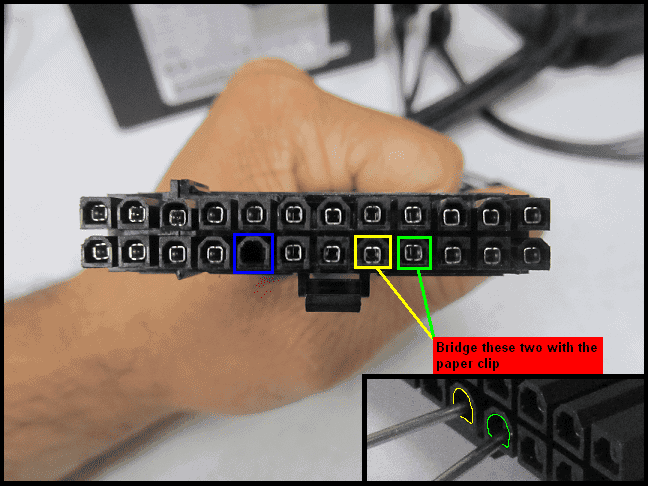
| 2 | Identify the Pins | Locate pin 16 (green) and pin 17 (black) on the 24-pin connector. If all wires are black, consult your PSU’s manual for the correct pins. |
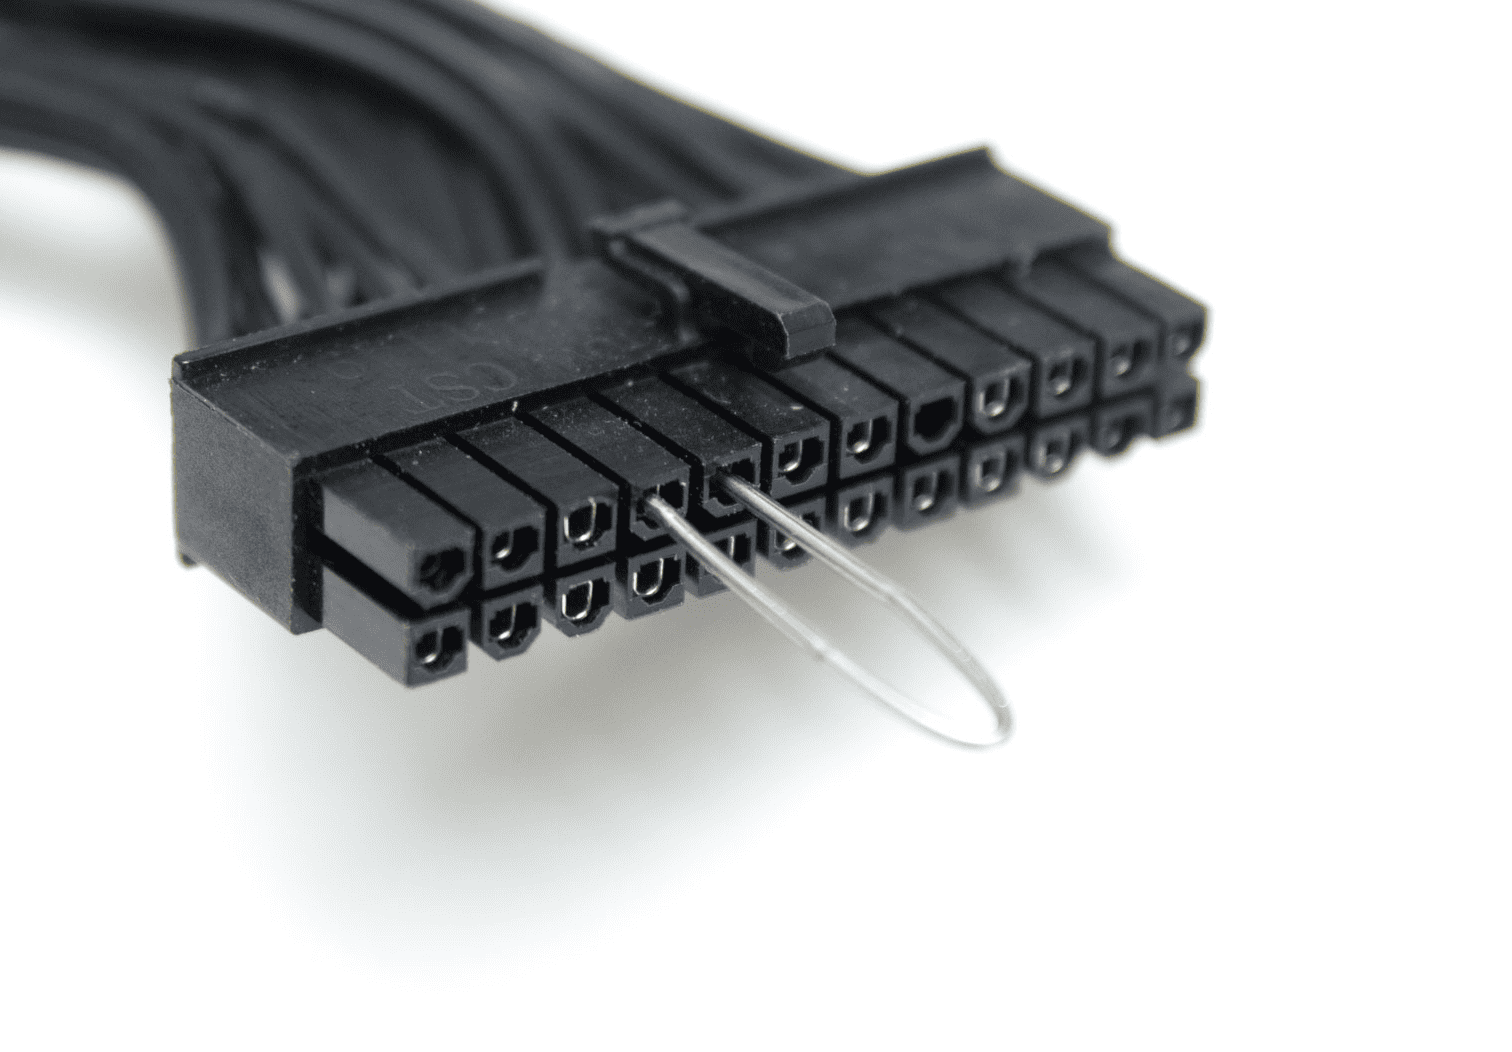
| 3 | Prepare the Paperclip | Unbend a paperclip so you have a U-shape with two exposed ends. |
| 4 | Connect the Pins | Carefully insert the ends of the paperclip into pin 16 and pin 17. Ensure a good connection. |
| 5 | Power On | Turn on the PSU switch. |
| 6 | Observe | If the PSU’s fan spins, it’s a good sign that the PSU is working. If not, it might be faulty and needs replacement. |
Important Notes
- Safety: Always handle the PSU with care. Avoid touching any exposed wires or components while the power is on.
- Limitations: The paperclip test only checks for basic functionality. It doesn’t diagnose more complex PSU issues.
- Alternatives: If you’re uncomfortable performing the paperclip test or need a more thorough diagnosis, consider using a PSU tester or seeking professional help.
PSU Paperclip Test Steps
What You’ll Need:
- A paperclip (unbent)
- Your computer’s PSU (disconnected from the computer)
Safety Precautions:
- Only perform this test with the PSU disconnected from the computer and the wall outlet.
- Do not touch any components inside the PSU.
- Avoid letting the paperclip slip and shorting unintended pins.
Instructions:
- Unplug the PSU from your computer and the wall outlet.
- Locate the 24-pin ATX connector on the PSU. This is the large rectangular cable that plugs into your motherboard.
- Consult your PSU manual or a pinout diagram to identify the specific pins. You’ll need to locate the green wire (usually labeled “PS_ON”) and a black ground wire.
- Straighten the paperclip.
- Carefully insert one end of the paperclip into the green wire pin on the 24-pin connector.
- Touch the other end of the paperclip to a black ground wire pin on the same connector.
Testing and Results:
- With the paperclip still connected, plug the PSU back into the wall outlet.
- Flip the power switch on the back of the PSU to the “ON” position.
- If the PSU is functioning properly, the fan inside should spin up. This indicates that the PSU is receiving power and can turn on.
- If there is no reaction, the PSU likely has a fault and may need to be replaced.
Remember:
- The paperclip test only checks if the PSU can turn on. It doesn’t guarantee the PSU is delivering proper voltage or is otherwise healthy.
- If the paperclip test fails, it’s best to replace the PSU. A faulty PSU can damage other components in your computer.
- If the paperclip test succeeds but your computer still won’t turn on, the issue may lie elsewhere (e.g., motherboard, RAM).
PSU Paperclip Test Steps (In Table Format)
If you’d rather go through the steps one after another, here’s the same test shown in an easy to follow table format:
| Step | Description |
|---|---|
| 1. Gather your materials. | You will need a paperclip or short “jumper” cable, the PSU you’re testing, and an AC power cable. |
| 2. Unplug Everything | While setting up, make sure everything is unplugged from your wall outlet and the PSU isn’t connected to your motherboard. |
| 3. Locate the green and black wires on the 24-pin ATX power connector. | The 24-pin ATX connector is the largest connector on the PSU. It is usually black and has a clip on one side. |
| 4. Straighten the paperclip. | You will need to straighten the paperclip into a U shape. |
| 5. Insert the paperclip’s ends into the green and black wires. | Bend the ends of the paperclip so that they can make contact with the metal terminals of the green and black wires. |
| 6. Plug In & Start the PSU. | With the paperclip in place, plug it into the wall outlet and turn on the PSU by flipping the switch on the back of the unit. |
If the PSU is functioning properly, the fan will start spinning and the power supply will be on.
Here are some additional things to keep in mind:
- Do not touch the paperclip while it is inserted into the PSU. The paperclip can become hot and may cause burns.
- This test only checks if the PSU is turning on. It does not test the output voltage of the PSU.
- If the PSU does not turn on, it is likely faulty and needs to be replaced.
- It is always important to consult your computer’s user manual or a qualified technician before attempting any hardware troubleshooting.
Alternative Method: Using A PSU Tester

A PC PSU tester goes beyond the simple on/off check of the paperclip test. It acts like real components, placing a load on the PSU’s voltage outputs and measuring how well it delivers power under simulated use. This allows for a more thorough diagnosis, displaying voltage readings and sometimes offering features like adjustable load levels and error indicators. While not a replacement for professional help, a PSU tester is a valuable tool for anyone maintaining or troubleshooting computer systems by providing a detailed picture of the PSU’s health.
How To Interpret The Results
| Result | Meaning |
|---|---|
| PSU fan spins and power supply is on | PSU is functioning properly |
| PSU fan does not spin and power supply is not on | PSU is likely faulty and needs to be replaced |
By following these steps and referring to the table, you can easily perform the power supply paperclip test and determine if your PSU needs to be replaced.
Additional Information
Understanding the Power Supply
The power supply is an essential component of your computer, converting power from the wall outlet into usable energy for your computer’s components. It’s the lifeblood of your system, and if it fails, your computer won’t operate correctly.
Need for Power Supply Testing
Common signs of power supply problems include unexpected shutdowns, system instability, and inability to turn on the computer. Testing your power supply can help diagnose these issues and potentially prevent further damage to your computer.
The Power Supply PaperClip Test
The PaperClip Test is a straightforward method of testing a power supply. It works by tricking the power supply into thinking it’s connected to the motherboard. This method is widely used due to its simplicity and effectiveness.

How to Perform the Power Supply PaperClip Test
To perform the test, you’ll need a paperclip, some electrical tape for safety, and your power supply. Start by unplugging your power supply, bending the paperclip into a U shape, and inserting it into the green and black pins on the power supply’s connector. After securing the paperclip, plug your power supply back in and turn it on.
Interpreting the Results of the PaperClip Test
If your power supply’s fan starts spinning, it’s getting power, which means it’s likely not the source of your computer’s issue. However, if the fan doesn’t spin, the power supply may be dead or malfunctioning.
If the power supply works, you may need to look elsewhere for the source of your computer’s problems. If it doesn’t, consider consulting a professional or replacing the power supply yourself if you’re comfortable doing so.
FAQs
What is the Power Supply PaperClip Test?
The Power Supply PaperClip Test is a simple diagnostic method used to test whether a computer’s power supply is working.
Why should I perform the PaperClip Test?
The test can help diagnose potential issues with your computer’s power supply, which could be causing system instability or shutdowns.
How do I perform the PaperClip Test?
The test involves using a paperclip to connect the green and black wires on your power supply’s connector, simulating the power-on signal usually given by the motherboard.
What if my power supply passes the PaperClip Test?
If your power supply passes the test, it’s likely functioning correctly, and you may need to investigate other potential causes for your computer’s issues.
What if my power supply fails the PaperClip Test?
If your power supply fails the test, it’s likely malfunctioning and may need to be replaced or repaired by a professional.


