Auto clickers can boost productivity on iPhones by automating repetitive tasks. These tools allow users to set up automatic taps at specific screen locations, saving time and effort. iOS devices now offer built-in auto click functionality through AssistiveTouch, eliminating the need for third-party apps.
Setting up an auto clicker on an iPhone is straightforward. Users can access this feature in the Accessibility settings. By enabling AssistiveTouch and configuring custom actions, iPhone owners can create tap sequences that repeat automatically. This function proves useful for games, form-filling, and other tasks requiring multiple taps.
Auto clickers on iPhones have limitations. They work best for simple, repetitive actions and may not suit complex tasks. Users should also be aware of potential conflicts with app terms of service when using auto clickers, especially in competitive gaming scenarios.
Using Auto Clickers on Your iPhone
What is an Auto Clicker?
An auto clicker is a software tool that automates mouse clicks or screen taps. It can simulate rapid clicks or taps at specific intervals and locations on your device’s screen. People use auto clickers for various reasons, such as automating repetitive tasks in games, software testing, or accessibility needs.
Auto Clickers and iPhones
iPhones do not have a built-in auto clicker feature. However, you can achieve similar functionality using a feature called Switch Control. Switch Control is designed to help people with physical disabilities interact with their devices. It can also function as a basic auto clicker.
How to Set Up Switch Control as an Auto Clicker
Here’s how to set up Switch Control to simulate auto clicks on your iPhone:
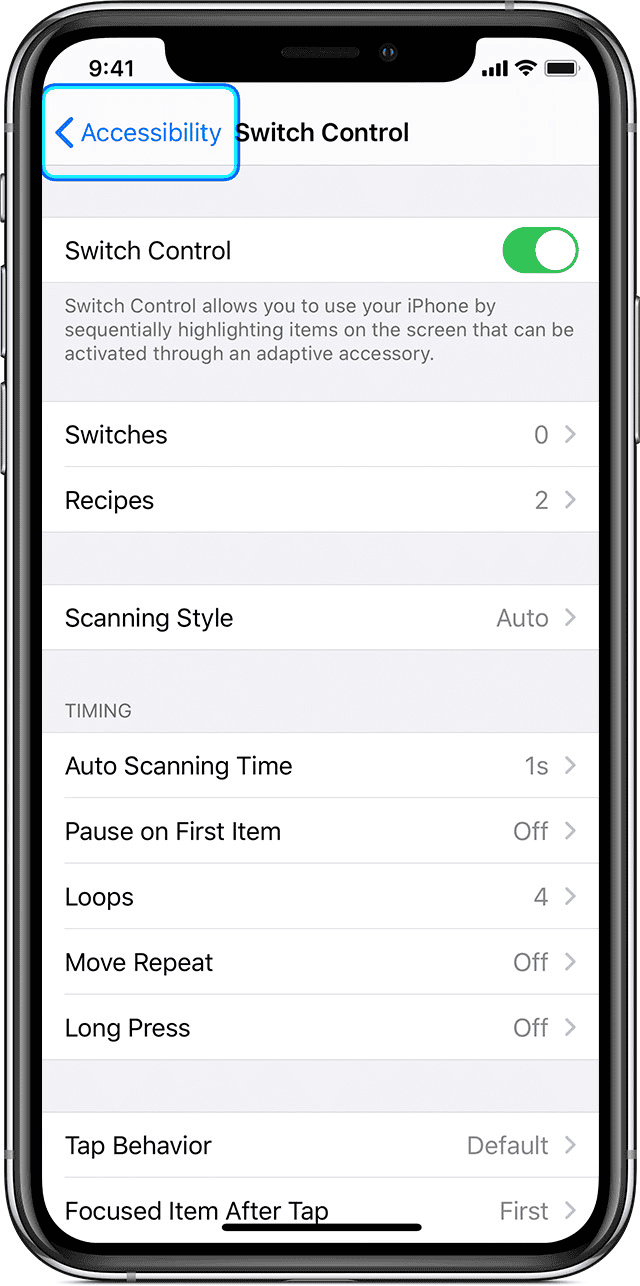
- Enable Switch Control: Go to Settings > Accessibility > Switch Control. Turn the Switch Control toggle on.
- Set Up a Switch: You’ll need to set up a switch. For auto clicking, the “Screen” switch is the most useful. Tap “Switches” then “Add New Switch…” and choose “Screen”. Tap anywhere on the screen to set this as your switch.
- Create a Recipe: A recipe tells Switch Control what actions to perform. Go back to the main Switch Control menu and tap “Recipes” then “Create New Recipe…” Give your recipe a name like “Auto Clicker.”
- Assign a Switch to the Recipe: Under “Assign a Switch,” tap “Full Screen” (or whichever switch you created).
- Choose a Gesture: Tap “Custom Gesture.” Now, tap repeatedly on the screen where you want the auto clicks to occur. This records the tap locations and timing. When done, tap “Stop.”
- Activate the Recipe: Go back to the main Switch Control menu. Under “Launch Recipes,” choose your “Auto Clicker” recipe.
- Start Auto Clicking: Triple-click the side button (or home button on older iPhones) to activate Switch Control. The screen will scan. When the scanner highlights your chosen area, tap the screen (your designated switch) to start the auto clicking.
- Stop Auto Clicking: Triple-click the side button again to turn off Switch Control.
Adjusting Auto Click Speed
The speed of the auto clicks depends on how quickly you tapped when recording the custom gesture. You can adjust the scanning speed in Switch Control settings. This affects how fast the scanner moves between items on the screen, indirectly affecting the time between clicks.
Pros and Cons of Using Switch Control as an Auto Clicker
| Pros | Cons |
|---|---|
| Built-in feature, no need for third-party apps. | Can be complicated to set up. |
| Free to use. | Not as precise or flexible as dedicated auto clicker apps on other platforms. |
| Useful for accessibility. | May interfere with some games or apps. |
Alternatives to Switch Control
Because iPhones do not allow direct installation of auto clicker apps like Android, Switch Control is the most common solution. Jailbreaking your device was a method to install such apps in the past, but this is not recommended due to security risks and voiding your warranty.
Using Auto Clickers Responsibly
It’s important to use auto clickers responsibly. Some games and apps may prohibit their use, and using them could result in account suspension or other penalties. Always check the terms of service of any app or game before using an auto clicker.
Other Accessibility Features on iPhone
Besides Switch Control, iPhones offer many other accessibility features that can be useful for various needs. Voice Control allows you to control your device using your voice. You can open apps, navigate menus, and even dictate text using voice commands. Guided Access lets you lock your iPhone to a single app. This is helpful for people with attention or sensory challenges, as it prevents them from accidentally navigating away from the app they are using. Zoom magnifies the entire screen, making it easier for people with low vision to see content. These features, combined with Switch Control, make iPhones more accessible to a wider range of users.
Key Takeaways
- iPhones have a built-in auto clicker feature called AssistiveTouch
- Auto clickers can automate repetitive taps for increased productivity
- Users should consider app policies before using auto clickers in games
Setting Up AssistiveTouch for Autoclick Functionality
AssistiveTouch provides a powerful way to create custom auto-clicking functionality on iPhones. This feature allows users to automate repetitive tapping actions without the need for third-party apps.
Enabling AssistiveTouch
To begin setting up auto-click functionality, users must first enable AssistiveTouch on their iPhone. Here’s how:
- Open the Settings app
- Tap Accessibility
- Select Touch
- Tap AssistiveTouch
- Toggle the switch to turn on AssistiveTouch
A small circular button will appear on the screen. This button serves as the control center for AssistiveTouch features.
Users can customize the appearance and opacity of the AssistiveTouch button in the settings. Adjusting these options can help minimize visual distraction during use.
Creating a Custom Gesture for Tapping
With AssistiveTouch enabled, the next step is to create a custom gesture for tapping:
- In AssistiveTouch settings, tap “Create New Gesture”
- Tap the screen where you want the auto-click to occur
- Tap “Stop” when finished
- Name your gesture (e.g., “Auto Tap”) and save it
Users can create multiple custom gestures for different tapping locations or patterns. This flexibility allows for various auto-clicking needs across different apps or games.
Configuring Tapping Patterns and Intervals
To set up the auto-clicking pattern:
- Go back to AssistiveTouch settings
- Tap “Create New Custom Action”
- Select your saved custom gesture
- Choose “Loop” and set the desired number of repetitions
- Adjust the pause between loops to control click speed
For continuous tapping, set the loop count to a high number. Users can fine-tune the click interval to match the specific requirements of their task or game.
To activate the auto-click:
- Tap the AssistiveTouch button
- Select your custom action
The iPhone will now perform the tapping action automatically according to the set pattern and interval.
Advanced Auto Clicker Features
Auto clicker apps for iPhone offer sophisticated capabilities beyond basic tapping. These features enhance automation and provide more control over repetitive tasks.
Utilizing Auto Clicker – Automatic Tap App
Auto Clicker – Automatic Tap is a popular app for iPhone users. It allows users to set up custom tapping patterns. The app offers adjustable click intervals, ranging from milliseconds to seconds. Users can create multiple tapping sequences for different tasks.
The app includes a coordinate system for precise tap locations. This feature is useful for games or apps that require specific screen interactions. Auto Clicker – Automatic Tap also provides a scheduling feature. Users can set start and end times for automated tapping sessions.
Implementing Switch Control for Enhanced Automation
Switch Control is a built-in iOS accessibility feature that can function as an auto clicker. It allows users to control their device with external switches or screen taps. To set up Switch Control:
- Go to Settings > Accessibility > Switch Control
- Enable Switch Control
- Set up switches (can be screen taps or external devices)
- Create custom gestures for repetitive actions
Switch Control offers more system-wide automation compared to third-party apps. It can perform complex sequences of actions across different apps and screens.
Best Practices for Click Type and Swiping
Auto clicker apps support various click types and swiping motions. Users should choose the appropriate action for their task:
- Single taps: Best for simple, repetitive actions
- Double taps: Useful for zooming or selecting items
- Long presses: Ideal for triggering context menus or drag actions
- Swipes: Effective for scrolling or navigating between screens
To reduce finger strain, users should set reasonable intervals between actions. For swiping, adjust speed and direction settings to mimic natural finger movements. This helps avoid detection in apps that monitor for automated behavior.
When using auto clickers, test settings on non-critical tasks first. This ensures the automation works as intended before applying it to important activities.
Frequently Asked Questions
Auto clickers can be useful tools for iPhone users, but they often raise questions about setup, compatibility, and usage. This section addresses common inquiries to help users navigate the world of auto clickers on iOS devices.
What steps are required to activate an auto clicker on an iPhone?
To activate an auto clicker on an iPhone, users need to download a compatible app from the App Store. After installation, they should open the app and follow the on-screen instructions. Most auto clicker apps require users to set up custom gestures or tapping patterns.
Users may need to grant necessary permissions for the app to function properly. Some auto clickers use the Accessibility features of iOS, which can be enabled in the Settings menu.
What is the process to obtain an auto clicker for gaming purposes, such as Roblox, on an iPhone?
Obtaining an auto clicker for gaming on an iPhone involves searching the App Store for gaming-specific auto clicker apps. Users should look for apps with positive reviews and ratings from other gamers.
It’s important to check if the chosen app is compatible with the desired game, such as Roblox. Some auto clickers are designed with specific games in mind, offering preset configurations for popular titles.
How does one deactivate an auto clicker on an iPhone?
Deactivating an auto clicker on an iPhone is typically straightforward. Users can close the auto clicker app completely by swiping it up in the app switcher.
For auto clickers that use Accessibility features, users should navigate to Settings > Accessibility and turn off the relevant switches. It’s crucial to ensure all auto clicking functions are disabled to prevent unintended actions.
Which auto clicker applications are free and compatible with the iPhone?
Several free auto clicker applications are available for iPhone users. Popular options include “Auto Clicker” and “AutoTouch.” These apps often offer basic functionality at no cost.
Free versions may have limitations on features or usage time. Users should read app descriptions carefully to understand what is included in the free version and what requires in-app purchases.
Are there any auto clickers available for download on iOS devices?
Yes, auto clickers are available for download on iOS devices through the App Store. Apple’s strict app policies mean that these auto clickers often function differently from their Android counterparts.
iOS auto clickers typically work within the confines of Apple’s operating system. They may use custom keyboards, screen recording features, or Accessibility settings to achieve auto-clicking functionality.
What are the best auto clickers for iOS, particularly for gaming apps like Roblox?
The best auto clickers for iOS gaming apps like Roblox often include features such as customizable tap sequences and adjustable click intervals. “Auto Clicker for Games” and “Autoclicker – Auto Tap” are highly rated options.
Users should consider factors like ease of use, compatibility with specific games, and customer support when choosing an auto clicker. Reading user reviews can provide insights into how well an auto clicker performs with particular games.


