Losing important files—whether it’s due to accidental deletion, drive failure, or partition corruption—can feel catastrophic. Fortunately, 2025 has brought a new wave of powerful data recovery software options, ranging from beginner-friendly tools to enterprise-grade recovery platforms.
This updated guide highlights the most capable and reliable data recovery solutions based on independent testing, expert reviews, and new industry developments.
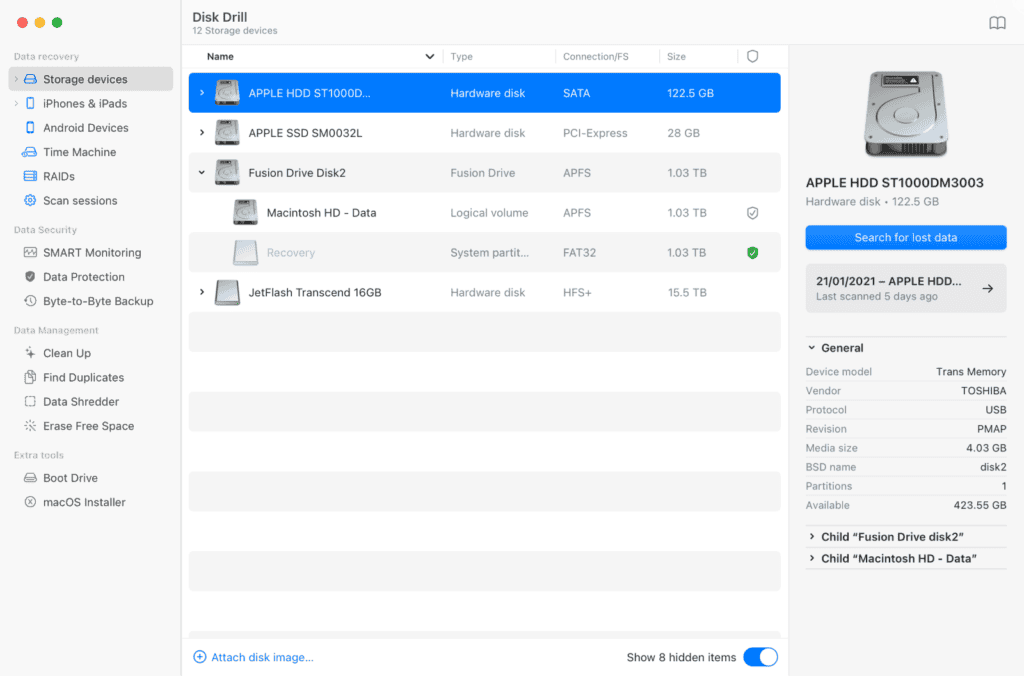
Best Overall (and Free-Friendly): Disk Drill
Platform: Windows & macOS
Best For: Everyday users and professionals needing fast, effective recovery
Disk Drill continues to dominate in 2025 thanks to its intuitive interface and deep recovery capabilities. It recovers deleted files from internal and external drives, USBs, memory cards, and more. The latest version supports up to 500 MB of free data recovery, making it a perfect starting point for most users.
Highlights:
- Supports 400+ file types
- Byte-level backup and SMART monitoring
- Quick scan and deep scan modes
- Mac version includes iOS and Android support
Recovery rate: Up to 97% success in deleted file recovery tests
Best Open-Source Recovery Tools: TestDisk & PhotoRec
Platform: Windows, macOS, Linux
Best For: Advanced users, partition repair, raw file recovery
These command-line tools are favored by tech-savvy users and data recovery pros for being lightweight and incredibly powerful. TestDisk is great for repairing damaged partitions, while PhotoRec focuses on recovering files from formatted or damaged storage—even when the filesystem is unreadable.
Highlights:
- PhotoRec supports 480+ file extensions
- No installation required
- Cross-platform and completely free
Use case: Excellent for recovering data from corrupted SD cards or external drives without relying on proprietary interfaces.
Easiest to Use: Recuva & EaseUS Data Recovery Wizard
Platform: Windows (Recuva), Windows/macOS (EaseUS)
Best For: Beginners, casual recovery needs
Recuva (from the creators of CCleaner) remains a top choice for quick scans and undeleting files, especially for free. Meanwhile, EaseUS offers a more robust interface with guided recovery, making it ideal for first-time users.
EaseUS Highlights:
- Deep scan mode
- Supports over 1,000 file types
- Recovers from HDD, SSD, USB, camera cards
Recuva Highlights:
- Lightweight installer
- Secure file deletion options
- Portable version available
EaseUS Discount: 25% off with promo code TECHRAD25
For IT Professionals: R‑Studio & DMDE
Platform: Windows, macOS, Linux
Best For: Complex recovery, RAID, and forensic data retrieval
R‑Studio is widely used in professional labs thanks to its advanced features like RAID reconstruction, network recovery, and raw file extraction. It supports virtually every file system and includes a powerful hex editor for manual operations.
DMDE (DM Disk Editor and Data Recovery) is another underrated gem for specialists. It’s lightweight but highly capable—particularly when dealing with deleted partitions, sector-by-sector imaging, or filesystem repair.
R‑Studio Highlights:
- Supports NTFS, HFS, EXT, APFS, ReFS, and more
- Network recovery tools
- Disk imaging and cloning
DMDE Highlights:
- Raw search and file carving
- Effective for RAID recovery
- Partition manager and hex editor built-in
For Mobile and High-Volume Recovery: Stellar Data Recovery 12.0
Platform: Windows, macOS, iOS, Android
Best For: Businesses, large recovery jobs, mobile data retrieval
Stellar’s new version includes support for RAID 0, 5, and 6, encrypted drives, and multiple external device formats. Its clean interface also makes it viable for non-tech users, while professionals will appreciate its cloning and forensic tools.
Highlights:
- Scans corrupted or non-bootable systems
- Supports lost email file recovery (PST, EDB)
- Repaired video/photo files (Premium edition)
AI-Driven Enterprise Backup: Veeam
Platform: Business / Enterprise Systems
Best For: Corporate environments, ransomware defense, immutable backups
In early 2025, Microsoft announced a major investment in Veeam Software to accelerate the development of AI-powered recovery tools and advanced threat detection. Veeam now leads the charge in enterprise-grade backup strategies with seamless integration across cloud and on-prem systems.
Highlights:
- Ransomware detection and rollback
- Immutable storage support
- AI-assisted anomaly monitoring
- Automated recovery orchestration
Note: Veeam isn’t traditional “data recovery” software—but it’s crucial for businesses needing secure, full-system backups with fast disaster recovery.
Recommended Picks by Use Case
| Use Case | Recommended Software |
|---|---|
| Best Free & Easy Recovery | Disk Drill |
| Command-Line or Tech-Savvy Users | TestDisk & PhotoRec |
| Quick Desktop Recovery | Recuva / EaseUS |
| Advanced Professional Lab Use | R‑Studio / DMDE |
| Mobile & High-Volume File Recovery | Stellar Data Recovery 12.0 |
| AI-Driven Enterprise Backup & Restore | Veeam (MS-Backed) |
Final Thoughts
- Start with Disk Drill if you’re recovering personal files or testing the waters. It balances power and ease-of-use better than most.
- Try TestDisk or DMDE if you’re confident navigating technical tools—or need to recover from partition corruption.
- Use R‑Studio or Stellar Data Recovery if you’re handling serious data loss scenarios or enterprise volumes.
- Consider Veeam if your business needs fast, secure, and AI-enhanced disaster recovery across systems.
Need help picking the right one for your system? Tell me your OS, device type (laptop, phone, external drive), and what happened—and I’ll recommend the best tool for the job.
The Computer Has Rebooted From a Bugcheck
Have you ever experienced your computer suddenly restarting with an error message about a “bugcheck”? This frustrating issue, commonly known as the Blue Screen of Death (BSOD), happens when Windows encounters a critical system error it cannot recover from. A bugcheck occurs when the operating system detects a serious problem with hardware drivers, memory corruption, or system files that forces it to restart for protection.
Many users face this problem after a recent Windows update or driver installation. The error message typically appears in the Event Viewer and provides some technical details about what went wrong. While it might seem alarming, most bugcheck situations can be resolved with the right troubleshooting steps.
The good news is that you don’t need to be a tech expert to fix most bugcheck errors. Simple solutions like updating device drivers, running system file checks, or testing your computer’s memory can often resolve the issue. In some cases, the problem might be caused by faulty hardware that needs repair or replacement.
The message “The Computer Has Rebooted From a Bugcheck” is essentially Windows telling you that it encountered a critical error (often referred to as a Blue Screen of Death or BSOD) that forced it to shut down and restart to prevent further damage. These errors are usually caused by problems with hardware, drivers, or corrupted system files.
Here’s a breakdown of what to do and common causes:
Common Causes:
- Faulty Hardware: This is a very common culprit.
- RAM (Memory): Insufficient or malfunctioning RAM is a frequent cause.
- Hard Drive/SSD: Corruption or issues with your storage drive.
- Graphics Card (GPU): Outdated, corrupted, or faulty graphics drivers are especially common, particularly if the error occurs when running graphics-intensive applications like games.
- Overheating: Components malfunctioning due to excessive heat can trigger these errors.
- Problematic Drivers:
- Outdated Drivers: Drivers that are not compatible with your current Windows version or other hardware can cause conflicts.
- Corrupted Drivers: A driver installation that went wrong can lead to instability.
- Recently Installed Drivers: If you just installed a new driver, that’s a strong suspect.
- Corrupted System Files: Essential Windows files can become damaged, leading to system instability.
- Software Conflicts: Sometimes, a specific program (especially newly installed ones or those with low-level system access, like some anti-cheat software) can cause issues.
- Outdated BIOS/UEFI Firmware: Old firmware can lead to compatibility problems.
- Overclocking or XMP Profiles: If you’ve manually overclocked your CPU/GPU or enabled XMP for your RAM, these settings can sometimes cause instability.
What to Do (Troubleshooting Steps):
It’s best to approach this systematically.
- Note the Bugcheck Code (if available):
- Often, the error message will include a hexadecimal code (e.g.,
0x0000001A,0x00000116). This code can provide clues about the specific nature of the error (e.g.,0x0000001Aoften points to memory management issues). - If you can get into Windows, you can check the “Event Viewer” (under “Windows Logs” -> “System”) for “Event ID 1001” which corresponds to a bugcheck.
- Often, the error message will include a hexadecimal code (e.g.,
- Check for Recent Changes:
- Did you install new hardware or software recently?
- Did you update any drivers?
- Rolling back these changes might resolve the issue.
- Update Drivers:
- Graphics Drivers: This is often the first place to start, especially if the error occurs during gaming or video playback.
- Go to Device Manager (right-click Start button).
- Expand “Display adapters,” right-click your graphics card, and choose “Update driver.”
- If that doesn’t work, consider visiting the manufacturer’s website (NVIDIA, AMD, Intel) to download and install the latest driver directly. Sometimes, uninstalling the current driver completely with a tool like Display Driver Uninstaller (DDU) before installing a fresh one is recommended.
- Other Device Drivers: Check for updates for other devices in Device Manager, especially those with a yellow exclamation mark.
- Graphics Drivers: This is often the first place to start, especially if the error occurs during gaming or video playback.
- Run System File Checker (SFC) and DISM: These tools help repair corrupted Windows system files.
- Open Command Prompt as administrator (search for “CMD,” right-click, “Run as administrator”).
- Type
sfc /scannowand press Enter. Let it complete. - After SFC, type
DISM /Online /Cleanup-Image /RestoreHealthand press Enter. Let it complete. - Restart your computer.
- Run Windows Memory Diagnostic Tool: This checks your RAM for errors.
- Search for “Windows Memory Diagnostic” in the Start menu.
- Choose “Restart now and check for problems (recommended).”
- Your computer will restart and run a memory test. If errors are found, you might have faulty RAM modules that need to be replaced.
- Check Your Disk for Errors:
- Open Command Prompt as administrator.
- Type
chkdsk /f /rand press Enter. - You’ll likely be prompted to schedule the check for the next restart. Type
Yand press Enter, then restart your computer.
- Check for Overheating:
- If your computer feels hot or fans are unusually loud, overheating could be the issue.
- Ensure proper airflow (don’t block vents).
- Clean dust from inside your computer (fans, heatsinks).
- Monitor temperatures using third-party software.
- Disable Overclocking or XMP:
- If you’ve enabled any overclocking settings (for CPU or GPU) or XMP for your RAM, go into your BIOS/UEFI settings and set them back to default. Overclocking can sometimes cause instability.
- Perform a System Restore:
- If you’ve created system restore points, you can try restoring your computer to a point before the issue started. This reverts system changes, but won’t affect your personal files.
- Search for “Create a restore point” in the Start menu, then click “System Restore.”
- Analyze Dump Files (Advanced):
- When a bugcheck occurs, Windows usually creates a “dump file” (often
C:\Windows\MEMORY.DMPor smaller minidump files inC:\Windows\Minidump). - These files contain information about what was happening in memory when the crash occurred. Analyzing them with tools like WinDbg (from Microsoft) can pinpoint the exact driver or component causing the issue. This is generally for more advanced users or IT professionals.
- When a bugcheck occurs, Windows usually creates a “dump file” (often
- Update BIOS/UEFI Firmware:
- This is a more advanced step and should only be done carefully, following your motherboard manufacturer’s specific instructions. An incorrect BIOS update can brick your motherboard.
- Consider a Clean Windows Installation:
- As a last resort, if nothing else works, a clean installation of Windows can rule out software and corrupted file issues. Back up your important data first!
By systematically working through these steps, you can often identify and resolve the cause of “The Computer Has Rebooted From a Bugcheck” error.
Key Takeaways
- Bugcheck errors indicate serious system problems that forced Windows to restart to prevent damage.
- Driver issues, memory corruption, and Windows updates are common causes that can be fixed with proper troubleshooting.
- Running diagnostic tools like SFC and memory tests can identify and repair most bugcheck problems.
Understanding Bugchecks and BSODs
A bugcheck is a critical system error that occurs when Windows detects a condition that compromises safe system operation. When this happens, Windows deliberately crashes itself and displays the infamous Blue Screen of Death (BSOD) to prevent damage to your computer.
Analyzing the Bugcheck Event
When a computer reboots from a bugcheck, Windows creates a memory dump file that contains valuable diagnostic information. This file can be found in the Windows directory, typically named “MEMORY.DMP” or smaller “minidump” files in the Minidump folder.
To analyze these files, users can employ the Windows Debugger tool (WinDbg). This tool helps identify which system component caused the crash by examining the error code and stack trace information.
The bugcheck code (like 0x0000007B or INACCESSIBLE_BOOT_DEVICE) provides specific information about what went wrong. These codes are crucial for troubleshooting as they point to particular types of failures.
Event Viewer also logs bugcheck events under Windows Logs > System with Event ID 1001 from source “BugCheck.”
Common Causes for Bugcheck Errors
Hardware issues frequently trigger bugchecks. Faulty RAM is a common culprit, causing memory corruption that leads to system instability. Running a memory diagnostic tool can help identify RAM problems.
Driver conflicts or corrupted drivers represent another major cause. Outdated, incompatible, or poorly written device drivers can crash the system. This is why keeping drivers updated is essential for system stability.
Disk errors may also result in bugchecks, especially when Windows cannot access critical system files. Running CHKDSK can help resolve these issues.
Other common causes include:
- Overheating components
- Power supply problems
- Malware infections
- Hardware conflicts
- Recent software installations
Many bugcheck errors occur when the computer is idle, suggesting background processes or power management issues might be triggering the problem.
Troubleshooting and Diagnostics Tools
When your computer reboots from a bugcheck, several built-in Windows tools can help identify the root cause. These tools allow you to examine error logs, check memory integrity, and analyze crash data.
Utilizing Windows Event Viewer
Event Viewer is a powerful diagnostic tool that records system events including crashes and errors. To access it, press Windows key + R, type “eventvwr.msc” and press Enter.
Navigate to “Windows Logs” > “System” to find bugcheck-related entries. Look for events with “Error” severity level, especially those from sources like “Kernel-Power” or “BugCheck.”
Each event contains valuable information including an Event ID and description that can point to specific problems. Write down these details before searching online for solutions.
Filter events by selecting “Error” under “Event Level” to focus only on critical issues. Pay special attention to events that occurred just before the system crash.
For recurring bugchecks, look for patterns in the error logs that might indicate failing hardware or problematic drivers.
Performing Memory Checks
Memory problems often cause bugcheck errors. Windows Memory Diagnostic is a built-in tool that can detect RAM issues.
To run this tool:
- Press Windows key + R
- Type “mdsched.exe” and press Enter
- Choose “Restart now and check for problems”
The test runs automatically during restart and checks for memory corruption or hardware failures. Results appear after Windows loads.
For more thorough testing, consider using Memtest86+, which runs outside Windows and can detect problems that Windows Memory Diagnostic might miss.
Memory tests should run for at least one complete pass, but multiple passes are recommended for thorough diagnosis. Remove all but one RAM stick if problems are detected to identify which module is faulty.
Examining Dump Files
Dump files (with .dmp extension) contain crucial data about system crashes. These files are created when bugchecks occur and store information about what was happening when the system failed.
Windows stores these files in “C:\Windows\Minidump” or “C:\Windows\MEMORY.DMP”. You can analyze them using tools like Windows Debugger (WinDbg) from the Windows SDK.
To use WinDbg:
- Install the Windows SDK or WinDbg Preview from the Microsoft Store
- Open WinDbg and load the dump file (File > Open Crash Dump)
- Type “!analyze -v” in the command window
The analysis reveals the likely cause of the crash, including responsible drivers or hardware components. Look for recurring names in multiple dump files.
For simpler analysis, try tools like BlueScreenView by NirSoft, which provides a user-friendly interface for examining dump files without requiring technical expertise.
System Recovery Options
When facing a bugcheck error, Windows provides several recovery tools to help fix your computer without losing data. These options can help you get back up and running when normal startup fails.
Using Windows System Restore
System Restore is a powerful recovery tool that returns your computer to a previous working state. This feature creates restore points automatically when you install new software or make system changes.
To access System Restore after a bugcheck:
- Restart your computer
- Press F8 during startup to access advanced boot options
- Select “Repair Your Computer”
- Choose “System Restore” from the recovery options
System Restore will revert system files and settings to a time when everything worked correctly, without affecting your personal files. This can fix problems caused by bad drivers or software installations that may have triggered the bugcheck.
Users should create manual restore points before making major system changes. This provides a reliable fallback option if something goes wrong.
Safe Mode and Data Recovery
Safe Mode boots Windows with minimal drivers and services, making it useful for troubleshooting bugcheck errors. When normal startup fails, Safe Mode often works.
To enter Safe Mode:
- Restart your computer
- Press F5 or 5 during startup (as indicated in search results)
- Windows will load with basic drivers only
In Safe Mode, users can access their files and back up important data before attempting more advanced repairs. This is critical since some repair methods might require reinstalling Windows.
For data recovery in situations where Windows won’t boot at all, users can create a bootable Windows ISO as mentioned in the search results. This allows access to the hard drive to retrieve important files even when the system won’t start normally.
Preventative Measures and Best Practices
Taking proactive steps can help you avoid the frustrating “computer has rebooted from a bugcheck” error. Regular maintenance and careful attention to your computer’s health are key to preventing these system crashes.
Updating Drivers and Software
Outdated drivers are often the main cause of bugcheck errors. To update your drivers:
- Open Device Manager by right-clicking the Start button and selecting it from the menu
- Look for devices with yellow warning icons
- Right-click each device needing updates and select “Update driver”
- Choose to search automatically for updated driver software
Users should regularly check for Windows updates too. These updates often include important security patches and system stability improvements that prevent crashes.
BIOS updates can also help prevent bugcheck errors. However, updating BIOS requires caution as incorrect updates can damage the system. Users should visit their computer manufacturer’s website for the correct BIOS version and follow instructions carefully.
Managing Overheating and Hardware Issues
Overheating is a common trigger for system crashes and bugcheck errors. Computers need proper airflow to function correctly.
Tips to prevent overheating:
- Clean dust from fans and vents every 3-6 months
- Ensure the computer has adequate ventilation space
- Consider using cooling pads for laptops
- Monitor system temperatures with software like HWMonitor
Hardware incompatibilities can also cause bugcheck errors. When installing new components, users should verify compatibility with existing hardware and software.
Memory issues frequently lead to system crashes. Running the Windows Memory Diagnostic tool can identify RAM problems before they cause bugchecks. Access this tool by searching for “Windows Memory Diagnostic” in the Start menu.
Frequently Asked Questions
Bugcheck errors often confuse computer users when their systems suddenly restart. These questions address common troubleshooting methods, error codes, and analysis techniques to help resolve these frustrating issues.
What steps can be taken to diagnose the cause of a bugcheck-related system reboot in Windows 11?
When a Windows 11 computer reboots due to a bugcheck, users should first check Event Viewer for error details. Navigate to Windows Logs > System and look for critical errors around the time of the reboot.
Running Windows Memory Diagnostic (mdsched.exe) can identify RAM issues that often cause bugchecks. This built-in tool will test the computer’s memory for errors and report any problems found.
Updating all device drivers is crucial, especially graphics, network, and storage controllers. Outdated or corrupted drivers are common culprits in system crashes.
How can I fix a bugcheck error with code 0x00000133 that leads to a computer restart?
The 0x00000133 bugcheck error (DPC_WATCHDOG_VIOLATION) typically occurs when a driver takes too long to process a DPC request. Start by updating the system BIOS and all device drivers to their latest versions.
Sometimes this error relates to storage issues. Check for firmware updates for SSDs and hard drives, as outdated storage firmware can trigger this specific bugcheck.
Disabling fast startup in Windows power options may help. This feature can occasionally create conflicts that lead to this particular bugcheck error.
What are common solutions for a bugcheck-related reboot on a Dell machine running Windows?
Dell users experiencing bugcheck reboots should first check Dell’s support site for updated drivers specific to their model. Dell provides optimized drivers that often resolve compatibility issues.
Running the Dell SupportAssist tool can automatically identify and fix hardware-related problems. This built-in diagnostic tool is designed specifically for Dell systems.
Memory issues frequently cause bugchecks on Dell machines. Testing RAM using the Dell ePSA pre-boot diagnostics can pinpoint faulty memory modules before Windows even loads.
How can I analyze a memory dump file to determine the cause of a bugcheck-induced reboot?
Memory dump files contain valuable information about crash causes. These files are typically stored in C:\Windows\Minidump or C:\Windows\MEMORY.DMP.
Microsoft’s Windows Debugger (WinDbg) is the standard tool for analyzing dump files. After installing the tool, open it and load the dump file using File > Open Crash Dump.
The most important command to run in WinDbg is !analyze -v, which provides detailed information about the crash. Look for references to specific drivers in the analysis output.
What is Event ID 1001 and how does it relate to a system reboot due to a bugcheck in Windows 10?
Event ID 1001 in the Windows System log indicates that the system has recovered from a serious error. This entry appears after a bugcheck-related reboot and contains valuable diagnostic information.
The event description typically includes details about the bugcheck code and parameters. These codes help identify the specific type of system failure that occurred.
Users can right-click on the event and select “Copy Details as Text” to share this information with technical support. The details often point to the exact driver or hardware component causing the issue.
How can I prevent recurring blue screen errors that result in a system reboot from bugchecks in Windows 7?
For Windows 7 systems experiencing repeated bugchecks, checking for outdated drivers is essential. Many Windows 7 drivers are no longer updated, so finding the last compatible version is important.
Using the System File Checker (sfc /scannow) can repair corrupted system files. Run this command from an elevated Command Prompt to scan and fix system file integrity issues.
Hardware issues often cause recurring bugchecks in older systems. Testing components like RAM, hard drives, and power supplies can identify failing hardware before it causes more serious damage.