Is your computer running slower than usual? Are you worried about potential viruses or malware? Keeping your computer safe does not have to cost you anything. Windows includes a built-in security tool that helps protect your device from various threats. You can easily scan your computer for viruses and malware using Windows Security (formerly known as Windows Defender), which provides comprehensive protection without the need to install additional software.
This free security feature is provided by Microsoft and has significantly evolved over the years – offering robust protection for Windows 10 and 11 users. By default, Windows Security runs in the background, but you can also initiate manual scans whenever you suspect that your computer might be infected. Whether you’ve downloaded a suspicious file or noticed unusual system behavior, performing a quick scan can help identify and remove potential threats.
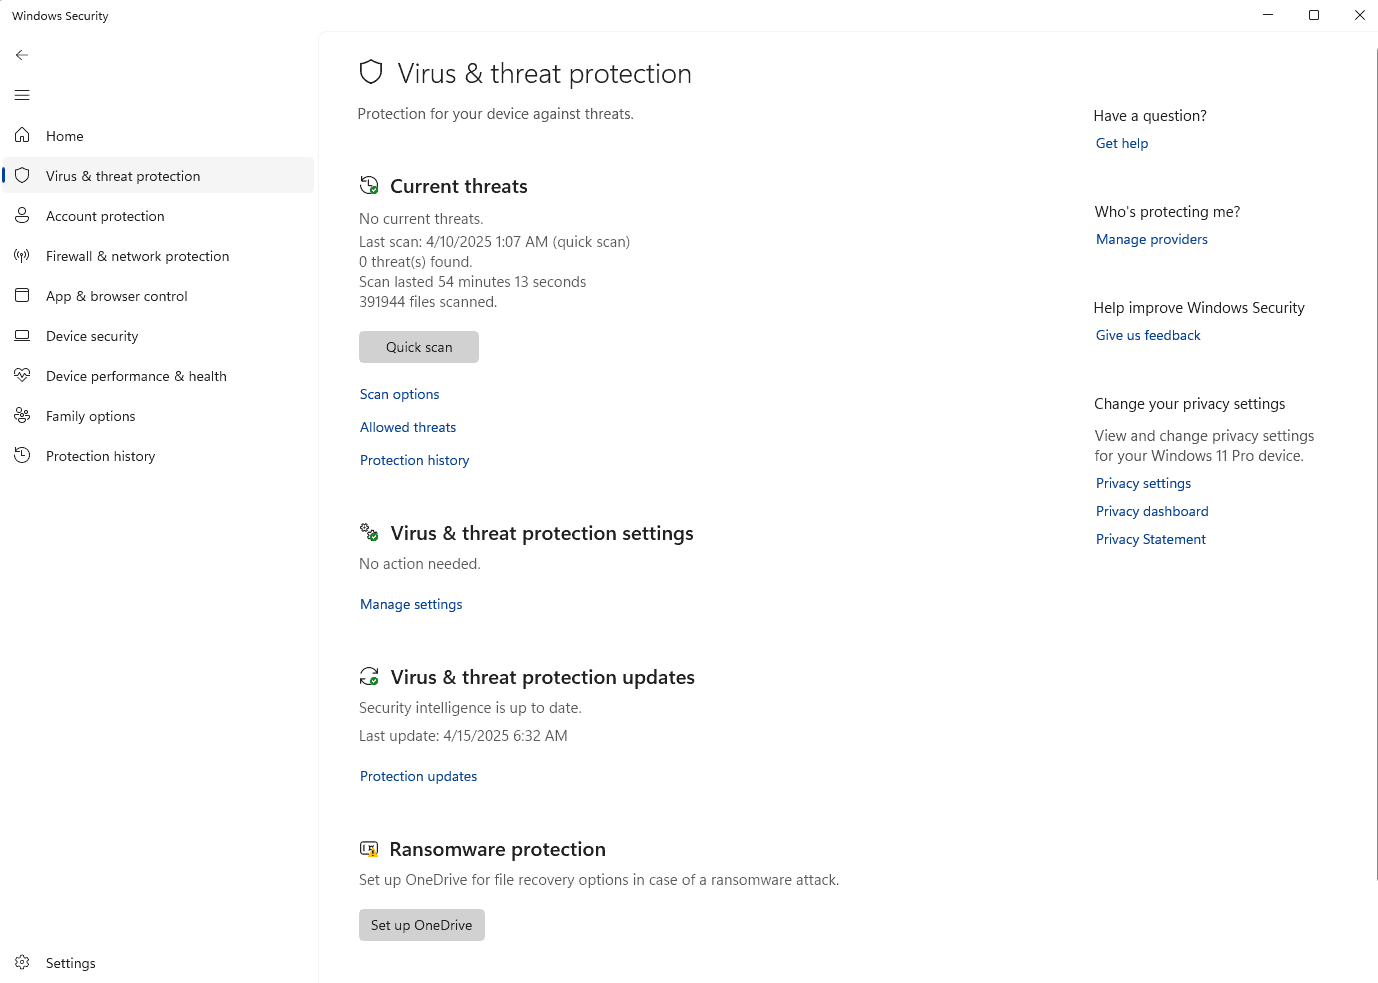
Here’s a clear, step-by-step guide on how to scan your Windows computer for viruses and malware using Windows Security (formerly known as Windows Defender), written in a straightforward style suitable for any skill level:
How To Scan Your Computer for Viruses and Malware Using Windows Security (Free)
If your PC is acting strange, slowing down, or you’re seeing unexpected pop-ups, it might be time to check for malware. The good news? You can scan your computer completely free using the built-in Windows Security tool — no need to install anything extra.
Follow these steps to run a virus and malware scan on Windows 10 or Windows 11:
✅ Step 1: Open Windows Security
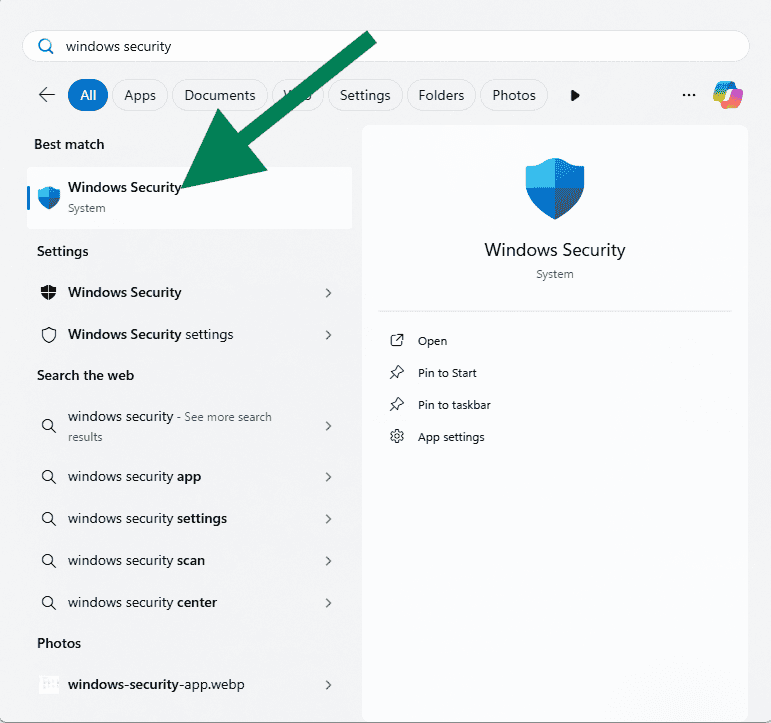
- Click the Start menu (Windows logo in the bottom-left corner).
- Type “Windows Security” into the search bar and press Enter.
- Click on the Windows Security app from the results.
✅ Step 2: Go to “Virus & Threat Protection”
- In the Windows Security window, click on “Virus & threat protection” in the left-hand panel (or in the center of the dashboard).
- This will bring up a summary of your protection status.
✅ Step 3: Run a Quick Scan
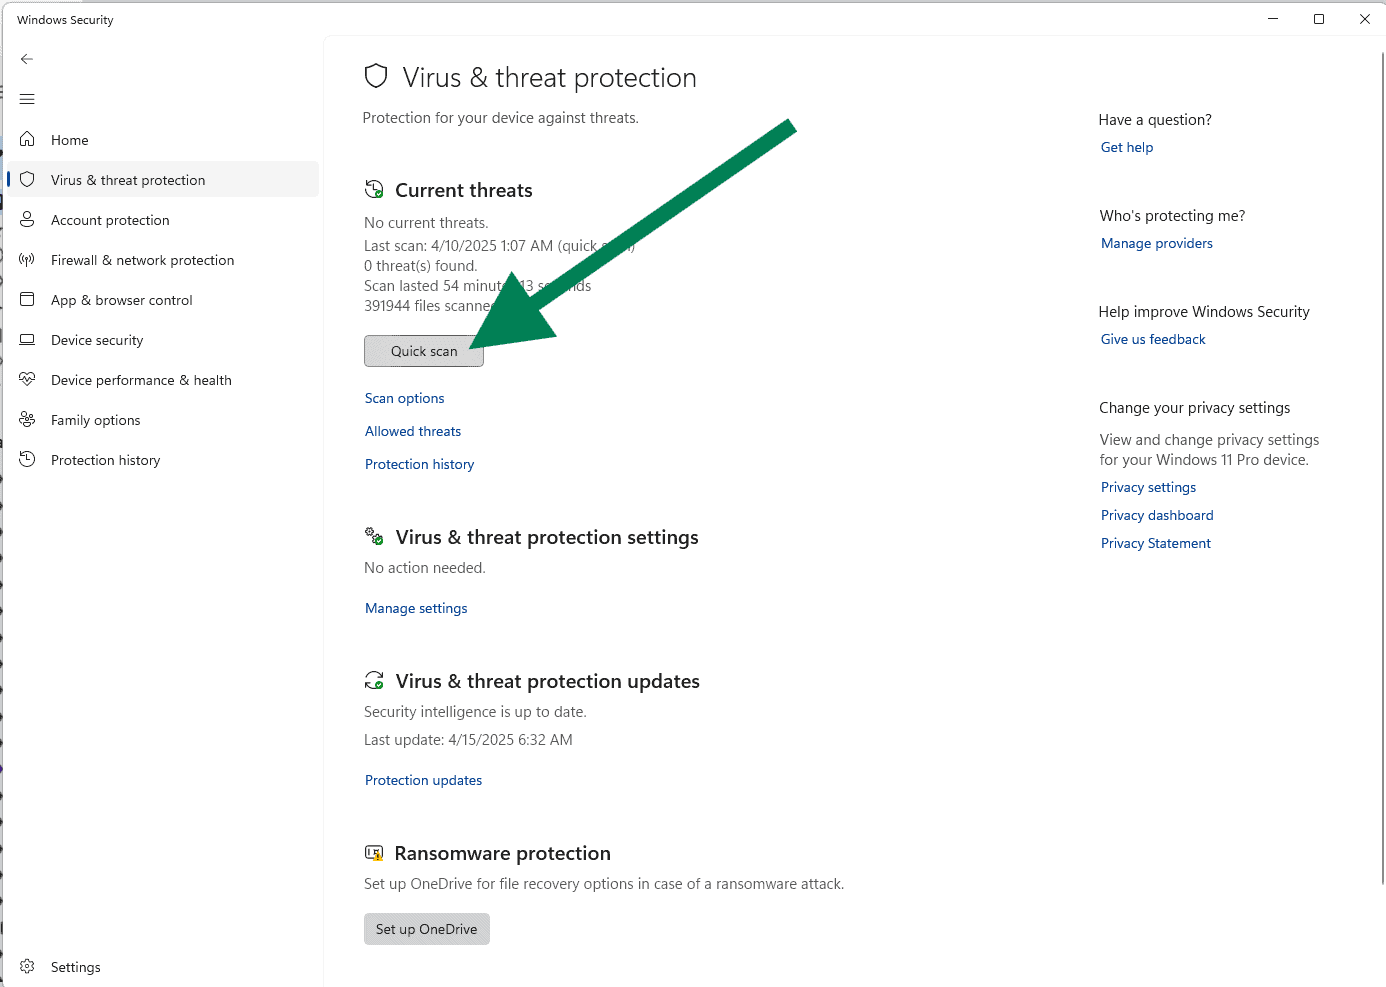
- Under the Current threats section, click the “Quick scan” button.
- Windows will immediately begin checking the most likely areas on your computer where threats tend to hide.
- This usually takes a few minutes. When it’s done, you’ll see the results.
✅ Step 4: Run a Full or Custom Scan (Optional)
If you want a more thorough scan:
- Scroll down and click “Scan options.”
- Choose one of the following:
- Full scan: Scans your entire system — this takes longer but is more complete.
- Custom scan: Lets you pick specific folders or drives to scan.
- Microsoft Defender Offline scan: Restarts your computer and checks for deeply embedded threats before Windows loads.
- Select your desired option and click “Scan now.”
✅ Step 5: Review the Results
- If threats are found, Windows Security will guide you through actions like removing, quarantining, or allowing the item.
- If nothing was found, you’ll see a message that says “No current threats” — which is great news.
🔄 Bonus Tip: Turn On Real-Time Protection
To stay protected in the future:
- Go back to the Virus & threat protection section.
- Under Virus & threat protection settings, click “Manage settings.”
- Make sure Real-time protection is turned On. This keeps your PC guarded 24/7.
Quick FAQ
Q: Is Windows Security enough protection?
A: For most users, yes. It’s built directly into Windows, runs automatically, updates daily, and has been proven to be very effective in independent tests.
Q: How often should I scan?
A: Windows Security runs background scans automatically, but it’s a good idea to run a full scan once a month or if you notice anything unusual.
Key Takeaways
- Windows Security provides free, built-in virus and malware protection that can be accessed through the Windows Security app or taskbar.
- Users can choose between quick, full, or custom scans depending on their specific needs and time constraints.
- Windows Security automatically handles most detected threats, but users can review scan history and manually remove persistent malware if necessary.
Understanding Windows Security
Windows Security serves as Microsoft’s built-in defense system against digital threats, providing comprehensive protection for your computer without requiring additional software. This integrated security suite offers multiple layers of protection while remaining user-friendly.
Evolution from Windows Defender to Windows Security
Windows Defender started as a basic anti-spyware tool in Windows XP. Over time, it evolved into a more robust antivirus solution in Windows 7 and 8.
With Windows 10, Microsoft expanded the program and renamed it Windows Security (though you might still see “Microsoft Defender” in some references). This change reflected its broader capabilities beyond simple virus detection.
The transition wasn’t just a name change. Microsoft enhanced the underlying technology, improved the detection engine, and integrated it more deeply with the operating system. Today’s Windows Security offers significantly better protection than its predecessor.
Overview of Features
Windows Security provides comprehensive protection through several key components:
- Virus & threat protection: Scans for and removes malware
- Firewall & network protection: Monitors network traffic
- App & browser control: Blocks dangerous downloads
- Device security: Manages hardware security features
- Account protection: Safeguards login credentials
The interface is organized into these easy-to-navigate sections. Each area offers detailed settings that users can customize based on their security preferences.
Windows Security also integrates with other Microsoft services. This creates a unified security ecosystem that protects your data across devices and platforms.
Real-Time Protection and Threat Management
Real-time protection continuously monitors your system for suspicious activity. It automatically checks files when they’re opened, downloaded, or modified—identifying threats before they can cause damage.
When potential malware is detected, Windows Security immediately takes action. Depending on the threat level, it might quarantine files, block execution, or remove them entirely.
The protection history feature provides a detailed log of all security incidents and actions taken. This transparency helps users understand what threats were detected and how they were handled.
Windows Security also employs cloud-based protection, sending information about suspicious files to Microsoft for analysis. This helps identify new threats quickly and improve protection for all users.
Preparation and Initial Setup
Before scanning your computer for viruses and malware, you need to properly set up Windows Security. This involves making sure the program is active, has the latest virus definitions, and runs regular scans automatically.
Enabling Microsoft Defender
Microsoft Defender comes pre-installed on Windows 10 and 11, but it may be disabled if you have third-party antivirus software. To check if it’s enabled:
- Click on the Start menu
- Type “Windows Security” and open the app
- Select “Virus & threat protection”
- Look for “Virus & threat protection settings”
If you see a message that protection is turned off, click on “Turn on” to enable Windows Defender. For Windows 7 users, Microsoft Defender may be called “Windows Defender” and can be accessed through Control Panel.
Make sure real-time protection is switched on. This feature monitors your system continuously and provides immediate protection against threats.
Updating Virus Definitions
For effective protection, Microsoft Defender needs current virus definitions. These files contain information about known threats and help the software identify malware.
To update virus definitions:
- Open Windows Security
- Click on “Virus & threat protection”
- Look for “Virus & threat protection updates”
- Select “Check for updates”
Windows typically updates these definitions automatically, but manual updates ensure you have the latest protection. Microsoft releases new definitions daily as new threats emerge.
You can also update by clicking the “Check for updates” button in the Windows Security dashboard. This ensures your system can detect even the newest threats.
Scheduling Automatic Scans
Regular scans are essential for maintaining system security. Microsoft Defender can be configured to run scans automatically at convenient times.
To set up scheduled scans:
- Open Windows Security
- Select “Virus & threat protection”
- Click on “Virus & threat protection settings”
- Scroll down to “Scheduled scan” options
The default schedule typically includes a quick scan once per day, but you can modify this to better suit your needs. Choose a time when your computer will be on but not in heavy use.
Consider scheduling a full scan weekly. These in-depth scans check all files on your system but take longer to complete. Set them for times when you won’t be using your computer.
Performing Virus and Malware Scans
Windows Security offers several scanning options to detect and remove threats from your computer. Each scan type serves a different purpose and thoroughness level, from quick checks to comprehensive system examinations.
Using Windows Security for Free Scanning
Windows Security (formerly Windows Defender) comes pre-installed on Windows computers, making it an excellent free option for virus protection. To access this tool, click the Start menu and type “Windows Security,” then select the app from the results.
Once open, you’ll see several security categories on the left panel. Select “Virus & threat protection” to access scanning options.
The main screen displays your current protection status and recent scan results. This interface also shows notifications about any detected threats that need attention.
Before running any scan, ensure Windows Security is updated with the latest virus definitions. Click “Check for updates” in the virus definitions section to download the most recent threat information.
Performing a Quick Scan
A Quick Scan examines the most common locations where malware typically hides. This scan type is ideal for routine checks or when you suspect a possible infection.
To start a Quick Scan:
- Open Windows Security
- Select “Virus & threat protection”
- Click the “Quick scan” button
The scan typically takes 5-10 minutes to complete, depending on your system. You can continue using your computer while the scan runs in the background.
After completion, Windows Security will display the results, including any detected threats. If malware is found, you’ll see options to quarantine or remove the infected files.
Running a Full System Scan
A Full Scan thoroughly examines all files and running programs on your hard drive. This comprehensive check is recommended when:
- You strongly suspect a malware infection
- You’re experiencing unusual system behavior
- You haven’t scanned your computer in a long time
To initiate a Full Scan:
- Open Windows Security
- Go to “Virus & threat protection”
- Click “Scan options”
- Select “Full scan” and then “Scan now”
This scan may take an hour or longer depending on your computer’s specifications and the number of files. The system might run slower during this process.
Full scans are more effective at finding deeply embedded malware that quick scans might miss. Schedule these periodically for optimal protection.
Exploring Advanced Scan Options
Windows Security offers additional specialized scanning options for specific scenarios:
Custom Scan: Allows you to scan specific folders or drives. This is useful when checking external devices or suspicious downloads.
Offline Scan: Reboots your computer into a special environment to find stubborn malware that hides during normal operation. This option is best for persistent malware that regular scans can’t remove.
Microsoft Malicious Software Removal Tool: A supplementary tool that can eliminate specific prevalent malware. It’s not a replacement for regular scans but provides additional protection.
To access these options, navigate to “Scan options” under the Virus & threat protection section. Each scan type includes a brief description to help determine which is most appropriate for your situation.
Responding to Detected Threats
When Windows Security identifies potential threats on your computer, taking appropriate action is crucial to maintain system safety and performance. The way you respond can determine whether the threat remains a problem or is effectively eliminated.
Reviewing and Understanding Protection History
Windows Security keeps a detailed record of all threats it encounters in the Protection History section. To access this information, open Windows Security and click on “Virus & threat protection,” then select “Protection history” near the bottom of the page. This section displays all detected items along with their status.
Each entry shows important details about the threat:
- Threat name and classification
- Date and time detected
- Current status (quarantined, removed, allowed)
- Affected files or locations
Users can click on individual entries to view more information about specific threats. This helps in understanding what type of malware was detected and where it came from.
Sometimes Windows Security might show that it detected a severe threat but doesn’t provide details in regular scans. In these cases, checking the protection history is especially important.
Removing or Quarantining Detected Threats
After Windows Security detects malware or suspicious files, it typically takes automatic action based on its threat assessment. However, users can manually decide how to handle these threats.
To manage detected threats:
- Open Windows Security
- Select “Virus & threat protection”
- Look under “Current threats” or “Protection history”
- Select the threat and choose “Remove” or “Quarantine”
Quarantined items are stored in a secure location where they cannot harm your system. This option is useful when unsure if a file is legitimate. Removed items are permanently deleted from the system.
For stubborn infections, users might need to run a Windows Defender Offline scan, which operates before Windows starts up. This helps catch malware that hides during normal operation.
The Microsoft Safety Scanner is another useful tool for removing persistent threats that regular scans miss.
Addressing False Positives
Sometimes Windows Security might incorrectly identify legitimate programs as threats. These false positives can occur when software exhibits behavior similar to malware.
Signs of a false positive include:
- A trusted program suddenly being flagged
- Software from reputable developers being blocked
- Programs that worked previously now trigger alerts
To handle a false positive:
- Check the protection history for the flagged item
- Select the item and choose “Allow on device” if certain it’s safe
- Add the program to the exclusion list to prevent future alerts
Users should exercise caution when allowing excluded items. Only legitimate software from trusted sources should be permitted. When in doubt, researching the specific threat name online or contacting the software developer can help determine if an alert is a false positive.
Regularly reviewing exclusions is recommended as some malware might attempt to disguise itself as legitimate programs.
How To Update Windows Security
To stay protected against the latest threats, it’s important to keep Windows Security (formerly Windows Defender) up to date. Microsoft regularly releases new virus definitions and security intelligence updates that help Windows Security detect new types of malware, spyware, and other malicious software.
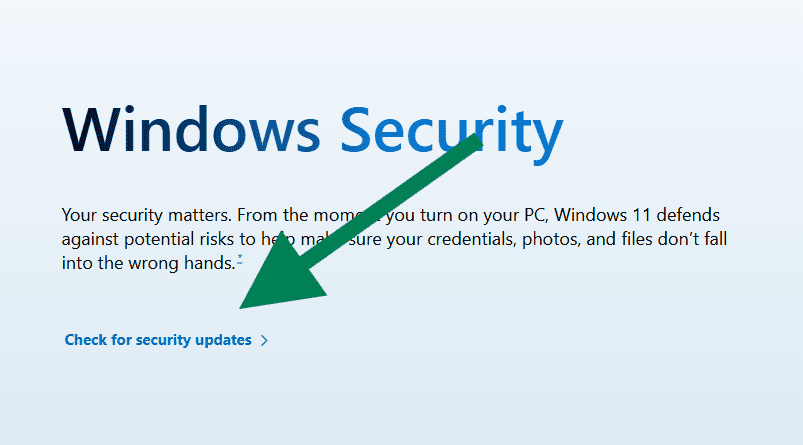
Here’s how to make sure your Windows Security is up to date:
✅ Step 1: Open Windows Security
- Click the Start menu, then search for “Windows Security”.
- Open the Windows Security app.
✅ Step 2: Go to Virus & Threat Protection
- In the app, click on “Virus & threat protection.”
- Scroll down to the “Virus & threat protection updates” section.
- Click “Check for updates.”
✅ Step 3: Download the Latest Security Intelligence
- A new window will open.
- Click the “Check for updates” button.
- Windows will search for the latest security definitions and install them automatically if available.
- Once complete, you’ll see a message that says “Security intelligence is up to date.”
🛠 Alternate Method: Update Through Windows Update
You can also update Windows Security as part of your regular Windows Updates:
- Open Settings.
- Click on “Windows Update.”
- Click “Check for updates.”
- Install any available updates — these often include new virus definitions.
Keeping your security definitions up to date ensures that Windows Security can detect the newest viruses, ransomware, and zero-day threats. It only takes a minute, but it’s one of the most important steps in protecting your computer.
Frequently Asked Questions
Windows Security provides several methods to scan for viruses and malware. Users can perform different types of scans depending on their needs and access the tool through various interfaces.
How can I initiate a full system virus scan using Windows Security?
To run a full system scan, open Windows Security by clicking the shield icon in the taskbar or searching for “Windows Security” in the Start menu.
Select “Virus & threat protection” from the main dashboard, then look for the “Current threats” section.
Click on “Scan options” and select “Full scan,” then press the “Scan now” button to begin scanning your entire system for threats.
What is the process for accessing and using Microsoft Defender Antivirus to check for malware?
Access Microsoft Defender by clicking on the Windows Security icon in the taskbar notification area or by searching for “Windows Security” in the Start menu.
Once opened, select “Virus & threat protection” from the main menu options.
Under “Current threats,” users can choose Quick scan to check the most common locations where malware might be found or select other scan options for more thorough checks.
Where can I find the option to perform a free virus scan in the Windows Security suite?
The scan options are located in the “Virus & threat protection” section of Windows Security.
After opening Windows Security, click on “Virus & threat protection” and look for the “Current threats” section, which contains the “Quick scan” button.
For additional scanning options, click on “Scan options” to access different scan types such as Quick scan, Full scan, Custom scan, or Microsoft Defender Offline scan.
How do I use Command Prompt to conduct a virus scan on Windows 10?
Open Command Prompt as administrator by right-clicking the Start button and selecting “Windows Terminal (Admin)” or “Command Prompt (Admin).”
To run a quick scan, type "%ProgramFiles%\Windows Defender\MpCmdRun.exe" -Scan -ScanType 1 and press Enter.
For a full scan, use the command "%ProgramFiles%\Windows Defender\MpCmdRun.exe" -Scan -ScanType 2 which will enable Windows Defender to scan for malware on your entire system.
Can I run Windows Defender to scan for viruses on Windows 11, and if so, how?
Yes, Windows 11 includes Windows Security (formerly Windows Defender) pre-installed and works similarly to Windows 10.
To access it, click on the Start menu, search for “Windows Security,” and open the app.
Select “Virus & threat protection,” then click “Quick scan” to start a basic scan, or select “Scan options” to choose between quick, full, custom, or offline scans to check for and remove viruses on the system.
Is there a way to schedule automatic virus scans with Windows Security?
Yes, users can schedule automatic scans through Task Scheduler in Windows.
Open Task Scheduler by searching for it in the Start menu, then select “Create Basic Task” from the Action menu.
Name the task, choose when to run it (daily, weekly, etc.), select “Start a program” as the action, and browse to "%ProgramFiles%\Windows Defender\MpCmdRun.exe" with arguments -Scan -ScanType 2 to set up regular malware scans automatically.

