Removing the covers of your PS5 console is a simple task that can help with cleaning, customization, and hardware upgrades. Whether you want to install a new SSD, clean dust from the fans, or swap out the standard white plates for colorful alternatives, knowing how to properly remove the PS5 covers is essential. To remove PS5 covers, start at the corner with the PlayStation logo, lift it slightly upward, and then slide the panel away from the center of the console.
The process is slightly different depending on whether you have the original PS5 or the newer PS5 Slim model. For the original model, you’ll want to position the console so the logo is in the bottom left corner, then gently lift and slide. For the PS5 Slim, you may need to remove the feet first before lifting the panels straight up and back.
Many PS5 owners struggle with cover removal their first time, often because they’re afraid of applying too much force. Don’t worry—the covers are designed to be removed without tools. Just make sure to grip the right corners and use a gentle but firm motion to avoid damaging the clips that hold the covers in place.
How to Remove a PS5 Cover: Step-by-Step Guide
Removing the covers on your PlayStation 5 (PS5) is useful for cleaning, upgrading storage, or troubleshooting. The PS5’s side panels (covers) are designed to be removable without tools, but it’s important to follow the correct steps to avoid damage.
Important Notes Before You Start
- Turn off your PS5 completely and unplug all cables from the console.
- Wait for the console to cool down if it was recently used, as internal parts can be hot.
- Handle the covers gently to avoid scratching or breaking clips.
- This guide applies to the standard PS5 model, not the PS5 Digital Edition or Slim models (which may differ).
Tools Needed
- None! The PS5 covers are designed for tool-free removal.
Step-by-Step Instructions
1. Position Your PS5 Correctly
- Place the PS5 on a flat surface with the front facing you.
- For easier handling, lay the console flat on its side with the PS logo facing up and the power button on the left.
2. Locate the Cover Corners
- Identify the corners of the cover panel you want to remove (left or right side).
- The covers have clips that hold them in place.
3. Slide the Cover
- Grip the corner of the cover firmly.
- Slide the cover upwards (towards the top edge of the console) about 1-2 cm.
- You should feel the clips disengage as you slide.
4. Lift the Cover Away
- Once slid up, gently lift the cover away from the console.
- Repeat for the other side if needed.
Reattaching the Covers
- Align the cover’s bottom clips with the console’s slots.
- Place the cover onto the console and slide it downward until it clicks securely in place.
Tips for Safe Removal
- Avoid using excessive force; if it doesn’t slide easily, double-check the direction.
- Keep the covers on a soft surface to prevent scratches.
- Use a microfiber cloth to clean dust from the covers and console interior while open.
Why Remove Your PS5 Covers?
- Cleaning dust buildup to maintain cooling efficiency.
- Upgrading or replacing internal storage (M.2 SSD slot is under the right cover).
- Checking or troubleshooting hardware issues.
Summary
Removing your PS5 covers is a simple process of sliding the panels upward and lifting them off. Always power down and unplug your console first, handle the panels gently, and follow the sliding motion carefully to avoid damage.
For more detailed visuals and instructions, check out:
- PlayStation Official Support: How to Remove and Attach PS5 Covers
- YouTube Tutorial: How to Remove the Covers from PS5
Key Takeaways
- PS5 covers can be removed by lifting from the corner with the PlayStation logo and sliding the panel away from the center.
- Different PS5 models (original vs. Slim) have slightly different removal techniques that affect how you approach the task.
- Removing PS5 covers allows for cleaning dust from fans, installing SSD storage upgrades, or customizing your console with different colored plates.
Understanding Your PS5 Cover
The PlayStation 5 cover plates serve both functional and aesthetic purposes, protecting internal components while allowing for customization. Knowing your PS5 model and taking proper precautions before removal ensures a smooth process.
Identifying Different PS5 Models
There are two main PS5 models: the standard edition with a disc drive and the Digital Edition without one. The cover plates for both models are similar but have slight differences in shape on the bottom left side where the disc drive is located.
The original PS5 models (launched in 2020) have glossy center sections with matte white side plates. The newer PS5 Slim models (released in 2023) are approximately 30% smaller and have slightly different cover designs.
When purchasing replacement covers or preparing for removal, check your specific model to ensure compatibility. The model number can be found on the back of your console (CFI-1000 series for original models, CFI-1100 or CFI-1200 for revised models, and CFI-2000 for Slim).
Safety Precautions Before Removal
Before attempting to remove your PS5 covers, power down the console completely and unplug all cables. Never remove covers while the system is running or connected to power.
Place your PS5 on a clean, flat surface with adequate space to work. Consider using a microfiber cloth beneath the console to prevent scratches.
Remove any dust from the exterior using a dry cloth or compressed air. This prevents dust from entering the console during the cover removal process.
Avoid using excessive force when removing the plates. The covers are designed to detach with moderate pressure at specific points. Using tools or sharp objects may damage the locking mechanisms or scratch the surface.
Working in a well-lit area will help you see the connection points clearly and avoid damaging components.
Step-by-Step Guide to Removing the PS5 Cover
Removing the PS5 cover is a straightforward process that requires careful handling to avoid damaging your console. Following the proper steps ensures you can safely access the interior for cleaning or SSD installation.
Tools Required for the Procedure
For this procedure, you’ll need minimal tools:
- Clean, flat surface (table or desk)
- Philips-head screwdriver (for base removal)
- Microfiber cloth (optional, for cleaning)
- Dry hands (to prevent slipping)
Before starting, power down the PlayStation 5 completely and unplug all cables, including the power cord, HDMI, and any USB devices. Allow the console to cool if it has been running recently. Having a dedicated workspace with good lighting will make the process easier and reduce the risk of misplacing small components.
Removing the PS5 Cover
First, place the PS5 on a flat surface with the PlayStation logo facing upward. If your console was standing vertically, you’ll need to remove the base using a Philips-head screwdriver.
Position the PS5 so that the glossy black center panel is facing up. Grip the upper corner of the white cover (the corner with the PlayStation logo) with your fingers.
Gently lift and slide the cover upward and away from the center of the console. You’ll feel slight resistance as the cover detaches from the clips holding it in place. Don’t force it—apply steady pressure.
For the opposite cover, flip the console over and repeat the same lifting motion. The cover should detach from the four clips securing it to the main body.
Reattaching the PS5 Cover
To reattach the cover, align it with the edges of the console. Position it slightly higher than where it should sit when fully attached.
Slide the cover downward while applying gentle pressure. You should hear clicking sounds as the clips reconnect. Make sure all four attachment points are securely fastened.
Test the fit by lightly pressing along the edges of the cover. There should be no gaps or loose sections. If the cover doesn’t seem to fit properly, remove it and try again, ensuring proper alignment.
After reattaching both covers, secure the base if you’re returning to vertical orientation. Give the PS5 a final inspection before reconnecting all cables and powering it on.
Frequently Asked Questions
Removing the PS5 cover is a straightforward process that many gamers need to perform for various maintenance tasks. Understanding the proper techniques helps prevent damage to your console while accessing its internal components.
What are the steps to remove the PS5 console cover for cleaning purposes?
To remove the PS5 cover for cleaning, first power down the console completely through the control center by selecting Power > Turn Off. Disconnect all cables from the console.
Place the PS5 on a soft, flat surface with the PlayStation logo facing down and the rear ports facing you. Grip the top corner of the cover (the one with the PlayStation logo), and gently lift upward while sliding the cover toward you.
The cover should detach with minimal force. Repeat the same process for the opposite side by flipping the console over.
How can you safely detach and replace the cover on the PS5?
Safely detaching the PS5 cover requires patience and careful handling. Ensure the console is powered off and placed on a soft surface to prevent scratches.
When reattaching the cover, align the hooks properly with their corresponding slots on the console. Slide the cover away from you until you hear a clicking sound, which indicates the cover is securely attached.
Avoid using excessive force during both removal and reattachment. The covers are designed to come off and go back on with minimal pressure.
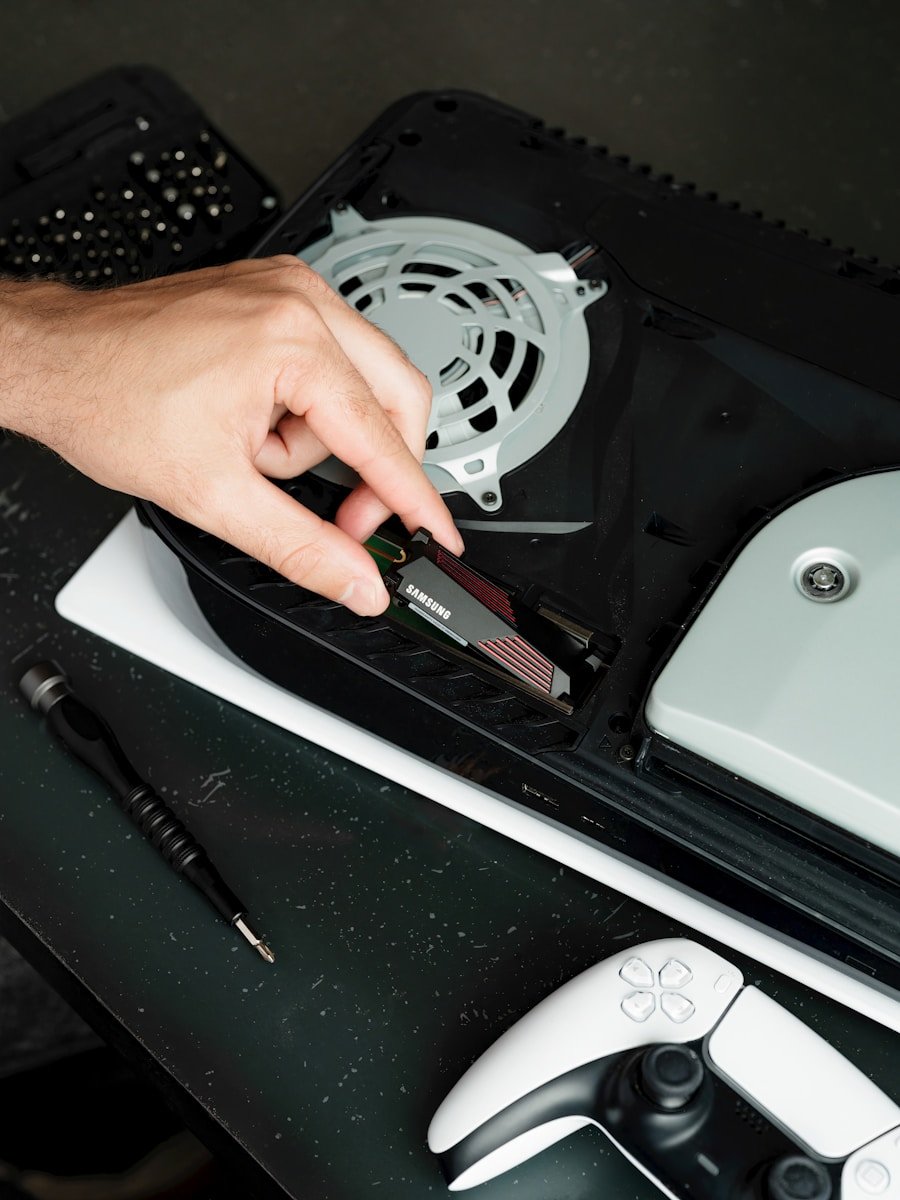
Can you explain the process for installing an SSD by removing the PS5’s side cover?
To install an SSD, first remove the bottom cover (when the PS5 is positioned horizontally) by following the standard cover removal process. Once removed, locate the rectangular expansion slot covered by a metal plate.
Unscrew the metal plate using a Phillips-head screwdriver and remove it. Insert your compatible M.2 SSD into the slot at a slight angle, then secure it with the screw provided in the expansion slot.
Replace the metal plate, tighten the screw, and reattach the PS5 cover by sliding it back into place until it clicks.
Is it possible to remove and change the skins on the PS5, and if so, how?
Yes, it’s possible to change PS5 skins or install custom covers. Remove the original covers following the standard procedure described above.
Custom skins typically adhere directly to the original covers or come as complete replacement covers. If using adhesive skins, clean the original covers thoroughly before application to ensure proper adhesion.
Replacement covers install exactly like the original ones, sliding into place along the console’s mounting brackets until they click securely.
What is the correct procedure to access and remove the PS5 fan for maintenance?
Accessing the PS5 fan requires removing both side covers first. After removing the covers, locate the fan assembly in the center of the console.
The fan is secured with several screws that must be carefully removed using the appropriate screwdriver. Keep track of all screws as they may be different sizes.
When cleaning the fan, use compressed air or a soft brush to remove dust. Avoid using liquids or applying pressure that could damage the fan blades.
Are there any specific instructions for removing the cover on a PS5 Slim or PS5 Pro model?
The PS5 Slim features a slightly different cover design than the original model. It uses a two-piece cover system that requires sliding each piece toward the bottom of the console when positioned vertically.
For the PS5 Slim, start at the top corner and gently pull outward while sliding downward. The covers on the Slim model are thinner than the original PS5.
As of March 2025, the PS5 Pro follows similar cover removal procedures to the original model, though the mounting clips may be positioned differently. Always refer to the specific model’s user manual for the most accurate instructions.


