Gaming can be more enjoyable with smooth visuals, and G-Sync technology from NVIDIA helps achieve this by reducing screen tearing and stuttering. Many gamers have compatible hardware but aren’t taking advantage of this feature simply because they don’t know how to activate it. To enable G-Sync, you need to first turn on adaptive sync in your monitor’s built-in menu, then open the NVIDIA Control Panel on your PC and navigate to the “Set up G-SYNC” tab where you can enable the setting.
The process requires both hardware and software configuration, but it’s fairly straightforward once you know where to look. Different monitors have different menu systems, so you might need to check your specific model’s user manual to find the adaptive sync or G-Sync compatible option in the display settings. Once enabled on the monitor, Windows will allow you to complete the setup through the NVIDIA control panel.
What Is G-Sync and Why It Matters
Nvidia G-Sync is a variable refresh rate (VRR) technology designed to eliminate screen tearing, reduce input lag, and minimize stutter during gaming. It synchronizes your monitor’s refresh rate with your GPU’s frame output, providing buttery-smooth visuals, especially in fast-paced games. Unlike traditional V-Sync, which can introduce noticeable lag, G-Sync works dynamically to adjust frame delivery in real time, creating a smoother and more responsive experience.
G-Sync is especially beneficial for gamers playing first-person shooters, racing games, or action titles where timing and visual clarity are critical. Whether you’re pushing high frame rates or struggling to keep above 60 FPS, G-Sync adapts to your system’s output to make gameplay feel consistent and visually fluid.
Requirements for G-Sync
Before enabling G-Sync, make sure your system meets the following requirements:
- Nvidia GPU: GeForce GTX 650 Ti Boost or newer.
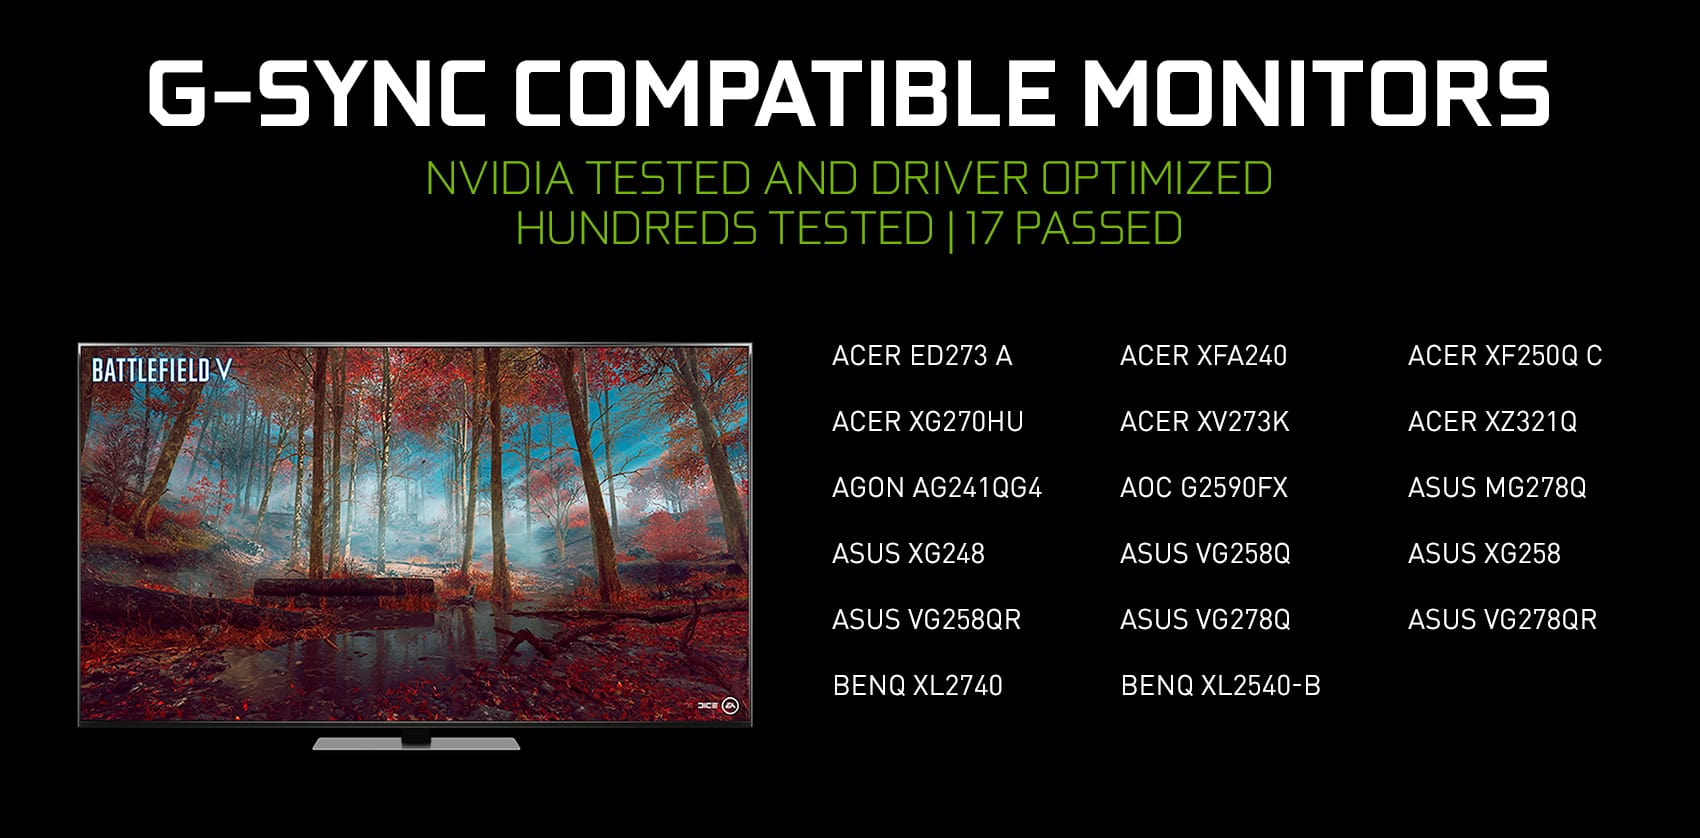
- Compatible Monitor: An official G-Sync monitor or a G-Sync Compatible FreeSync monitor.
- Display Connection: Use a DisplayPort cable for best results (HDMI is not supported for G-Sync on most models).
- Windows 10 or 11: Fully updated OS with recent Nvidia drivers.
- Latest Nvidia Drivers: Download via GeForce Experience or the Nvidia website.
How to Enable G-Sync on Your Monitor
Step 1: Connect Your Monitor Properly
Ensure your monitor is connected via DisplayPort. While some newer monitors support G-Sync over HDMI 2.1, most implementations still rely on DisplayPort for full compatibility. Avoid using adapters or dock stations that may interfere with VRR signaling.
Step 2: Update Your Nvidia Drivers
Open GeForce Experience or manually download the latest drivers from Nvidia’s official site. Keeping your drivers up to date ensures better performance, bug fixes, and compatibility with the latest G-Sync features.
Step 3: Enable G-Sync in Nvidia Control Panel
- Right-click your desktop and open Nvidia Control Panel.
- Under the left-hand menu, expand Display and click Set up G-SYNC.
- Check the box labeled Enable G-SYNC, G-SYNC Compatible.
- Choose either:
- Enable for full screen mode, or
- Enable for windowed and full screen mode, depending on your preference.
- Select your G-Sync compatible monitor from the list.
- Click Apply.
Step 4: Verify That G-Sync Is Working
To confirm that G-Sync is active:
- Go to Nvidia Control Panel > Display > G-SYNC Indicator.
- Check the option to display the G-Sync status overlay.
- Launch a game. If the overlay appears in the top-right corner, G-Sync is functioning correctly.
Alternatively, you can use tools like Nvidia Pendulum Demo or VRR Test patterns to check frame pacing.
Advanced Tips for Best Results
- Disable V-Sync in your games, but enable it in the Nvidia Control Panel. This allows G-Sync to manage frame timing optimally while preventing tearing.
- Use an FPS limiter (like RTSS or in-game cap) to cap your frame rate just below your monitor’s maximum refresh rate. For example, cap at 141 FPS on a 144Hz monitor.
- Turn off background applications or overlays (like Discord, MSI Afterburner, or OBS) if you experience flickering or stuttering.
- Some G-Sync Compatible monitors may need their VRR setting enabled in the monitor’s on-screen display (OSD) menu. Look for terms like “Adaptive Sync” or “FreeSync” and turn it on.
Common Issues and Fixes
- G-Sync Not Showing Up: Double-check that your monitor supports G-Sync (either officially certified or G-Sync Compatible). Update drivers and firmware if necessary.
- Stuttering or Flickering: Set monitor refresh rate to native in Display Settings. Also try a different DisplayPort cable, as poor-quality cables can cause sync issues.
- V-Sync Conflicts: Avoid enabling both in-game V-Sync and Nvidia Control Panel V-Sync at the same time unless you’re following a capped frame rate strategy.
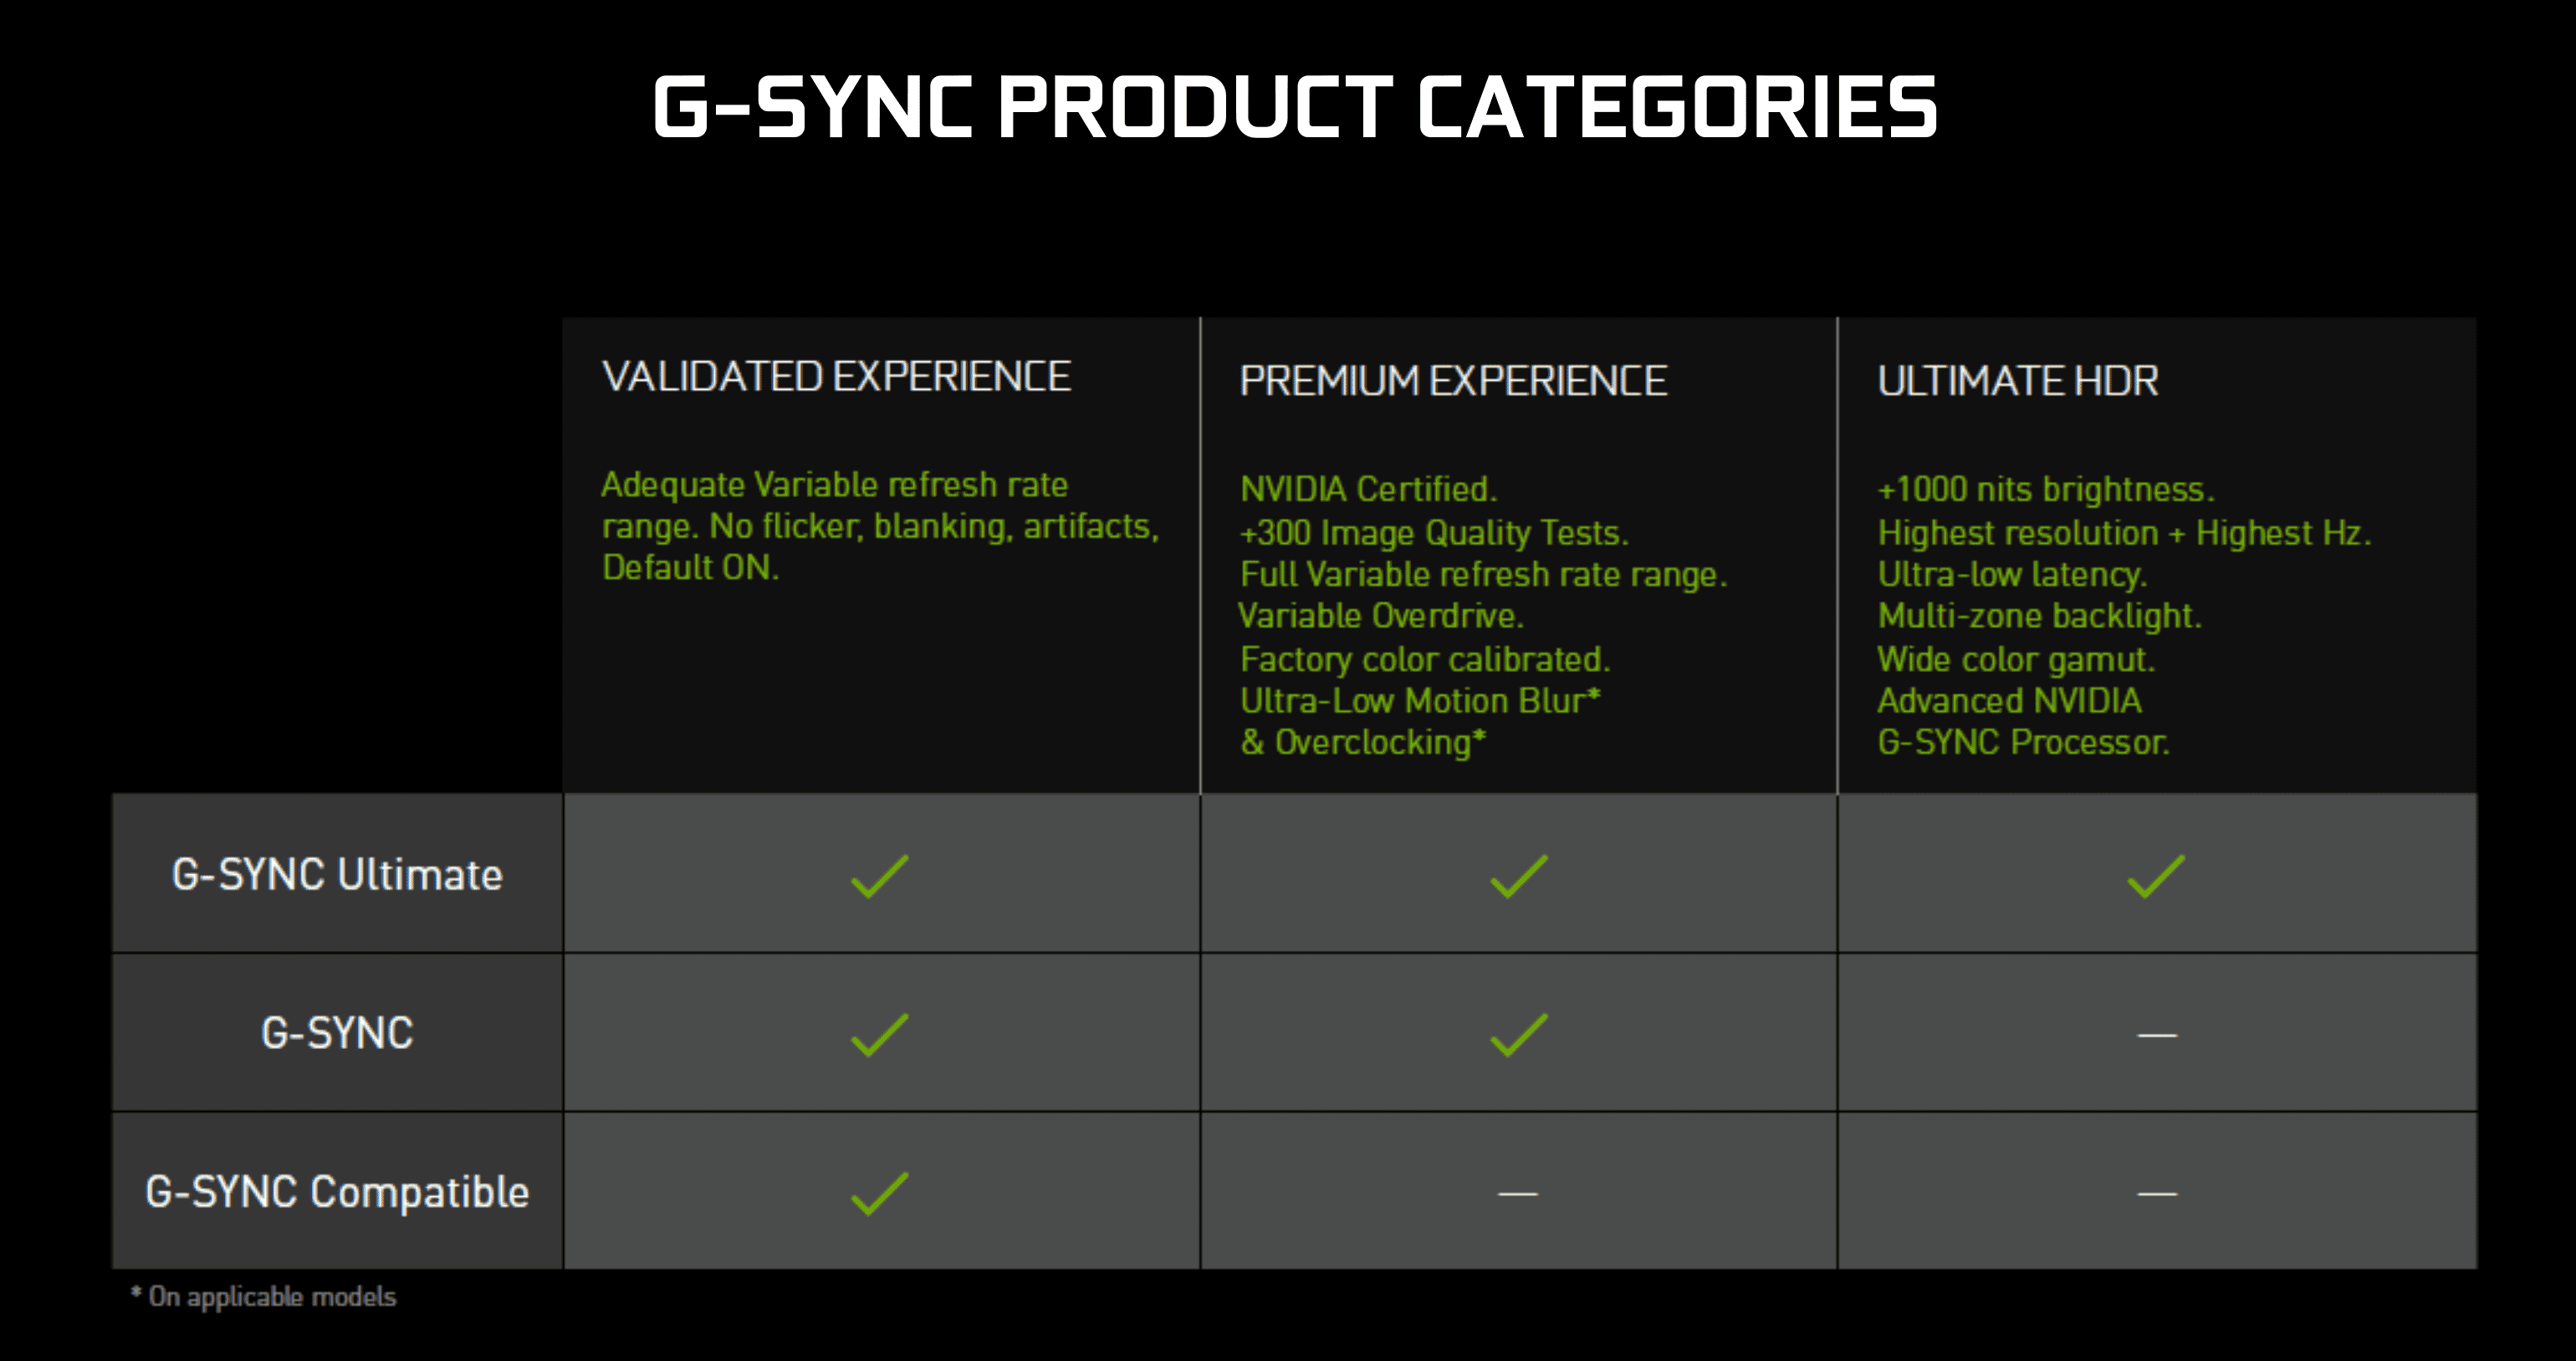
G-Sync vs G-Sync Compatible: What’s the Difference?
- G-Sync (Hardware Module): These monitors have a proprietary Nvidia chip built-in, allowing for flawless VRR performance across a wide range of frame rates and additional features like variable overdrive.
- G-Sync Compatible (FreeSync Monitors): These monitors don’t use Nvidia hardware but meet Nvidia’s performance standards when paired with a GeForce GPU. While performance is generally solid, the range of refresh rates may be narrower, and features like variable overdrive may not be supported.
Both types can deliver excellent performance, but G-Sync monitors tend to offer a slightly more polished experience—at a premium price.
Final Thoughts on Using G-Sync for Gaming
Once enabled and fine-tuned, G-Sync can dramatically improve your gaming experience. Whether you’re chasing high-FPS competitive gaming or immersing yourself in cinematic single-player worlds, it’s one of the best ways to eliminate screen tearing and stutter while keeping latency low. With proper setup and monitoring, G-Sync transforms your display into a seamless extension of your gameplay.
Key Takeaways
- G-Sync requires activation in both your monitor’s menu settings and the NVIDIA Control Panel on your computer.
- Compatible monitors will be listed as “G-Sync compatible” and need adaptive sync enabled before software configuration.
- Proper G-Sync setup eliminates screen tearing and provides smoother gaming visuals with NVIDIA graphics cards.
Understanding G-Sync and Its Benefits
G-Sync technology solves common display problems that gamers face while providing a smoother visual experience. It creates a perfect sync between your graphics card and monitor to eliminate visual artifacts.
What Is G-Sync?
G-Sync is NVIDIA’s proprietary variable refresh rate (VRR) technology that synchronizes your monitor’s refresh rate with your graphics card’s frame rate output. Unlike traditional fixed refresh rates, G-Sync dynamically adjusts how often your screen updates to match exactly how quickly your GPU renders each frame.
This technology requires special hardware built into compatible monitors. NVIDIA designed G-Sync to address common graphical issues like screen tearing, where portions of multiple frames appear simultaneously on screen.
G-Sync comes in different versions, including standard G-Sync and G-Sync Ultimate, which offers enhanced features like HDR support and even better performance. The technology works by allowing the monitor to wait for the GPU to finish rendering a frame before refreshing.
The Advantages of Using G-Sync
The primary benefit of G-Sync is the elimination of screen tearing without introducing the input lag normally associated with V-Sync. When your framerate fluctuates during gameplay, G-Sync keeps everything smooth.
G-Sync works best when games run below your monitor’s maximum refresh rate. For example, if you have a 144Hz monitor but your game runs at 90 FPS, G-Sync will adjust your monitor to refresh at exactly 90Hz.
Other advantages include:
- Reduced stuttering when framerates change suddenly
- Lower input lag compared to traditional V-Sync solutions
- Smoother motion during gameplay, even at lower framerates
- Better visual clarity during fast-moving scenes
G-Sync also helps prevent artifacting, those unwanted visual glitches that can appear during intense gaming sequences.
How G-Sync Improves Gaming Experience
G-Sync creates a tear-free gaming experience that feels more responsive and looks visually consistent. Fast-paced games benefit tremendously from the technology, as rapid movements appear smoother without jarring tears across the screen.
For competitive gamers, the reduced input lag means controls feel more responsive. Actions like aiming in shooters or timing combos in fighting games become more precise.
G-Sync particularly shines in games with variable framerates. When entering a graphically intensive area that would normally cause stuttering or tearing, G-Sync maintains visual smoothness.
Games with dramatic lighting changes or fast camera movements show the most noticeable improvements. G-Sync makes night-to-day transitions or quick turns in racing games appear much more fluid.
Players often report less eye strain during long gaming sessions since the visual experience remains consistent without the jarring effects of tearing or stuttering.
Setting Up G-Sync on Your Monitor
Enabling G-Sync on a compatible monitor requires a few specific steps through the Nvidia Control Panel. This technology synchronizes the monitor’s refresh rate with the GPU’s frame output to eliminate screen tearing and deliver smoother gameplay.
Requirements for G-Sync
Before setting up G-Sync, users need to ensure they have the right equipment. A G-Sync compatible or G-Sync certified monitor is essential for this technology to work.
An Nvidia GPU from the GTX 650 Ti Boost series or newer is required to support G-Sync functionality. Most modern Nvidia cards from the RTX and GTX 16-series will work perfectly.
A DisplayPort connection is necessary for most G-Sync setups, though some newer models may support G-Sync over HDMI. Users should check their monitor’s manual for specific connection requirements.
The latest Nvidia drivers must be installed on the system. Outdated drivers may prevent G-Sync from functioning correctly or appearing in the control panel options.
Enabling G-Sync from the Nvidia Control Panel
To activate G-Sync, users should right-click on the desktop and select “NVIDIA Control Panel” from the menu. This opens the configuration hub for all Nvidia GPU settings.
In the Control Panel, navigate to “Display” in the left sidebar and click on “Set up G-SYNC.” This section contains all G-Sync related settings.
Check the box that says “Enable G-SYNC, G-SYNC Compatible” to turn on the feature. Users can choose between “Full screen mode” or “Windowed and full screen mode” depending on their preferences.
For most gaming setups, selecting “Enable for full screen mode” offers the best performance and compatibility with games. After making selections, click “Apply” to save the settings.
Optimizing G-Sync Settings for Gaming
For the best G-Sync experience, additional settings should be configured. In the Nvidia Control Panel, navigate to “Manage 3D Settings” and set “Vertical sync” to “On” to work alongside G-Sync.
Some professional gamers recommend enabling “Low Latency Mode” and setting it to “Ultra” for competitive games. This reduces input lag while maintaining G-Sync benefits.
Frame rate limiters can enhance the G-Sync experience. Setting a cap 3-4 FPS below the monitor’s maximum refresh rate (e.g., 141 FPS for a 144Hz monitor) helps maintain optimal G-Sync operation.
For specific games, individual optimization might be necessary. The “Program Settings” tab in the 3D Settings section allows users to create custom profiles for different games, tailoring G-Sync performance for each title.
Configuring G-Sync for Different Gaming Scenarios
G-Sync settings need to be adjusted based on your specific gaming needs and hardware setup. Proper configuration ensures you get the smoothest gameplay experience with minimal screen tearing and input lag.
Windowed vs Full-Screen Mode
G-Sync works differently depending on your chosen display mode. For optimal performance, full-screen mode is generally recommended when using G-Sync. In the NVIDIA Control Panel, users should check “Enable G-SYNC for full screen mode” to activate this feature.
Full-screen mode typically provides better frame rate performance and lower input lag compared to windowed options. Many competitive gamers prefer this setup for the most responsive experience.
For those who need to multitask, the “Enable G-SYNC for windowed and full screen mode” option exists. This setting allows G-Sync to work even when games are running in windowed or borderless windowed mode, though it may not be as efficient as dedicated full-screen operation.
When using windowed mode with G-Sync, players might notice slightly higher input lag, but the convenience of quick alt-tabbing between applications makes this a worthwhile tradeoff for some gamers.
Using G-Sync with Multiple Monitors
Setting up G-Sync across multiple displays requires specific configuration. First, users should connect all G-Sync compatible monitors and open NVIDIA Control Panel.
Under “Display” and “Set up G-SYNC,” gamers can select which monitors should use G-Sync. For the best experience, all monitors should have similar refresh rates and specifications.
When gaming on one screen while using others for different tasks, it’s important to set the primary display in Windows settings. This ensures G-Sync functions properly on the gaming monitor.
Users with mixed monitor setups (some with G-Sync, others without) should configure each display individually. The “Selected display” dropdown in NVIDIA Control Panel allows for monitor-specific settings.
For multi-monitor gaming, setting all displays to the same refresh rate helps prevent synchronization issues that might otherwise lead to stuttering or tearing.
Managing 3D Settings for Optimal Gaming
The NVIDIA Control Panel offers several crucial 3D settings that affect G-Sync performance. Under “Manage 3D Settings,” users should set “Preferred refresh rate” to “Highest available” to maximize G-Sync benefits.
V-Sync settings require special attention. For the best G-Sync experience, V-Sync should be turned off in games but enabled in the NVIDIA Control Panel. This combination reduces input lag while preventing frame tearing.
Users can create game-specific profiles by selecting “Program Settings” tab in the 3D Settings menu. This allows custom configuration for each game, which is particularly useful when different titles benefit from different G-Sync setups.
Setting a frame rate limit 2-3 FPS below the monitor’s maximum refresh rate helps keep frames within G-Sync’s operational range. For example, on a 144Hz monitor, limiting frames to 141 FPS ensures G-Sync works consistently.
Power management mode should be set to “Prefer maximum performance” for gaming sessions to maintain stable frame rates and prevent G-Sync inconsistencies.
Troubleshooting Common G-Sync Issues
G-Sync technology can occasionally present challenges that prevent optimal performance. These issues typically stem from configuration settings, compatibility limitations, or hardware constraints.
Addressing Compatibility and Performance Hurdles
One common problem is the G-Sync option not appearing in the NVIDIA Control Panel. This usually happens when using a FreeSync or G-Sync Compatible monitor without proper setup. Users should ensure they’re using a DisplayPort cable, as HDMI often doesn’t support G-Sync functionality on compatible displays.
For those with black screens or spinning wheels, updating graphics drivers is essential. NVIDIA regularly releases driver updates that fix compatibility issues with Variable Refresh Rate (VRR) technology.
G-Sync may also not work in windowed modes by default. To fix this:
- Open NVIDIA Control Panel
- Navigate to “Set up G-Sync”
- Select “Enable for windowed and full-screen mode” instead of just full-screen
Some older G-Sync Compatible monitors may require a firmware update from the manufacturer’s website to properly support the technology.
Frequent Questions on G-Sync Configuration
Why is G-Sync enabled but not working?
This often happens when in-game frame rates exceed the monitor’s refresh rate. Users should enable V-Sync in the NVIDIA Control Panel (not in-game) and use frame rate limiters to keep frames slightly below maximum refresh rate.
Does G-Sync work with FreeSync monitors?
Yes, many FreeSync monitors are now certified as “G-Sync Compatible.” However, they must be connected via DisplayPort and might have a more limited effective range than true G-Sync hardware.
Users often wonder about performance impact. G-Sync typically has minimal performance overhead compared to fixed refresh rates.
For testing if G-Sync is working properly, NVIDIA’s Pendulum Demo provides a simple way to visualize the difference between standard, V-Sync, and G-Sync operation.
Fixing G-Sync Artifacting and Screen Tearing
Screen tearing or stuttering despite G-Sync being enabled often indicates that the render rate isn’t matching properly with the display. To resolve this:
- Limit frame rates to 2-3 FPS below maximum refresh rate
- Disable other conflicting technologies like Fast Sync or Enhanced Sync
- Enable “Low Latency Mode” to “Ultra” in NVIDIA Control Panel
Ghosting and motion blur issues might not be G-Sync related but rather monitor overdrive settings. Users should experiment with the monitor’s response time settings to find the optimal balance.
For artifacting (visual glitches), try lowering the monitor’s refresh rate slightly below maximum. Some G-Sync Compatible displays work more reliably at 144Hz rather than 165Hz, for example.
If problems persist, checking for GPU overheating is worthwhile, as thermal throttling can create inconsistent frame pacing that G-Sync struggles to handle smoothly.
Frequently Asked Questions
G-Sync technology offers adaptive refresh rates to reduce screen tearing, but setup can vary depending on your hardware. These questions address common scenarios users face when trying to enable this feature on different devices and connections.
How can I enable G-Sync on a monitor that supports FreeSync?
Many FreeSync monitors are now G-Sync compatible. To enable G-Sync on a FreeSync monitor, first make sure the monitor is connected via DisplayPort and FreeSync is enabled in the monitor’s on-screen display menu.
Next, open the NVIDIA Control Panel by right-clicking on the desktop and selecting it from the menu. Navigate to “Display” and click “Set up G-SYNC.” Check the box for “Enable G-SYNC, G-SYNC Compatible” and apply the settings.
What are the steps to activate G-Sync on Windows 11?
Activating G-Sync on Windows 11 follows a similar process to previous Windows versions. First, ensure the latest NVIDIA drivers are installed through GeForce Experience or the NVIDIA website.
Right-click on the desktop and select “NVIDIA Control Panel.” Under the Display section, select “Set up G-SYNC” and check the box to enable it. Select whether to enable it for full screen mode only or for both full screen and windowed modes.
After applying these settings, go to “Manage 3D settings” and set “Vertical sync” to “On” or “G-SYNC Compatible” for best results.
Why is the option to set up G-Sync not appearing in my settings?
If the “Set up G-SYNC” option is missing from NVIDIA Control Panel, several issues might be causing this. First, verify that the monitor is G-SYNC compatible or certified.
Make sure the monitor is connected using a DisplayPort cable, as many G-SYNC implementations don’t work over HDMI. Check that the monitor is set as the primary display in Windows display settings.
Sometimes, reinstalling the NVIDIA drivers completely can resolve this issue. Use Display Driver Uninstaller (DDU) to remove all traces of the driver before installing the latest version.
How do I enable G-Sync on my gaming laptop?
Enabling G-Sync on a gaming laptop requires first confirming that both the internal display and GPU support the technology. Open NVIDIA Control Panel by right-clicking on the desktop.
Navigate to “Display” and select “Set up G-SYNC.” If your laptop supports it, check the box to enable G-SYNC. Choose whether to enable it for full screen only or both full screen and windowed modes.
For optimal performance, also go to “Manage 3D settings” and set “Preferred refresh rate” to “Highest available” and “Vertical sync” to “On” or “G-SYNC Compatible.”
What is the process to activate G-Sync on a Samsung Odyssey G7 monitor?
The Samsung Odyssey G7 is a G-Sync compatible monitor. First, ensure the monitor is connected via DisplayPort and update the monitor’s firmware if needed.
Access the monitor’s on-screen display menu and enable “Adaptive Sync” or “FreeSync Premium Pro.” Open NVIDIA Control Panel, navigate to “Display” and select “Set up G-SYNC.”
Check the box to enable G-SYNC and apply the settings. For best performance with the Odyssey G7, set the in-game frame rate limit slightly below the maximum refresh rate of the monitor.
Is it possible to use G-Sync over an HDMI connection, and how can it be done?
G-Sync over HDMI is possible but limited. Only newer G-Sync modules (since 2019) and some G-Sync Compatible monitors support this feature over HDMI 2.0 or newer.
To use G-Sync over HDMI, connect the monitor using a high-quality HDMI cable that supports the appropriate bandwidth. Open NVIDIA Control Panel and check if the “Set up G-SYNC” option is available.
If the option appears, enable G-SYNC following the standard procedure. Note that even with supported hardware, G-Sync performance over HDMI may not match DisplayPort connection quality.


