Have you ever wanted to extend your computer’s display without buying a new monitor? Using a laptop as a second screen can be a practical solution for multitasking, presentations, or gaming. Most Windows laptops can function as monitors for other devices through wireless connections or specialized software, giving you more screen space without extra costs.
Setting this up is simpler than many people think. While traditional laptops don’t have HDMI input ports like standard monitors, there are several workarounds. Windows has built-in projection features that allow one laptop to display content from another computer. Third-party apps like Splashtop or Steam’s in-home streaming can also help connect devices.
For those who need this setup regularly, USB capture devices offer another solution. These small adapters create a video input connection for your laptop, letting it receive display signals from other devices. The method you choose depends on your specific needs, existing equipment, and how you plan to use the extra screen space.
The Best Ways To Use A Laptop As A Monitor
Using a laptop as a second monitor can be incredibly useful for multitasking, gaming setups, or extending your desktop workspace—especially if you don’t have an external display handy. However, it’s important to note that most laptops don’t support direct video input, so you can’t simply connect them with an HDMI cable and expect it to work. Instead, you’ll need to use software solutions or specific operating system features to make it happen.
Here are the best and most reliable methods for using a laptop as a monitor:
1. Use Windows’ Built-in “Project to This PC” Feature
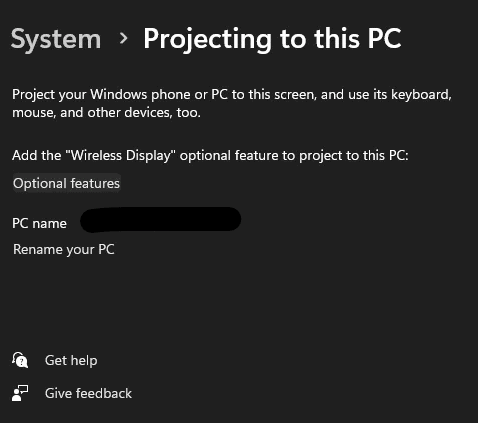
If both devices run Windows 10 or 11, you can use the Wireless Display feature:
How to Do It:
- On the laptop you want to use as a monitor:
- Go to Settings > System > Projecting to this PC.
- Choose “Available everywhere” or “Available on secure networks”.
- Adjust other preferences (e.g., PIN requirement, etc.).
- On your main PC:
- Press Windows + K to open the Connect menu.
- Select the laptop from the list.
- Choose to Extend, Duplicate, or Second screen only.
This turns the laptop into a wireless display using Miracast.
Pros:
- No cables required
- Built-in to Windows
- Easy to set up
Cons:
- Both devices must support Miracast
- Wireless performance may lag for video or gaming
2. Use a Third-Party App Like SpaceDesk
If your laptops don’t support Miracast or you want more control, apps like SpaceDesk offer a powerful alternative.
How SpaceDesk Works:
- Install the SpaceDesk server on your main computer.
- Install the SpaceDesk viewer on your laptop.
- Both devices must be connected to the same Wi-Fi or Ethernet network.
- Your laptop will mirror or extend the main screen via the app.
Pros:
- Works with Windows, Android, and even web browsers
- Supports touch input on touchscreen laptops
- Great for extending or duplicating displays
Cons:
- Requires network connection
- Minor input lag compared to physical monitors
3. Use Remote Desktop Software (Limited Use Case)
Apps like Chrome Remote Desktop or Microsoft Remote Desktop can let you remotely control one PC from another. While not true second-monitor functionality, it’s useful if you want to operate your main PC through your laptop screen.
Pros:
- Good for remote access
- Easy to set up with a Google or Microsoft account
Cons:
- Not a proper second display solution
- Less ideal for real-time interaction or gaming
4. Use a Capture Card (Advanced / Gaming Use)
For gamers or streamers wanting to use a laptop to display console or PC output, an HDMI capture card can technically allow a video feed to be displayed on a laptop.
How It Works:
- Connect the output of a desktop or console to the HDMI input of a capture card.
- Plug the capture card into your laptop’s USB port.
- Use software like OBS or Elgato to view the input feed.
Pros:
- High-quality video feed
- Great for streaming setups
Cons:
- No native OS control—only works within apps
- Expensive and not true extended monitor functionality
5. Use macOS Sidecar (Mac + iPad only)
If you’re a Mac user with an iPad, Sidecar lets you use your iPad as a second screen wirelessly or with a USB cable.
Quick Comparison Table
| Method | Platform | Requires Cable? | Best For | Lag Level |
|---|---|---|---|---|
| Project to This PC | Windows | No | Casual multitasking | Low-Medium |
| SpaceDesk | Windows/Android | No | Dual monitors, flexible setups | Low-Medium |
| Remote Desktop | Any | No | Remote control | High |
| Capture Card | Any with HDMI Out | Yes | Gaming/streaming feeds | Very Low |
| Sidecar | macOS + iPad | No/Yes | Mac and iPad users | Very Low |
Final Tips
- Wired connections (like USB-C displays) generally perform better than wireless ones, but laptops rarely support video input.
- Network speed matters: if you’re using a Wi-Fi-based solution, faster internet = smoother performance.
- Battery drain increases when using these methods—keep both devices plugged in if possible.
Key Takeaways
- Laptops can function as secondary monitors through Windows built-in projection features or third-party applications.
- USB capture devices provide a hardware solution for connecting external devices to your laptop for display purposes.
- Setting up a laptop as a monitor helps maximize productivity without purchasing additional equipment.
Understanding Video Output Options
Connecting a laptop as a monitor requires understanding the various video output capabilities available on modern devices. The right connection type can make all the difference in display quality and setup simplicity.
The Role of HDMI and USB-C
HDMI is the most common video output port found on laptops and desktops. It transmits both high-definition video and audio through a single cable. When using a laptop as a monitor, it’s important to note that most laptops have HDMI-out ports only, which means they can send signals but not receive them.
This is where video capture cards become essential. These devices connect to the HDMI-out port of the source computer and convert the signal so it can be displayed on another laptop.
USB-C has revolutionized connectivity for newer laptops. Many modern USB-C ports support video transmission through alternate modes like DisplayPort. Some newer laptops can directly receive video input through USB-C, making them easier to use as secondary monitors without additional hardware.
Leveraging DisplayPort and Other Connectivity
DisplayPort connections offer another high-quality option for video output. Many laptops include mini-DisplayPort or full-sized DisplayPort outputs that provide excellent resolution and refresh rates for external displays.
For older laptops without HDMI or DisplayPort, VGA and DVI ports might be available. These older standards still work but may deliver lower quality and lack audio transmission capabilities.
Network-based solutions provide an alternative when physical connections aren’t practical. Software like Spacedesk or Microsoft’s Wireless Display allow laptops to function as monitors over Ethernet or Wi-Fi connections.
These wireless options introduce some latency, making them less suitable for gaming or video editing but perfectly adequate for productivity tasks or presentations.
Setting Up Your Laptop as a Monitor
Turning your laptop into a monitor requires some technical adjustments but can be accomplished through several methods. Most modern laptops can function as secondary displays with the right configuration and tools.
Configuring Display Settings
Windows laptops offer built-in functionality for screen sharing through the “Project” feature. To access this, press Win+P on the computer you want to use as the primary device, then select “Extend” or “Second screen only” from the menu.
For MacBooks, the process involves enabling screen sharing through the Display settings. Navigate to System Preferences > Displays > Arrangement to configure how the screens interact.
Both computers need to be on the same network for wireless connections to work properly. Some laptops may have limitations based on their hardware capabilities or operating system.
Remember to check your laptop’s display resolution settings to ensure optimal viewing quality. Higher resolutions provide better clarity but may affect performance.
Using Software Solutions for Extended Displays
When built-in options aren’t available, third-party software can bridge the gap. Applications like Spacedesk, Duet Display, and Input Director transform laptops into functional monitors.
Spacedesk works over a network connection and turns your laptop into a wireless display. It’s free and relatively easy to set up with minimal lag.
Duet Display offers a more premium experience by connecting devices via USB cable, reducing latency issues common with wireless solutions. It works particularly well for Windows-to-Windows or Mac-to-Mac setups.
For gaming or high-performance needs, Steam’s Remote Play and Parsec provide options that minimize input lag. These applications transmit video signals while maintaining responsiveness for gaming or design work.
USB capture devices represent another hardware solution that can input video directly to your laptop, though this requires additional equipment.
Connecting Peripherals for a Unified Experience
To create a seamless multi-monitor setup, proper peripheral management is essential. A USB hub can expand your connectivity options when ports are limited.
Consider using a single keyboard and mouse across both computers with software like Mouse Without Borders or Synergy. These programs allow cursor movement between screens as if they were a unified system.
For video conferencing, decide which device will handle webcam and microphone duties. Using the laptop’s built-in webcam and mic often makes sense, as they’re positioned appropriately for face-to-face communication.
Audio management requires attention too. Configure your sound output settings to direct audio to your preferred speakers or headphones. Some software solutions automatically handle audio routing between devices.
Cable management becomes important with multiple devices. Use cable clips or sleeves to maintain an organized workspace and prevent accidental disconnections.
Optimizing Your Multi-Monitor Setup
Setting up multiple monitors correctly can significantly boost productivity and enhance your computing experience. The right configuration makes it easier to manage tasks, reduces eye strain, and creates a more efficient workflow.
Best Practices for Desktop Organization
When using a laptop as a monitor in a multi-monitor setup, proper organization is essential. Start by determining which screen will be primary and which will be secondary. Most users place their main tasks on the primary screen and reference materials on others.
Use Windows’ display settings or macOS display preferences to arrange monitors in a way that matches their physical layout. This ensures the mouse cursor moves naturally between screens.
Consider using virtual desktops to further organize your workspace. This feature lets you create multiple desktop environments for different types of work.
Task-specific organization works well too. For example, keep communication apps like email and messaging on one screen, while keeping work documents on another.
Selecting the Right Accessories
The right accessories can transform a basic multi-monitor setup into a powerful workstation. A docking station is especially valuable when using a laptop as one of your displays. These devices allow you to connect multiple peripherals through a single cable.
Essential accessories include:
- Quality monitor arms or stands for proper ergonomics
- Cable management solutions to reduce desk clutter
- A mechanical keyboard for comfortable typing
- Reliable speakers or headphones for audio needs
Consider a KVM switch if you need to control multiple computers with one set of peripherals. This is particularly useful in hybrid setups with both laptops and desktops.
Proper lighting behind monitors can reduce eye strain during long sessions. Look for bias lighting systems designed specifically for computer monitors.
Enhancing Productivity with Multiple Screens
Multiple monitors allow you to maintain full-size views of several applications simultaneously. This eliminates the constant switching between windows that slows down work.
Productivity enhancement strategies:
- Use dedicated screens for specific functions (coding, browsing, communication)
- Learn keyboard shortcuts for moving windows between displays
- Install software like DisplayFusion or PowerToys to enhance multi-monitor functionality
- Configure different scaling settings if your monitors have different resolutions
Arrange your screens based on your most common workflow. For reading documents, consider positioning one monitor in portrait orientation.
Create custom layouts for different types of work. For instance, a developer might want code on one screen and the application preview on another.
Alternative Uses for Your Laptop Screen
Laptops can do more than just serve as portable computers. Their screens can be repurposed for several creative and practical applications beyond traditional use.
Transforming Laptops into Projectors
Laptops can function as makeshift projectors for presentations or movie nights. By adjusting the brightness and resolution settings to maximum, users can project content onto a wall in a darkened room.
For better results, specialized software can enhance this capability. Programs like TeamViewer allow users to mirror their laptop screen to another device, which can then be connected to a proper projector.
Some newer laptop models feature HDMI-out ports that connect directly to projectors, eliminating the need for additional adapters. This setup works well for business presentations or classroom instruction.
In settings without proper projection equipment, this alternative use can be invaluable for impromptu meetings or entertainment purposes.
Extending Displays to Digital Cameras and Other Devices
Modern laptops can serve as external monitors for digital cameras through USB connections or specialized software. Photographers use this setup for viewing images on a larger screen while shooting.
Many digital cameras now offer “tethered shooting” capabilities, allowing real-time image transmission to a laptop. This creates a studio-like experience even in field photography.
Networking tools enable laptops to display content from other devices too. Through wireless protocols like Miracast or AirPlay, users can mirror smartphones or tablets to their laptop screens.
Some professionals use their laptop screens as secondary displays for gaming consoles or streaming devices. This provides flexibility when traveling or in spaces without dedicated monitors.
Frequently Asked Questions
Many people have questions about using a laptop as a monitor for various devices. The process differs depending on what you’re connecting to your laptop and what equipment you have available.
How can I set up my laptop to act as a secondary display for my desktop computer?
To use a laptop as a secondary display for a desktop computer, Windows 10 and 11 offer a built-in feature called “Wireless Display.” First, make sure both computers are on the same Wi-Fi network.
On the desktop computer, press Windows key + P and select “Connect to a wireless display.” Then, on the laptop, open the Action Center and select “Connect” to make it discoverable.
Software options like Spacedesk can also help. Install the display driver on the desktop computer and access the web viewer on the laptop to establish the connection.
What steps are necessary to use a laptop as a display for a PlayStation 4 console?
Using a laptop as a display for a PS4 requires additional software since laptops typically don’t have video input ports. Remote Play is the official Sony solution.
Download the PS4 Remote Play app on your laptop. Register your PS4 on your Sony account and enable Remote Play in the PS4 settings.
Connect your PS4 controller to your laptop via USB or Bluetooth. Open the Remote Play app and sign in with your PlayStation Network account to stream your PS4 to your laptop screen.
Is it possible to connect an Xbox to my laptop and use the laptop screen as a monitor?
Yes, you can use a laptop as a display for an Xbox using the Xbox app’s streaming feature. First, make sure both devices are on the same network.
On your laptop, download and install the Xbox app from the Microsoft Store. Sign in with the same Microsoft account you use on your Xbox.
In the Xbox app, click on “Connection” and select your Xbox when it appears. The app will stream your Xbox gameplay to your laptop screen.
What software or settings are required to enable my laptop screen for use with a PlayStation 5 system?
For PS5, Sony provides the PS Remote Play application that allows using a laptop as a display. Download and install PS Remote Play on your laptop.
Enable Remote Play in your PS5 settings under System > Remote Play. Register your PS5 to your PlayStation Network account if you haven’t already.
Open the Remote Play app on your laptop, sign in to your PlayStation Network account, and select your PS5 to begin streaming the display to your laptop.
Can I utilize my laptop as a monitor for my desktop PC using an HDMI cable?
Most laptops cannot accept video input through their HDMI ports. Laptops typically have HDMI output ports only, designed to send video to external displays, not receive it.
For a direct connection, you would need a laptop with an HDMI input port, which is rare. Gaming laptops sometimes offer this feature but it’s not common.
Wireless solutions like Windows’ built-in projection features or third-party software like Spacedesk are more practical than trying to use an HDMI cable directly.
Are there any specific procedures to follow when configuring a laptop to act as a monitor with Windows 11?
In Windows 11, connect your laptop to the main PC by opening Settings > System > Nearby sharing and turning it on for both devices. Ensure both computers are on the same network.
Press Windows key + K on the main PC and select your laptop from the list of available displays. Choose “Extend” to use the laptop as a second monitor.
Windows 11 also supports the “Wireless Display” feature. You can add this optional feature through Settings > Apps > Optional features if it’s not already installed.